• Skip to primary navigation
  • Skip to main content
  • Skip to primary sidebar
  • Skip to secondary sidebar
  • Skip to footer
  • Home
  • Recipes
  • Hiking
  • Contact

Holly in the PNW

The girl that can't sit still!

Sidebar/Content/Sidebar

Mason Jar Soup

October 18, 2019

My friend gave me the idea of Mason Jar Soup. You will thank me after making these mason jar soups because it will save you lots of time on your food prep. It’s quick and simple and it’s soup season. Who doesn’t love to save time? Food prepping can be brutal at times but this will make your week so much easier!

Dust off those old canning jars that have been sitting in the cupboard and put them to good use. Just need a few ingredients and you have soup for the week!

  • Curry paste
  • Better Than Bouillon
  • Veggies (carrots, frozen peas and fresh spinach)
  • Protein (extra firm tofu or cooked chicken)
  • Rice noodles or cooked rice

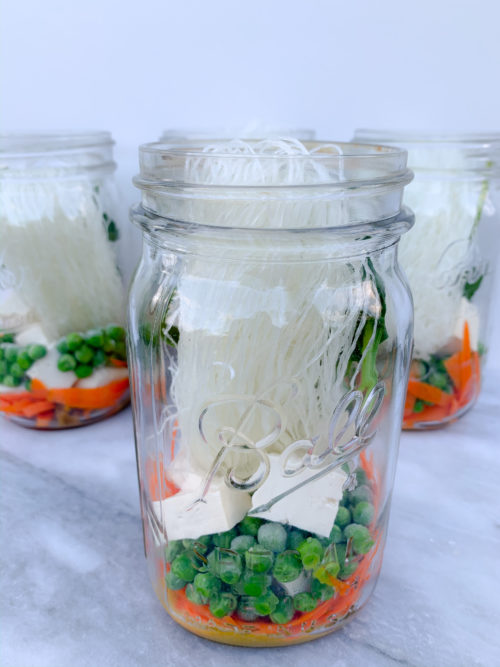
Add the curry paste and Better Than Bouillon ingredients first so it’s at the bottom of the jar.

Mae Ploy yellow curry paste is what I normally buy. I usually add maybe a 1/2 teaspoon per jar. If you like your soup spicy add more. I usually buy this at my local Asian supermarket but I’ve seen it in major grocery stores too.

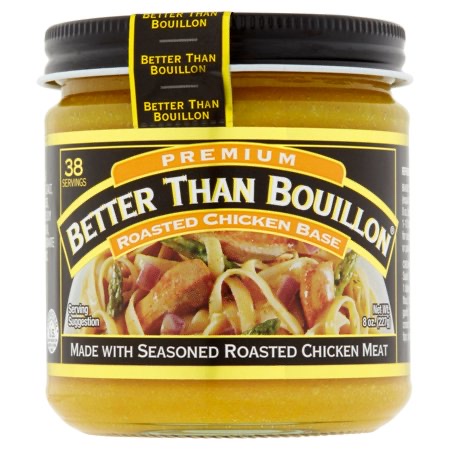
Better Than Bouillon is a must-have condiment. This is good in a lot of dishes especially in the mason jar soup. You can use it when you cook your basics with chicken, veggies and pasta.

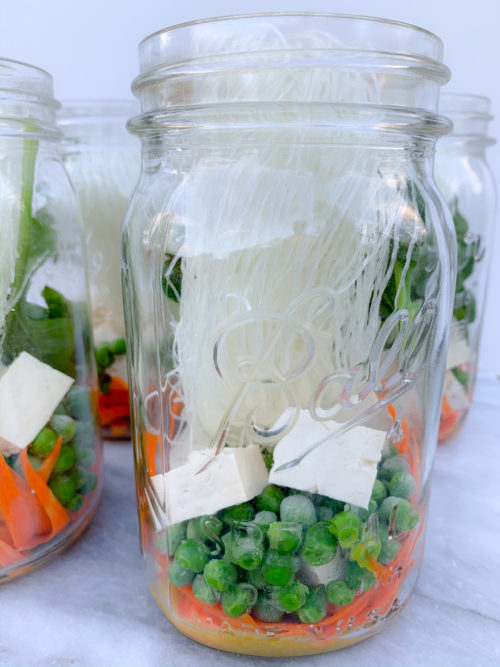
Next add the vegetables that you picked out. I used thinly sliced carrots, frozen peas and fresh spinach.  Add the extra firm tofu or cooked chicken and top with rice noodles (or rice). Pop the lid on it and put it in the fridge until you are ready to eat it.

Add hot water, put the lid back on, shake it up a little and let it seep for a few minutes so the noodles and veggies soften. Stir and eat up!

Enjoy!!!

Print

Mason Jar Soup

Course Dinner, Lunch, Main Course
Cuisine American, Asian
Keyword Mason Jar Soup
Prep Time 20 minutes
Servings 4 jars

Ingredients

  • 1/2 tsp Yellow Curry Paste - per jar or more if you want it spicy
  • 1 tbsp Better Than Bullion - per jar
  • 1 package extra firm tofu cut into pieces, divided
  • 1 carrot thinly sliced (use a peeler) divided
  • 2 cups frozen peas divided
  • 2 cups spinach divided
  • 1 package rice noodles divided
  • or 1/2 cup cooked rice - per jar

Instructions

  1. Start layering your mason jar with all of the ingredients, wet to dry. First start with curry paste and Better Than Bouillon. 

  2. Follow with adding in the carrots, frozen peas, spinach and tofu. Add as much or as little veggies as you like. There is no set amount. The ingredients list I provided is just a guideline, there is no wrong way to make this soup!

  3. Top with dry rice noodles or rice, screw on the lid and put it in the fridge until you are ready to eat it.

  4. Fill jar 2/3 of the way with hot water and let it seep for a few minutes until the noodles and veggies are soft.

Filed Under: Everyday Meals, Lunch

Chocolate Chip Pumpkin Bundt Cake

October 15, 2019

Chocolate chips, pumpkin and some basic ingredients will make this moist and delicious Chocolate Chip Pumpkin Bundt Cake. Yes, I said moist! This is the perfect dessert for  you and because it’s fall.

With all this pumpkin talk I wanted to whip up a quick dessert that anyone (even you!) can make. The chocolate chips add a perfect balance of sweetness to the cake. The powdered sugar sprinkled on top adds the perfect touch to make it look extra fancy.

This is also a great breakfast dish served with a large cup of coffee. It’s also perfect for Sunday football parties since you can feed a large group with this cake. Go Hawks!

Look at this middle! Doesn’t it look divine?!

Cut up a slice and dig in! If you make the slice too small, be warned, you will be back for seconds!

Enjoy!!!

Print

Chocolate Chip Pumpkin Bundt Cake

Course Cake, Dessert
Cuisine American
Keyword Chocolate Chip Pumpkin Bundt Cake
Prep Time 20 minutes
Cook Time 1 hour 5 minutes
Total Time 1 hour 25 minutes

Ingredients

  • 3 cups all-purpose flour
  • 2 tsp baking soda
  • 2 tsp cinnamon
  • 1 tsp pumpkin pie spice
  • ½ tsp salt optional
  • 2½ cups granulated sugar
  • 1 cup vegetable oil
  • 3 eggs
  • 1 tsp vanilla extract
  • 1 can (15 ounce) pumpkin
  • 2 cups semi-sweet chocolate chips
  • powdered sugar for dusting

Instructions

  1. Preheat oven to 350 degrees. Spray 10-inch bundt pan with baking spray and set aside.
  2. In a medium bowl, whisk together the flour, baking soda, cinnamon, pumpkin pie spice and salt.

  3. In a large bowl, beat sugar and vegetable oil until combined. Add eggs, one at a time, beating well after each addition. Add vanilla as you add the last egg.

  4. Alternate adding flour mixture and scoops of pumpkin to the egg mixture, beating well on medium-low after each addition. Stir in chocolate chips.

  5. Pour batter into prepared bundt pan.

  6. Bake for 60 - 65 minutes, or until a toothpick inserted in the center comes out clean. Cool for 10 minutes before cooling on a wire rack. Let cool completely and then dust with powdered sugar before serving.

Filed Under: Cakes, Desserts

Pumpkin Toffee

October 14, 2019

It’s already October and I can’t believe it. I better get on the pumpkin bandwagon like everyone else! Recently I had some delicious toffee at a friend’s house, so I decided to make Pumpkin Toffee. Don’t let candy making scare you, it’s a lot easier than you think!

For this recipe you can use white or dark chocolate. The recipe calls for pecans, walnuts or almonds. Mix it up a bit and make some with each nut or just stick to one. The white toffee I used walnuts and the dark toffee I used almonds. Whatever you choose it all takes good with the pumpkin toffee.

The most important part of this recipe is not to over cook the mixture so you will need a candy thermometer. I’m so glad I purchased a thermometer, I use it for everything now. The one I have is magnetic so it’s handy to keep on the fridge for easy access.

Ingredients to make this delicious Pumpkin Toffee are as follows:

  • Butter
  • Warm water
  • Granulated sugar
  • Salt
  • Light corn syrup
  • Pecans, Walnuts or Almonds
  • Pumpkin Pie Spice
  • White or Dark Chocolate

Follow the directions carefully and you won’t regret it!

This toffee isn’t too hard, when you bite into the chewy goodness, it just melts in your mouth.

Enjoy!!!

Print

Pumpkin Toffee

Course Dessert
Cuisine American
Keyword Pumpkin Toffee
Prep Time 40 minutes
Cook Time 30 minutes
Total Time 1 hour 10 minutes
Servings 1 pound

Ingredients

  • 1 1/2 cups pecans, walnuts or almonds chopped up a little
  • 1 cup unsalted butter cut into pieces, 2 sticks
  • 1/2 cup warm water
  • 1 cup + 1 tablespoon granulated sugar divided
  • 1 tsp salt
  • 1 tsp light corn syrup
  • 1 1/4 tsp pumpkin pie spice divided
  • 6 ounces white or dark chocolate coarsely chopped

Instructions

  1. Toast the chopped pecans, walnuts or almonds: Preheat oven to 300°F (150°C). Line a large baking sheet with parchment paper or a silicone baking mat. Spread the chopped pecans, walnuts or almonds on top and toast for 7-8 minutes or lightly browned. Set aside. 1 cup will be used inside the toffee and the remainder are sprinkled on top.

  2. Make the toffee: While stirring with a wooden spoon, melt the butter over medium heat in a 3-quart heavy-duty saucepan. Once melted, add the water, 1 cup granulated sugar, salt, and corn syrup. Stir constantly until the sugar dissolves, then brush down the sides of the pan with a water-moistened pastry brush. Attach a candy thermometer to the pan, making sure the bulb is not touching the bottom of the pan (if it touches you’ll get an inaccurate reading).

  3. Stir the mixture, every minute as it begins to boil. Rapid bubbles, a thicker consistency, and a slightly darker color form around 240°F (116°C). Continue to stir every minute until it reaches 290°F (143°C; soft crack stage). Watch carefully – the temperature slowly rises in the beginning, but then boasts quickly. If you notice it rising very fast, you can even turn off the heat when the toffee reaches 285°F (141°C), as it will continue to cook in the few seconds after.

  4. Immediately remove the pan from heat and stir in 1 teaspoon pumpkin pie spice and 1 cup toasted pecans, walnuts or almonds. Pour the toffee out onto a silicone baking mat lined baking sheet. Smooth into an even layer. The toffee should be thick and not spread all the way to the edges of the pan. Cool the toffee for 5 minutes.

  5. Meanwhile, get the toppings ready. Mix the remaining 1 tablespoon of granulated sugar with the remaining 1/4 teaspoon of pumpkin pie spice. Melt the white or dark chocolate. You can melt it in a double boiler or use the microwave. I melt it in the microwave in 20 second increments, stopping and stirring after each.

  6. Spread the melted white or dark chocolate on top of the toffee, then sprinkle with remaining pecans, walnuts or almonds and sugar/pumpkin pie spice mix.

  7. Refrigerate toffee for 20 minutes or until chocolate has set. Peel off the silicone baking mat and break toffee into pieces.

Recipe Notes

Store toffee in an airtight container at room temperature in a cool dry place for up to 2 weeks.

Filed Under: Desserts

Lemon Orzo Chickpea Salad

October 3, 2019

Lemon Orzo Chickpea Salad is next on the blog!

I haven’t been able to post much on my blog lately and I sure do miss it. Summer and vacation just took over my life, but it was well worth it. A lot of life changing moments!

One good thing about fall is I’ll be back to cooking and baking! As you may have guessed, the kitchen is where I enjoy spending my spare time, especially when it’s raining outside!

I had just got home from vacation, back to the grind at work, and they were having a potluck the next day. Of course I had no food in the house so I had to scramble. I looked around the kitchen and found orzo, chick peas, Parmesan cheese and a lemon. So I came up with Lemon Orzo Chickpea Salad. It was a huge hit at the potluck! Luckily I made such a large batch I had plenty of leftovers to share at home.

It’s an easy quick recipe.

  • Toast the orzo in a little olive oil.
  • Stir in the garlic and oregano, then pour in the broth.
  • Let the orzo simmer until the liquid has been absorbed.
  • Stir in the lemon zest, juice, and chick peas.
  • Stir in the cheese, salt, and pepper.

Serves about 4 – 6.

Enjoy this Lemon Orzo Chickpea Salad!!!

Print

Lemon Orzo Chickpea Salad

Course Salad, Side Dish
Cuisine American
Keyword Lemon Orzo Chick Pea Salad
Cook Time 15 minutes

Ingredients

  • 1 1/2 cups dry orzo pasta
  • 1 tbsp olive oil
  • 2 cloves garlic minced
  • 3 cups chicken broth
  • 1 tsp oregano
  • 1 lemon zested
  • Juice of half of a lemon
  • 1 can chick peas drained
  • 1/3 cup grated Parmesan
  • pepper to taste
  • salt to taste

Instructions

  1. In a skillet over medium heat, add the olive oil and pasta.

  2. Cook, stirring occasionally until toasted, about 30-60 seconds.

  3. Stir in garlic, then slowly stir in oregano.

  4. Add the broth, a small amount at a time, while continuing to stir.

  5. Bring to a boil, cover the skillet with a lid and turn down to a simmer for 8-10 minutes or until the pasta has absorbed most of the water and is tender.

  6. Remove the lid and add the lemon zest, juice, and chick peas.

  7. Add the Parmesan cheese, salt and pepper to taste and serve immediately.


Filed Under: Everyday Meals

Banana Bread

August 14, 2019

If you know me then you know I love bananas! I recently had a birthday and one of my girlfriends decided to buy me a large bunch of bananas as a gag gift. It was perfect, but I couldn’t eat them fast enough so I got to make Banana Bread! Over ripe bananas are perfect for this easy to make banana bread.

All you need is a bowl and a mixer to whip this banana bread right up!  Grab the butter, sugar, eggs, mashed bananas, vanilla, flour and baking soda.

Cream butter and sugar until smooth. Beat in eggs, vanilla and then bananas. Add flour and soda, stirring just until combined.

Pour into prepared pan and bake at 350 degrees F (175 degrees C) for about 1 hour (or till toothpick comes out clean). If the bread is not done place tin foil over bread and cook in 5 minute increments until done. Remove from pan and let cool, store in refrigerator or freeze.

Slice up the bread and serve it warm. Top with butter if desired. Eating this banana bread warm with a cup of coffee could make for one of the best mornings ever!

Dig in! Enjoy!!!

Print

Banana Bread

Course Breakfast
Cuisine American
Keyword Banana Bread
Prep Time 15 minutes
Cook Time 1 hour
Total Time 1 hour 15 minutes
Servings 12 slices

Ingredients

  • 1/2 cup unsalted butter softened
  • 1 cup white sugar
  • 2 eggs
  • 1 1/2 cups mashed bananas about 3 bananas
  • 1 tsp vanilla extract
  • 2 cups all-purpose flower
  • 1 tsp baking soda

Instructions

  1. Preheat oven to 350 degrees F (175 degrees C). Grease and flour one 9x5 inch pan.

  2. Cream butter and sugar until smooth. Beat in eggs, vanilla and then bananas. Add flour and soda, stirring just until combined.

  3. Pour into prepared pan and bake at 350 degrees F (175 degrees C) for about 1 hour (or till toothpick comes out clean). If you need to cook longer than an hour place tin foil over bread and bake in 5 minute increments. Remove from pan and let cool, store in refrigerator or freeze.

Filed Under: Breakfast, Comfort Foods

Strawberry Freezer Jam

July 16, 2019

What do you do with all those fresh picked strawberries?! Strawberry Freezer Jam of course! It’s my favorite jam and it’s so easy to make. Since the jam is stored in the freezer, you can make a little or a lot, depending on how many berries you picked.

Pick your strawberries from your local u-pick strawberry field or you can buy some at your local market. If you pick 17 pounds like I did, you might be in the kitchen all day and will need a lot of freezer space! You only need 8 cups of fresh berries (or 3 1/4 cups crushed berries). If you’re making tons of jam 17 pounds will work just great!

Remove and discard strawberry stems. Crush strawberries in bowl. I used a hand mixer stick to crush the berries into small pieces since I don’t like large lumps in my jam, just crush the berries to your desired consistency. Measure out 3 1/4 cup berries and put in a separate bowl. Add the sugar to the berries and mix well. Set aside for 10 minutes. Squeeze lemons and measure out 1/4 cup fresh lemon juice. Add to the crushed berries and make sure you do not add any lemon seeds to the berries. Add pectin to the mixture and mix until the sugar is completely dissolved. Pour into prepared containers or canning jars, leaving 1/2 inch space at top of each for expansion during freezing; cover with lids. Let stand for 24 hours or until set. Freeze up to 1 year.

Canning jars can be expensive so you can also use Tupperware and make sure the lids are super tight. These jars are plastic that I bought at Michael’s and I used a 50% off coupon for 6 plastic jars with lids and it cost me $3.99.  They worked out great!

Serve the jam with your favorite baked good of choice. Crescents rolls are pretty tasty with strawberry freezer jam.

Strawberry freezer jam is great for gift giving too!

Enjoy!!

Print

Strawberry Freezer Jam

Course Breakfast
Cuisine American
Keyword Strawberry Freezer Jam
Servings 7 cups

Ingredients

  • 8 cups fresh strawberries 3 1/4 cups crushed strawberries
  • 2 lemons 1/4 cup freshly squeezed
  • 4 1/2 cups sugar
  • 7 8 ounce container or canning jars with lids
  • 1 box MCP Premium Fruit Pectin

Instructions

  1. Remove and discard strawberry stems

  2. Crush strawberries in bowl. I used a hand mixer stick to crush the berries into small pieces since I don't like large lumps in my jam, crush to your desired consistency. Measure out 3 1/4 cup berries and put in a separate bowl.

  3. Add the sugar to the berries and mix well. Set aside for 10 minutes.

  4. Squeeze lemons and measure out 1/4 cup fresh lemon juice. Add to the crushed berries and make sure you do not add any lemon seeds to the berries.

  5. Add pectin to the mixture and mix until the sugar is completely dissolved.

  6. Pour into prepared containers or canning jars, leaving 1/2 inch space at top of each for expansion during freezing; cover with lids.

  7. Let stand for 24 hours or until set. Freeze up to 1 year.


Filed Under: Breakfast

Bagel Bites

July 9, 2019

I found my new favorite quick easy breakfast idea, Bagel Bites! Two bagel bites are a quick filling snack if you’re on a time crunch. Freeze them and heat them up for 30 seconds in the microwave and they are just as good. I suggest to heat them up for a better tasting bagel bite, but eating them cold works too!

This is a simple recipe to follow and the bonus is, there is no yeast involved!

I prefer to use bread flour but I have used all-purpose flour and they both work great. In a medium bowl combine the flour, baking powder and salt and whisk well. Add the yogurt and mix with a fork or spatula until well combined, it will look like small crumbles.

Lightly dust flour on a work surface and remove dough from the bowl, knead the dough a few times until dough is tacky, but not sticky, about 15 turns (it should not leave dough on your hand when you pull away).

Divide dough into 20 equal balls (give or take). Flatten each ball into circles, then place 1/2 tablespoon cream cheese on each. Cover the cream cheese well and roll into a ball. Repeat with the remaining dough balls.

Top with egg wash and sprinkle with seasoning of your choice if desired. Trader Joe’s “Everything but the Bagel Sesame Seasoning Blend” is my number one pick.

Bake on the top rack of the oven for 20 minutes. Let cool at least 10 minutes before eating.

You can add any type of flavored cream cheese or seasoning. I’ve even made a pizza sauce cream cheese that was delicious!

Eat one at a time and you will keep going back for more!

Enjoy!!!

Print

Bagel Bites

Course Breakfast
Cuisine American
Keyword Bagel Bites
Prep Time 20 minutes
Cook Time 20 minutes
Total Time 40 minutes
Servings 20 bagel bites

Ingredients

  • 2 cups bread flour or unbleached all purpose flour
  • 4 tsps baking powder (make sure it’s not expired or it won’t rise)
  • 1 tsp kosher salt
  • 2 5.3 oz Fage non-fat Greek yogurt (not regular yogurt, it will be too sticky)
  • 1 package cream cheese (cut into 20 cubes)
  • 1 egg beaten
  • optional toppings: everything bagel seasoning sesame seeds, poppy seeds, dried garlic flakes, dried onion flakes**

Instructions

  1. Preheat oven to 375. Place parchment paper or a silpat on a baking sheet. If using parchment paper, spray with oil to avoid sticking.

  2. In a medium bowl combine the flour, baking powder and salt and whisk well.
  3. Add the yogurt and mix with a fork or spatula until well combined, it will look like small crumbles.
  4. Lightly dust flour on a work surface and remove dough from the bowl, knead the dough a few times until dough is tacky, but not sticky, about 15 turns (it should not leave dough on your hand when you pull away).
  5. Divide dough into 20 equal balls (give or take). Flatten each ball into circles, then place 1/2 tablespoon cream cheese on each. Cover the cream cheese well and roll into a ball. Repeat with the remaining dough balls.

  6. Top with egg wash and sprinkle with seasoning of your choice if desired.
  7. Bake on the top rack of the oven for 20 minutes. Let cool at least 10 minutes before eating.


Filed Under: Appetizers, Breakfast

Baked Sugar Donuts

June 7, 2019

National Donut Day is here! My all-time favorite donut is just a plain ol’ sugar donut. Every time I walk into a donut store I check to see if they have any. It’s easy and simple! These might be a little healthier because they are baked and not fried. But, are any type of donuts really healthy? Ha!

These are made with yeast and they will have to rise twice. So make sure you are prepared to let the dough rest for awhile. They are light and fluffy baked donuts!

You can make these donuts anyway you would like. Make a regular donut with a hole in the middle or you can add jelly or any type of filling to the inside of the donut. I added homemade strawberry jam to these ones! I’ll post my  strawberry jam recipe as soon as we get strawberries in season. It’s my favorite jam and I can’t wait to make more cause now I’m all out!

The jam inside gives it a little kick. You can always leave the sugar off the donuts and add some vanilla or chocolate mousse or other types of flavors that you can think of.

Enjoy!!!

Print

Baked Sugar Donut

Course Dessert
Cuisine American
Keyword Baked Sugar Donuts
Prep Time 30 minutes
Cook Time 10 minutes
Resting time 2 hours
Total Time 40 minutes
Servings 12 donuts

Ingredients

  • 2 1/2 cups all-purpose flour divided (spooned and leveled) plus more for dusting
  • 1/4 cup granulated sugar
  • 1/4 tsp salt
  • 2 1/4 tsp instant yeast quick acting (1 packet = 7 grams)
  • 2/3 cup warm milk 110˚F microwave 35 sec.
  • 4 tbsp unsalted butter melted divided
  • 2 egg yolks
  • 1/2 tsp vanilla extract
  • 1/3 cup jelly or jam (optional)
  • 1/3 cup granulated sugar to roll donuts

Instructions

  1. In a large mixing bowl, whisk together 1 cup flour, 1/4 cup sugar, 2 1/4 tsp (1 packet) instant yeast and 1/4 tsp salt.
  2. Add warm milk, 3 tbsp melted butter, 2 egg yolks and 1/2 tsp vanilla extract, and whisk vigorously to combine well.

  3. Cover with plastic wrap or clean towel and rest at room temperature for 10 minutes, until some bubbles form on the surface.

  4. Add remaining 1 1/2 cups flour, adding just enough until dough holds together and no longer sticks to the sides of the bowl. Knead in the bowl 5 minutes. If dough is really sticking to your hands, dust lightly with flour then continue kneading with clean dry hands. Cover bowl with plastic wrap and let rise in a 100˚F oven for 45 min or at room temperature for 2 hours, or until doubled in size.

  5. Line a baking sheet with parchment paper and preheat oven to 375˚F with rack in the center of the oven.
  6. Turn dough out onto a floured surface and roll the dough out to just under 1/2” thick. Cut circles using a 2 1/2 inch round cookie cutter. Re-roll scraps if needed to make 12 donuts total. Place donuts on prepared baking sheet, cover with a tea towel and let rise in a 100˚F oven for 20 min or at room temperature 45 min, or until puffed. Bake uncovered in the center of a preheated oven at 375˚F for 10-12 minutes or until lightly golden on top.
  7. Right out of the oven, brush each hot bun all over with the remaining 1 tbsp melted butter and roll in a bowl of sugar to coat lightly. Cut a deep slit in the side of each donut and pipe jam with a pastry bag into each one if desired.


Filed Under: Breakfast, Desserts

Chocolate Nutella Basketball Cake

June 1, 2019

I was asked to make a cake for a high school basketball team for a dessert dash. It was a challenge to make but worth it! Plus it’s chocolate nutella so you know it’s tasty! I used the same cake recipe and frosting as my Chocolate Nutella Cupcakes. It’s also a great cake to make for the NBA playoffs since the Golden State Warriors are in the running! Go Warriors!

For the cake I used a half round cake pan. Make sure to coat the pan with lots of non stick spray so the cake doesn’t stick to the pan after it’s baked. Let the cake cool completely. Cut the cake in half and apply frosting to the middle of the cake. Attach the top of the cake and coat the whole cake with rest of the frosting.

I used a half sheet cake board for the background.

I used marshmallow fondant to decorate the outside of the cake.  It’s expensive to buy fondant so I wanted to make my own. Make the fondant, add orange gel food coloring and roll it out to about an 1/8 inch thick and cover the cake with fondant. Decorate the rest of the cake with the rest of the fondant and color the fondant with the corresponding colors for the back board, ball lines and if you want a team name added. When you add the basketball to the cake board make sure you have a round cake board under the basketball cake. The oils will spread onto the half sheet cake board if you don’t have a mini round one directly under the cake. Once the black lines are on the basketball, add the red rim and basket hoop strings.

Enjoy!

Print

Chocolate Nutella Basketball Cake

Course Cake, Dessert
Cuisine American
Keyword Chocolate Nutella Basketball Cake

Ingredients

  • 1 box chocolate cake mix or your favorite homemade recipe

Nutella Frosting

  • 1 cup butter
  • 1/2 cup shortening
  • 1 cup Nutella hazelnut spread
  • 4-5 cups powdered sugar
  • 3-4 tbsp milk or water

Marshmallow Fondant

  • 16 ounce package mini marshmallows
  • 2-5 tbsps water
  • 8 cups powdered sugar
  • 1/3 cup vegetable shortening

Instructions

  1. Bake cake as directed on the box. Let the cake completely cool.

Nutella Icing

  1. Beat together butter and shortening until smooth.

  2. Add Nutella and mix until smooth.
  3. Slowly add 4 cups of powdered sugar and mix until smooth.
  4. Add 2-3 tbsp of milk or water and mix until smooth.
  5. Add fifth cup of powdered sugar and mix until smooth.
  6. Add more water or milk until the right consistency.

Marshmallow Fondant

  1. Place marshmallows and 2 tablespoons of water in a large microwave-safe bowl. 
  2. Microwave for 30 seconds on high; stir until mixed well. Continue microwaving in 30 second intervals until they are melted and smooth.

  3. Place about 5 cups of the powdered sugar on top of the melted marshmallow mixture and gently fold it into the marshmallows.
  4. Grease your hands and your counter-top generously with shortening. Turn marshmallow mixture onto counter and start kneading it like you would dough.
  5. Add more confectioners' sugar as needed and re-grease your hands the counter-top as needed.
  6. If the marshmallow fondant is tearing easily, it is too dry; add water (about 1/2 tablespoon at a time) kneading until fondant forms a firm, smooth elastic ball that will stretch without tearing, about 8 minutes.
  7. To color fondant, add a little gel color to your desired amount and knead it with your hands until it absorbs all of the color. Add more color as needed to reach the desired colored. (I use medical gloves when mixing in the color. It's very helpful while cleaning your hands after).

  8. Follow directions above to assemble and decorate the cake.

Recipe Notes

TO STORE FONDANT:

To store the fondant, coat it with a thin layer of shortening, wrap it tightly with plastic wrap, and the place it in a resealable bag with all the air squeezed out. It will keep well in refrigerator for several weeks.
When ready to use, knead fondant until smooth. Roll out fondant 1/8 inch thick.

Filed Under: Cakes, Desserts

Gooey Chocolate Chip Cookies

May 15, 2019

Today is National Chocolate Chip Cookie Day! I’ve made a ton of different types of chocolate chip cookies in my day but these ones are my favorite… chewy, gooey and oh so soft! Gooey Chocolate Chip Cookies are where it’s at! Check out my other chocolate chip cookie recipes from my blog. Skillet Chocolate Chip Cookie,  Salted Chocolate Cookies & Chocolate Chip Cookie Cake.

No mixer required to make these delicious cookies. With a recipe this easy you just might find yourself making these chocolate chip cookies over and over!

I always try and make thick cookies no matter what kind I’m making. I have two tricks to try and make this happen.  First, chill the dough for a couple of hours or over night. Second, shape the cookies tall rather than wide on the cookie sheet.

To get them gooey and soft bake for 11 minutes. They will look slightly under cooked when you pull them out of the oven. Leave them on the cookie sheet for about 10 minutes, they will continue to cook before transferring them to a wire rack to cool completely.

As they are cooling on a wire rack make sure to eat one or two while they are warm, it’s the best! Don’t forget the milk to eat along with your warm gooey chocolate chip cookie!

Enjoy!!!

Print

Gooey Chocolate Chip Cookies

Course Cookies, Dessert
Cuisine American
Keyword Gooey Chocolate Chip Cookies
Prep Time 15 minutes
Cook Time 11 minutes
Total Time 26 minutes
Servings 36 medium size cookies

Ingredients

  • 2 1/4 cups all-purpose flour (spoon & leveled)
  • 1 1/2 tsp cornstarch
  • 1 tsp baking soda
  • 1/2 teaspoon salt
  • 3/4 cup unsalted butter melted & slightly cooled
  • 3/4 cup packed light or dark brown sugar
  • 1/2 cup granulated sugar
  • 1 large egg + 1 egg yolk at room temperature
  • 2 tsp pure vanilla extract
  • 1 cup semi-sweet chocolate chips or chocolate chunks (or more)

Instructions

Instructions

  1. Whisk the flour, baking soda, cornstarch, and salt together in a large bowl. Set aside.
  2. In a medium bowl, whisk the melted butter, brown sugar and granulated sugar together until no brown sugar lumps remain. Whisk in the egg, then the egg yolk and lastly the vanilla extract.

  3. Pour the wet ingredients into the dry ingredients and mix together with a large spoon or rubber spatula. Add the chocolate chips or chocolate chunks. 

  4. Cover the dough and chill in the refrigerator for 2-3 hours or overnight. Chilling is mandatory. I highly recommend chilling the cookie dough overnight for less spreading.

  5. Take the dough out of the refrigerator and allow to slightly soften at room temperature for 10 minutes.
  6. Preheat oven to 325°F. Line two large baking sheets with parchment paper or silicone baking mats. 

  7. Roll the dough into balls, about 1 tablespoon of dough each. Roll the cookie dough balls to be taller rather than wide. This will allow the cookies to be on the thick side. Place 12 balls of dough onto each cookie sheet. 

  8. Bake the cookies for 11 minutes. The cookies will look under baked. They will continue to bake on the cookie sheet. Allow to cool on the cookie sheet for 10 minutes before transferring to a wire rack to cool completely.

Recipe Notes

You can make the cookie dough and chill it in the refrigerator for up to 2-3 days. Allow to come to room temperature then continue with step 4.

Cookies stay fresh covered at room temperature for up to 1 week or freeze cookies up to 3 months. 

Filed Under: Cookies, Desserts

  • « Go to Previous Page
  • Page 1
  • Page 2
  • Page 3
  • Page 4
  • Page 5
  • Interim pages omitted …
  • Page 9
  • Go to Next Page »

Primary Sidebar

Hello and Welcome

Hi! I'm Holly and welcome to my personal blog and thank you for taking the time to look through my recipes and hiking adventures. I hope you enjoy them as much as me. Stay connected to see upcoming blog posts! I'm excited to have you join!

Recent Posts

  • Sourdough Focaccia
  • Andes Mint Truffles
  • Cole Slaw
  • Pumpkin Spice Cupcakes
  • Chicken Tortilla Soup

Archives

  • October 2024
  • December 2023
  • October 2023
  • August 2022
  • April 2022
  • February 2022
  • January 2021
  • May 2020
  • April 2020
  • February 2020
  • November 2019
  • October 2019
  • August 2019
  • July 2019
  • June 2019
  • May 2019
  • April 2019
  • March 2019
  • February 2019
  • January 2019
  • December 2018
  • November 2018
  • October 2018
  • September 2018
  • August 2018
  • July 2018
  • June 2018
  • May 2018

Categories

Don’t Miss These!

Pumpkin Cheese Ball

Valentine Sugar Cookies

7-Layer Bean Dip

Circus Cookies

Most Popular Recipes

Monster Cake

Ding Dong Cake

Secondary Sidebar

Filter by Category

  • Appetizers
  • Breakfast
  • Cakes
  • Comfort Foods
  • Cookies
  • Cupcakes
  • Desserts
  • Dinner
  • Drinks
  • Everyday Meals
  • Grilling
  • Hiking
  • Lunch
  • Soup
  • Vegetarian Dishes

Filter by Date

Search

Footer

My Favorites

stay connected

  • Facebook
  • Instagram
  • Pinterest

Don’t miss a recipe or an adventure!

Copyright© 2025 · Brunch Pro Theme by Feast Design Co.