• Skip to primary navigation
  • Skip to main content
  • Skip to primary sidebar
  • Skip to footer
  • Home
  • Recipes
  • Hiking
  • Contact

Holly in the PNW

The girl that can't sit still!

Archives for February 2019

Simple Chocolate Truffles

February 27, 2019

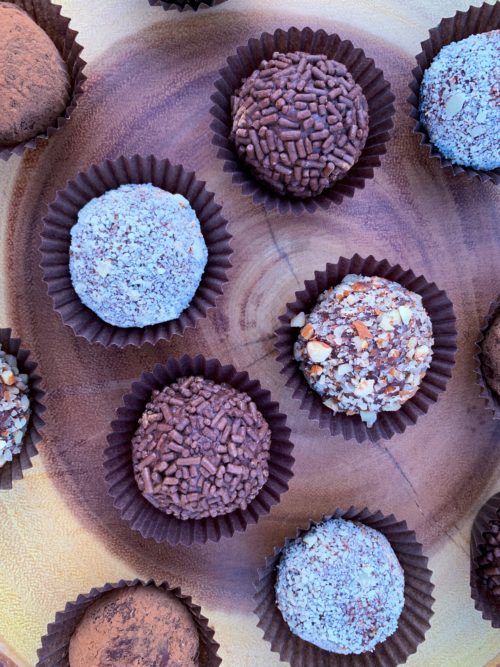
If you want a sweet and quick chocolate treat, these perfectly sized Simple Chocolate Truffles are where it’s at! The topping options are endless, making them a versatile treat for all sorts of occasions. Extra creamy truffles, yet not overly sweet, are the perfect little treat for just about anyone.

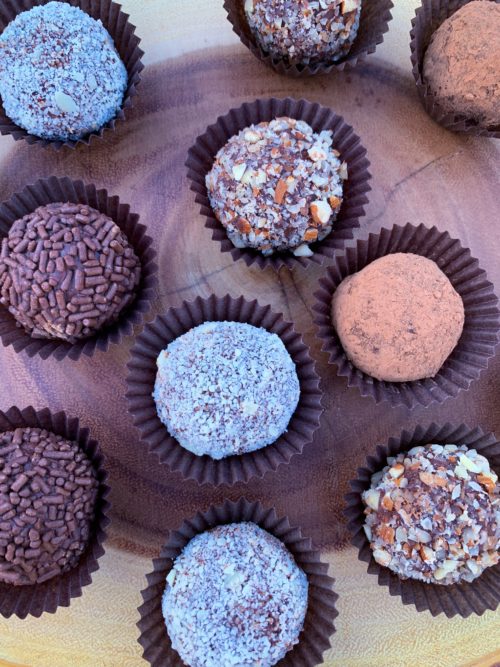
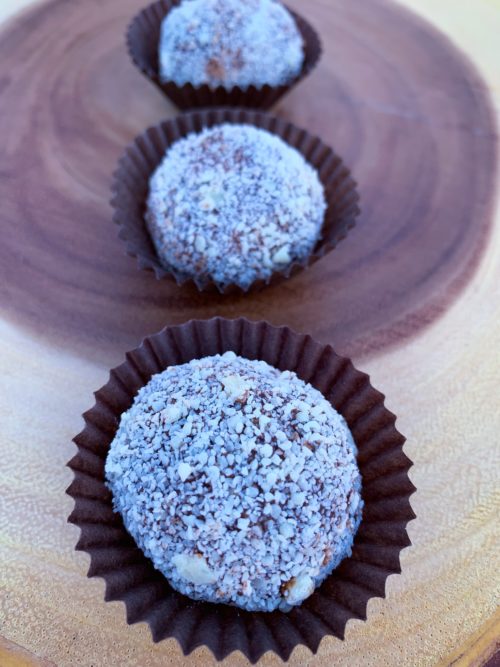
I coated the simple chocolate truffles with a few different tasty toppings. White chocolate shavings are one of my favorites and definitely make these truffles adorable .

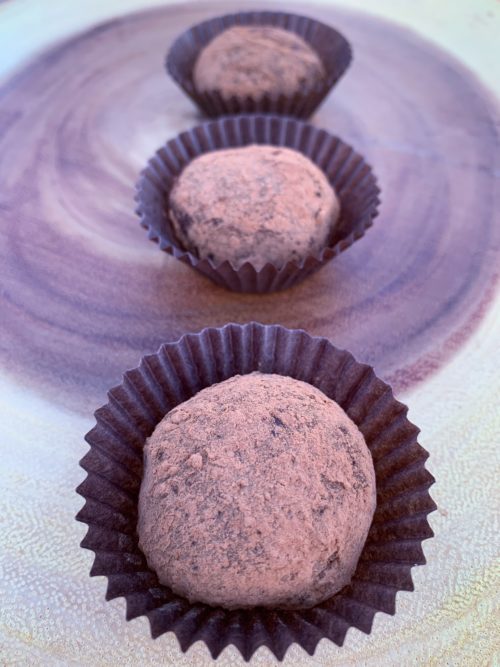
Simply dusted with cocoa powder!

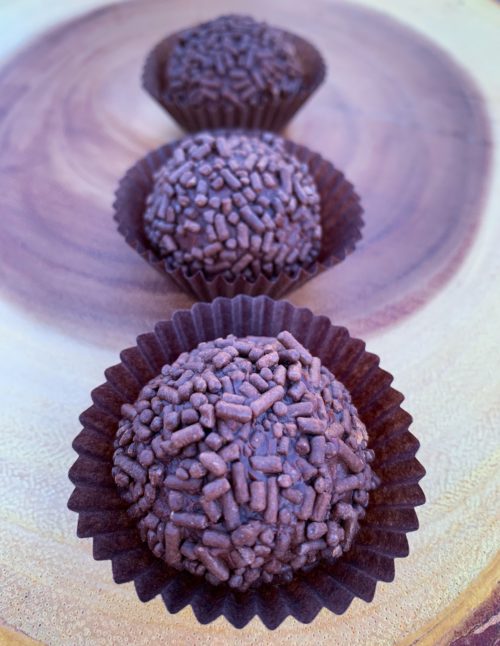
Everyone loves sprinkles! I used chocolate sprinkles because you can’t go wrong with chocolate on chocolate right?!

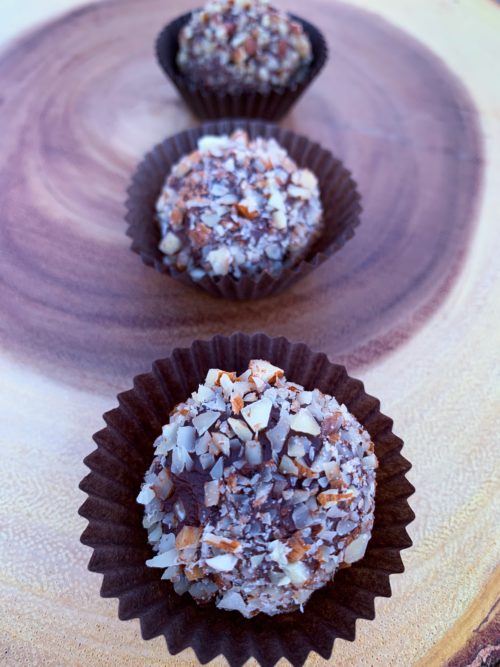
Crush up any kind of nuts, I used a mixture of almonds and pecans.

Simple chocolate truffles are best at room temperature. Arrange your beautifully topped truffles on a plate for an after dinner treat for yourself or your loved ones. Put a few different truffles in a little gift box and give them to your favorite coworker. Whatever you choose to do with your truffles, they won’t disappoint!

Enjoy!!!

Print

Simple Chocolate Truffles

Course Dessert
Cuisine American
Keyword Simple Chocolate Truffles
Prep Time 20 minutes
Resting time 1 hour
Total Time 1 hour 20 minutes
Servings 18 truffles

Ingredients

  • 2 4-ounce quality chocolate bars (very finely chopped)
  • 2/3 cup heavy cream
  • 1 tbsp unsalted butter at room temperature
  • 1/2 tsp pure vanilla extract
  • topping options: unsweetened cocoa powder, sprinkles, crushed nuts, melted or tempered chocolate, coconut

Instructions

  1. Place the finely chopped chocolate pieces in a heat-proof bowl. Set aside.

  2. Heat the heavy cream until it is simmering, hot but not boiling. You can heat it on the stove or in the microwave.

  3. Add the butter to the chocolate and pour the heavy cream evenly on top. Let the warm cream and chocolate butter mixture sit for 5 minutes. Add the vanilla extract then stir until the chocolate has completely melted. If the chocolate isn’t melting, place the heat-proof bowl over a pot of simmering water (1 inch of water will do) and stir until melted. 

  4. Pour into a flat shallow dish, such as an 8×8 inch baking pan, so the mixture evenly and quickly sets. Cover with plastic wrap and refrigerate for 1 hour.

  5. Scoop the set truffle mixture into 1 tablespoon sized mounds. I use a cookie scoop which is the perfect size. Roll into balls. The mixture will be very sticky. 

  6. Roll each ball into the topping of your choice.  

Recipe Notes

Cover tightly and store truffles at room temperature for 3-4 days or in the refrigerator for up to 2 weeks.


Filed Under: Desserts

Skillet Chicken Fajitas

February 21, 2019

I try and eat healthy unless I’m baking something delicious for my blog. You always need a little room for baked goods, right? When I’m not baking I’m usually cooking a healthy meal. Skillet chicken fajitas are one of my easy and healthy go-to dinners I eat at least once a week. If you stick to the basics they are pretty healthy and you should have some left over for lunch tomorrow!

Sautéed onions and peppers with seasoned chicken, you will devour this meal as fast as you put it on your plate. It’s quick, easy and healthy. It has a nice little kick to it but if you like it spicy you can add more hot sauce to the recipe. Grab that skillet and start cooking!

After you cook up all the ingredients in the skillet spoon the mixture onto a tortilla and add some fresh pico de gallo or salsa. I used my simple and easy homemade pico de gallo, but any store bought brand will work.

You can keep this meal more on the healthy, lean side or you can add your favorite cheese and avocados. Either way, healthy or not, you’ll love this skillet chicken fajita recipe.

Enjoy!!!

Print

Skillet Chicken Fajitas

Course Dinner, Main Course
Cuisine Mexican
Keyword Skillet Chicken Fajitas
Prep Time 20 minutes
Cook Time 20 minutes
Resting time 30 minutes
Total Time 1 hour 10 minutes
Servings 8 people

Ingredients

Chicken Fajitas

  • 2 pounds chicken breasts (thinly sliced)
  • 4 tbsp fresh cilantro
  • 1 tbsp extra virgin olive oil
  • 1/2 tsp ground cumin
  • 1 tsp chili powder
  • 2 tsp dried oregano
  • 1/2 tsp garlic powder
  • 1 tsp kosher salt
  • 1 tsp hot sauce (or more if you want it spicy)
  • Juice of one lime

For the Peppers and Onions

  • 1 tbsp extra virgin olive oil
  • 1 red bell pepper (thinly sliced)
  • 1 yellow bell pepper (thinly sliced)
  • 1 orange bell pepper (thinly sliced)
  • 1 yellow onion (thinly sliced)
  • 1 teaspoon chili powder
  • 1 teaspoon kosher salt

Instructions

  1. In a large bowl combine all of the chicken fajita ingredients. Do not add the lime juice or pepper and onion ingredients.

  2. Toss the thinly sliced chicken in the marinade until coated. Cover and refrigerate for 30 minutes.

  3. Preheat a large cast iron skillet over high heat with 1 tablespoon of oil.

  4. When the skillet is hot add in the sliced peppers, onion, chili powder and salt.

  5. Saute the peppers and onions for about 4 minutes or until they are softened slightly.

  6. Remove the peppers and onions from the skillet onto a plate and set aside.
  7. Add one more tablespoon oil to the skillet.

  8. Add in the chicken fajita mixture and saute until the chicken is cooked thoroughly and is no longer pink (cook to at least 165 degrees!).

  9. Add the peppers and onions back into the skillet. Squeeze the lime juice over the chicken, peppers and onions.

  10. Mix everything together until well combined and heated evenly (about 1 minute). Serve immediately.

  11. Serve the fajitas on tortillas and top with pico de gallo or salsa. If desired, top with your favorite cheese and sliced avocados.

Filed Under: Everyday Meals

Talapus Lake

February 18, 2019

There’s been a lot of a snow fall in Seattle lately so that means the mountains are getting a ton. I went on a snowshoe trip last year so I wanted to post about it so people can head out and enjoy this snow we’ve been getting. Grab your snowshoes and head to Talapus Lake! Talapus Lake is right off I-90 near Snoqualmie.

It was a blue bird day and the perfect day for a winter hike.

The hike round trip took about 3 hours and was 6.14 miles according to my Garmin Fenix 5 watch that I use every time I hike. I love it!

The elevation gain is 1220′. It’s a doable hike especially with snow shoes. If the snow is packed down hard enough you can even use micro spikes. Half the hike I used my micro spikes and the other half I used my snowshoes.

Once you get to Talapus Lake it has an amazing open view of the lake. With all that snow you couldn’t even tell it was a lake.

I think the best part of the hike are the Jay birds. They would fly up to you and land on your head! At one point they stole my pb&j right outta my hand. It was startling at first but they will land on your hand or your shoulder so watch out for them. Feeding them is a big no-no! The Jay that stole my sandwich was completely unintentional on my part, but it sure was fun!

Enjoy the hike! I’ve done this hike in the summer and winter and I love it because of the gorgeous views and it’s a quick trip from Seattle.

DRIVING DIRECTIONS

From Seattle, head east on I-90 to exit 45. Turn left, and drive under the freeway on FR 9030. In 1 mile follow the road around to the right at the junction. Continue straight on a gravel, sometimes severely potholed road, to the trailhead at the road’s end. Northwest Forest Pass and Alpine Lakes Wilderness Permit required, both available at the trailhead.

Filed Under: Hiking

Peanut Butter Blossoms

February 13, 2019

Peanut Butter Blossoms are one of my favorite cookies. You can’t go wrong with peanut butter cookies topped with a Hersey’s kiss. I thought it would make a really cute valentine cookie so I sprinkled the cookies with red sanding sugar instead of regular sugar. Of course the original cookie recipe calls for regular sugar but this is festive for February and topped with a kiss!

Just bake all these cookies and give them away if you don’t want to eat them all yourself! It’s a great cookie to take to your office or give to your kids for Valentine’s Day at school.

So cute and festive for Valentine’s Day!

Enjoy!!

Print

Peanut Butter Blossoms

Course Cookies, Dessert
Cuisine American
Keyword Peanut Butter Blossoms
Prep Time 20 minutes
Cook Time 10 minutes
Resting Time 30 minutes
Total Time 30 minutes
Servings 24 cookies

Ingredients

  • 1 1/4 cups all-purpose flour
  • 1/2 tsp baking soda
  • 1/4 tsp salt
  • 1/2 cup unsalted butter softened to room temperature
  • 3/4 cup granulated sugar divided
  • 1/2 cup packed light brown sugar
  • 1 large egg at room temperature
  • 3/4 cup creamy peanut butter
  • 1 tsp pure vanilla extract
  • 24 chocolate kiss candies unwrapped
  • optional: 1/2 cup red sanding sugar

Instructions

  1. Whisk the flour, baking soda, and salt together. Set aside.
  2. Using a hand mixer or a stand mixer fitted with paddle attachment, beat the butter for 1 minute on high speed until creamy. On medium-high speed, beat in the brown sugar and only 1/4 cup of the granulated sugar until completely creamed and smooth, about 2 minutes. Add the egg and beat on high until combined, about 1 minute. Scrape down the sides and bottom of the bowl as needed. Add the peanut butter and vanilla extract and mix on high until combined.

  3. Add the dry ingredients to the wet ingredients and mix on low until combined. Cover and chill the dough for at least 30 minutes in the refrigerator.

  4. Preheat oven to 350°F. Line two large baking sheets with parchment paper or silicone baking mats. Set aside. Also, make sure there is room in your freezer because they will later need to be placed inside to prevent the chocolate kisses from melting on the warm cookies.

  5. Scoop and roll cookie dough, about 1 Tablespoon of dough each. Roll each ball in the remaining 1/2 cup of sugar. *If you want to make your cookies festive, replace the regular sugar with the red sanding sugar. Arrange on the baking sheet about 2 inches apart. Bake for 10 minutes or until the tops begin to slightly crack. Remove cookies from the oven and allow to cool for 10 minutes.

  6. Press a chocolate kiss candy into each cookie on 1 of the baking sheets until it sticks. Place the baking sheet in the freezer so the chocolate does not melt. Remove after 10 minutes in the freezer. Repeat with 2nd baking sheet of cookies.


Filed Under: Cookies, Desserts

Valentine Sugar Cookies

February 12, 2019

Yes, another Valentine Cookie post!  I had some left over cookie dough batter from the Heart Shaped Sugar Cookies I made.  I added pink butter cream frosting and made some more valentine sugar cookies. These cookies are soft, delicious, and even better topped with butter cream frosting!

I had both colors left over from the original recipe so I mixed them together to get a multicolored look for these valentine cookies. I used pink butter cream frosting to pipe the frosting on top of the cookie. You can use any tip you want, the one pictured is a star tip.

The recipe listed is the same recipe I used for the Heart Shaped Sugar Cookies, but I made some edits to make this exact multicolored cookie.

Enjoy!!!

Print

Valentine Sugar Cookies

Course Cookies, Dessert
Cuisine American
Keyword Valentine Sugar Cookies
Prep Time 40 minutes
Cook Time 10 minutes
Resting time 1 hour
Total Time 50 minutes
Servings 24 cookies

Ingredients

  • 1 cup unsalted butter at room temperature
  • 1 cup granulated sugar
  • 1 tsp vanilla extract
  • 2 large eggs at room temperature
  • 4 cups all-purpose flour sifted
  • 3/4 cup cornstarch sifted
  • 3/4 tsp kosher salt
  • 1/4 cup pink sanding sugar for bowl of pink batter
  • few drops red/pink food coloring for bowl of pink batter

Butter Cream Frosting

  • 3/4 cup unsalted butter room temperature
  • 2 - 3 cups confectioners' sugar
  • 2 - 3 tbsp heavy cream
  • 1/2 tsp pure vanilla extract

Instructions

  1. You will cut the recipe in half so please keep this in mind when you are preparing your batter. Two bowls will be required. I made the white batter first and then the pink batter to make sure I kept everything separate.
  2. Preheat oven to 350 degrees F.

  3. Remember, use half the ingredients in each bowl!

  4. In a standing mixer fitted with a paddle attachment, cream butter, granulated sugar, vanilla and egg together.
  5. Sift flour, cornstarch, salt. Mix until incorporated.
  6. In the second bowl, add a few drops of red/pink food coloring to the sugar/butter mixture. Mix until a desired color is reached. Sprinkle ¼ cup pink sanding sugar to this bowl.

  7. Transfer both batters to plastic wrap, separately.

  8. Roll each batter into a disk and chill for about 1 hour.

  9. Take some white batter and some pink batter and mix together to make a white and pink mixture. Don't mix together too much or the batter will look pink, you want some white batter showing. Roll the batter to a 1/4 inch thickness.

  10. Cut cookies with a heart shaped cutter.
  11. Place cookies on a baking sheet lined with parchment paper or silicone mat.
  12. Bake for 10 minutes and watch them closely, you don't want them to brown. Let cool on a wire rack.

Buttercream Frosting

  1. In a large bowl using a hand-held mixer or stand mixer fitted with a whisk or paddle attachment, beat the butter on medium speed until creamy - about 2 minutes.
  2. With the mixer running on low, add 2 and 1/2 cups confectioners' sugar, 2 Tablespoons heavy cream, and the vanilla extract. Increase to high speed and beat for 3 full minutes.

  3. Add 1/2 cup more confectioners' sugar if frosting is too thin; 1 more Tablespoon cream if frosting is too thick.

  4. Yields about 2.5 cups of frosting

  5. Pipe frosting using a tip of your choice onto the cooled sugar cookie.


Filed Under: Cookies, Desserts

Salted Chocolate Cookies

February 8, 2019

I know there are so many chocolate cookie recipes out there so I just needed to add another. Every blog needs one. These are some thick chocolate cookies that won’t disappoint. I do love thick and chewy cookies! It’s a challenge of mine to always have thick chocolate cookies and I think I nailed this one.

The results are thick, crisp-edged, and soft inside with loads of chocolate chunks! Top off with a faint crunch of sea salt.

Sink your teeth into these yummy salted chocolate cookies! Grab a tall glass of milk to go along with these thick, soft and chewy cookies.

Enjoy!

Print

Salted Chocolate Cookies

Course Cookies, Dessert
Cuisine American
Keyword Salted Chocolate Cookies
Prep Time 15 minutes
Cook Time 10 minutes
Total Time 25 minutes
Servings 28 cookies

Ingredients

  • 1/2 cup unsalted butter at room temperature
  • 2 tablespoons granulated sugar
  • 2 tablespoons turbinado sugar (Sugar in the Raw)
  • 3/4 cups plus 2 tbsp packed light or dark brown sugar
  • 1 large egg at room temperature
  • 1 tsp vanilla extract
  • 3/4 tsp baking soda
  • 1/4 tsp fine sea or table salt
  • 1 3/4 cups all-purpose flour
  • 1/2 pound semi or bittersweet chocolate, cut into roughly 1/2-inch chunks with a serrated knife
  • sea salt to finish

Instructions

  1. Heat oven to 350°F and line a baking sheet with parchment paper or a silicone baking mat.

  2. In a large bowl, cream the butter and sugars together with an electric mixer with a paddle attachment until very light and fluffy, about 5 minutes. Add egg and vanilla, beating until incorporated, and scraping down the bowl as needed. Beat in salt (fine sea or table) and baking soda until combined. Add the flour on a low speed until just mixed. The dough will look crumbly. Stir in the chocolate chunks.

  3. Using a cookie scoop, if you don't have a cookie scoop it's about 1 tablespoon mounds, spacing them apart on the prepared baking sheet. Sprinkle each with a few flakes of sea salt. 

  4. Bake for 10 minutes or until golden on the outside but still very gooey and soft inside. Once out of the oven, let the cookies rest on the baking sheet for 5 minutes. Transfer to a cooling rack.

Filed Under: Cookies, Desserts

Healthy Chili

February 6, 2019

It’s been snowy and cold in Seattle so I cooked up this healthy chili to stay warm. You can’t beat a hot bowl of chili on a cold day! This chili isn’t overly powerful with chili taste and spice. You can add more chili powder and spice to your liking. I can’t do a lot of spice but there’s a little kick to it so it’s not so bland.

This is a quick chili recipe that’s not difficult and you can whip it up for yourself or for a party. It’s delicious!

Enjoy!!

Print

Healthy Chili

Course Main Course, Soup
Cuisine American
Keyword Healthy Chili
Prep Time 20 minutes
Cook Time 50 minutes
Total Time 1 hour 10 minutes
Servings 4 people

Ingredients

  • 1 lb ground turkey
  • 1 1/2 cups canned pinto beans drained and rinsed
  • 1 sweet onion chopped
  • 1 bell pepper chopped
  • 2 tbsp garlic minced
  • 2 tbsp chili powder or to taste
  • 1 tbsp dried oregano
  • 2 tsp cumin powder
  • 2 tsp cocoa powder
  • 1 tsp salt
  • 1/2 tsp black pepper
  • 1/4 tsp cayenne pepper or to taste
  • 4 cups beef broth
  • 1 can 14 oz diced tomatoes
  • 1/4 cup corn meal
  • Topping options: sour cream, shredded cheddar cheese, chopped red onions, shallots or green onions, sliced jalapenos, hot sauce, diced avocado

Instructions

  1. Add ground turkey to sauce pan and stir with wooden spoon to break up the meat into smaller pieces; saute until meat is brown.

  2. Stir in onions and saute until soft, about 2 minutes.
  3. Stir in bell peppers and garlic.
  4. Add chili powder, dried oregano, cumin powder, cocoa powder, salt, black pepper, cayenne pepper and stir until fragrant, about 1 minute.
  5. Transfer meat mixture into a bigger pot.

  6. Stir in beef broth, tomatoes and pinto beans.
  7. Bring the chili to a boil stirring frequently. Reduce the heat and let it simmer for about 45 minutes.
  8. Stir in corn meal slowly. The corn meal will clump up if you pour it in all at once.
  9. Cook until chili has thickened, stirring frequently, about 5 minutes.
  10. Pour chili into serving bowls and serve with your choice of toppings: sour cream, shredded cheddar cheese, chopped red onions, shallots or green onions, sliced jalapenos, hot sauce, diced avocado or anything you can think of!

Filed Under: Everyday Meals

Valentine Vanilla Cake Pops

February 4, 2019

Valentine Vanilla Cake Pops should be added to your list for your special day! These are a perfect ratio between cake and icing. On your first bite you won’t regret making these for your friends or family, or that special someone. With all those red sprinkles, it’s just so festive!

Cake pops are a great way to eat just a small serving without devouring a whole cake. Like I say in a lot of my posts, I love personal sizes.

I’ve made chocolate cake pops before and I finally tried vanilla. If you’re more of a vanilla fan then this cake pop recipe is just for you. You can make these with any type of sprinkles or colored candy coating.  Since it was February, and Valentine’s Day is coming soon, I wanted to throw in the red sprinkles and make it festive.

Grab the recipe and start rolling and dipping those cake balls into something very delicious! Let me know what you think.

Wrap them up in miniature cellophane bags, tie them with a ribbon and give them out as Valentine gifts. You will be loved even more!

Enjoy!

Print

Valentine Vanilla Cake Pops

Course Cake, Dessert
Cuisine American
Keyword Valentine Vanilla Cake Pops
Prep Time 1 hour
Cook Time 25 minutes
Resting time 2 hours
Total Time 3 hours 25 minutes
Servings 40 cake pops

Ingredients

Vanilla Cake

  • 1 2/3 cups cups all-purpose flour spoon & leveled
  • 1/2 tsp baking powder
  • 1/4 tsp baking soda
  • 1/2 tsp salt
  • 1/2 cup unsalted butter softened to room temperature
  • 1 cup granulated sugar
  • 1 large egg at room temperature
  • 2 tsp pure vanilla extract
  • 1 cup 2% milk

Frosting

  • 7 tbsp unsalted butter softened to room temperature
  • 1 3/4 cups confectioners' sugar
  • 2-3 tsp 2% milk
  • 1 tsp pure vanilla extract

Coating

  • 40 ounces candy melts or coating

Instructions

Vanilla Cake

  1. Whisk the flour, baking powder, baking soda, and salt together in a medium bowl. Set aside. Using a handheld or stand mixer fitted with a paddle or whisk attachment, beat the butter and sugar together in a large bowl until creamed, about 2 minutes. Add the egg and vanilla extract and beat on high speed until combined. Scrape down the bottom and sides of the bowl as needed.
  2. With the mixer running on low speed, add the dry ingredients and milk to the wet ingredients until combined. Make sure there are no large lumps at the bottom of the bowl. Batter will be slightly thick.

  3. Prepare a 9x13 pan and spray with non-stick coating. Pour the batter evenly into the pan. Bake for 25-27 minutes or until a toothpick inserted in the center comes out clean. Allow the cake to cool completely in the pan; set on a wire rack.

Vanilla Frosting

  1. With a handheld or stand mixer fitted with a paddle attachment, beat the butter on medium speed until creamy, about 2 minutes. Add confectioners' sugar, milk, and vanilla extract with the mixer running on low. Increase to high speed and beat for 3 full minutes.
  2. Crumble the cooled cake into the bowl on top of the frosting. Make sure there are no large lumps. Turn the mixer on low and beat the frosting and cake crumbles together until combined.
  3. Measure 1 Tablespoon of moist cake mixture and roll into a ball. I use a cookie scoop to measure out my ball. Place balls on a lined baking sheet. Refrigerate for 2 hours or freeze for 1 hour.
  4. Melt the coating in a 2-cup liquid measuring cup (best for dunking!). Use a microwave or you can use a double boiler and pour some out at a time into the liquid measuring cup. Let the coating cool down for a few minutes before you begin dipping. If it's too hot when you dip, the coating will crack.

Coat the cake balls

  1. Remove only 2-3 cake balls from the refrigerator at a time. Keep the rest cold! Dip a lollipop stick about 1/2 inch into the coating, then insert into the center or the cake ball. Only push it about halfway - 3/4 through the cake ball. Dip the cake ball into the coating until it is completely covered. Make sure the coating covers the base of the cake ball where it meets the lollipop stick. Very gently tap the stick against the edge of the measuring cup to allow excess coating to drop off. Decorate the top with sprinkles and place upright into a styrofoam block, box (flip the box upside down and poke the lollipops into the bottom of the box) or even tall shot glasses work. Repeat with remaining cake balls, only working with some out of the refrigerator at a time. The cake balls must be very cold when dipping!

  2. Coating will set within an hour. Store cake pops in the refrigerator for up to 1 week. You may freeze the cake pops up to 3 months.


Filed Under: Cakes, Desserts

Primary Sidebar

Hello and Welcome

Hi! I'm Holly and welcome to my personal blog and thank you for taking the time to look through my recipes and hiking adventures. I hope you enjoy them as much as me. Stay connected to see upcoming blog posts! I'm excited to have you join!

Recent Posts

  • Chicken Tortilla Soup
  • Beef Bowls
  • Ice Cream Sandwiches
  • Mint Chocolate Delights
  • Peanut Butter Cookies

Archives

  • August 2022
  • April 2022
  • February 2022
  • January 2021
  • May 2020
  • April 2020
  • February 2020
  • November 2019
  • October 2019
  • August 2019
  • July 2019
  • June 2019
  • May 2019
  • April 2019
  • March 2019
  • February 2019
  • January 2019
  • December 2018
  • November 2018
  • October 2018
  • September 2018
  • August 2018
  • July 2018
  • June 2018
  • May 2018

Categories

Don’t Miss These!

Plum Muffins

Vanilla Naked Cake with Raspberry Filling

Simple Chocolate Truffles

Wonton Soup

Most Popular Recipes

Bagel Bites

Monster Cake

Footer

My Favorites

stay connected

  • Facebook
  • Instagram
  • Pinterest

Don’t miss a recipe or an adventure!

Copyright© 2023 · Brunch Pro Theme by Feast Design Co.