• Skip to primary navigation
  • Skip to main content
  • Skip to primary sidebar
  • Skip to footer
  • Home
  • Recipes
  • Hiking
  • Contact

Holly in the PNW

The girl that can't sit still!

Archives for November 2018

Chocolate Nutella Cupcakes

November 24, 2018

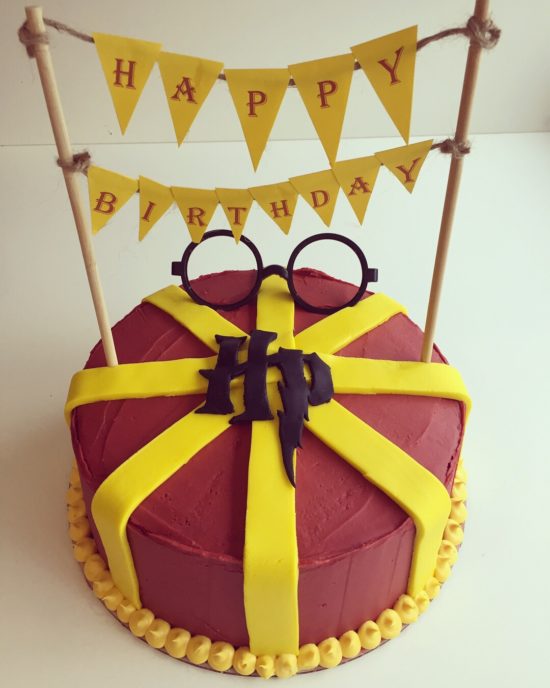
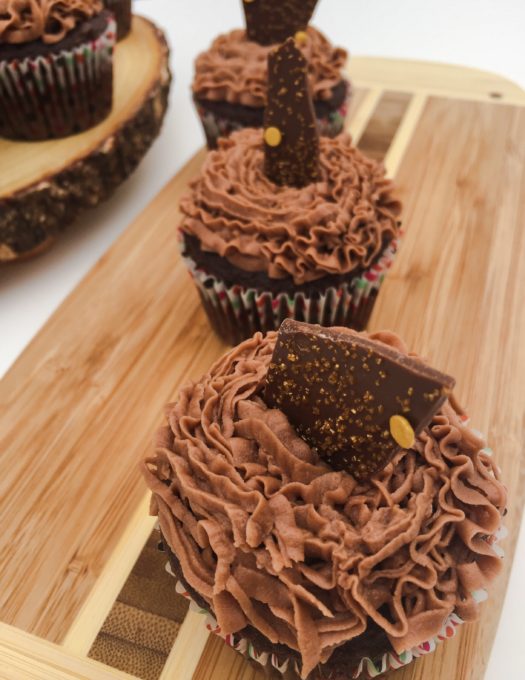
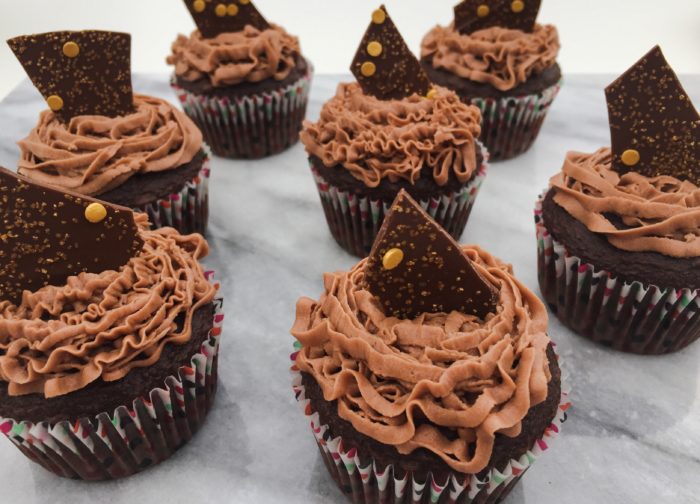
I made this cake recipe for my best friend’s 40th birthday. Since it’s so delicious, I had to make cupcakes and share will all of you. The frosting is to die for! How can you go wrong with Chocolate and Nutella?! Chocolate Nutella Cupcakes for the win!

It’s an easy recipe so get to baking! Grab your favorite chocolate cake recipe and whip up that Nutella frosting!

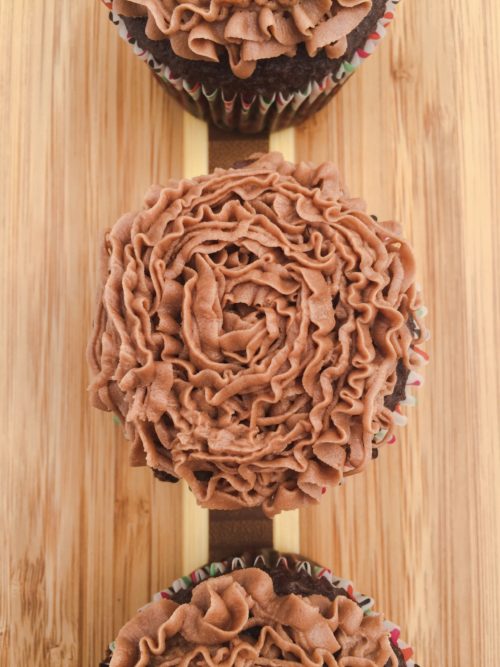
I used a flower tip to frost the cupcakes. To add the chocolate pieces on the top of the cupcakes I used chocolates melts. Melt the chocolate in the microwave and spread the melted chocolate on a silicone mat. If you don’t have a silicone mat use a cookie sheet and cover with parchment paper. While still warm, add any color sprinkles you desire. Let the chocolate harden, break into pieces and add to the top of the cupcakes for decoration.

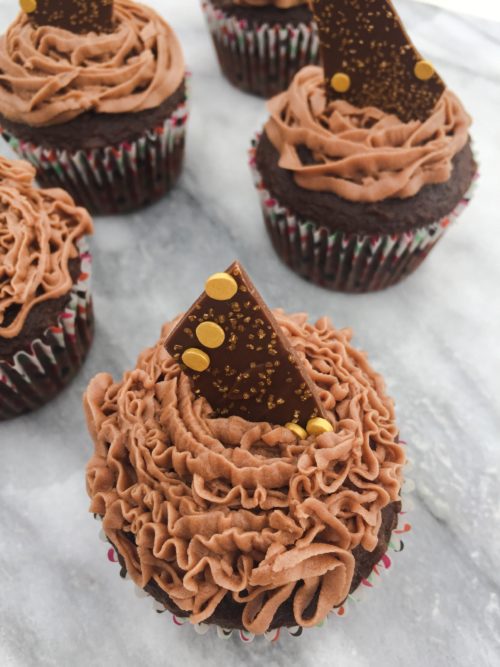
You can make a cake or cupcakes from this recipe. People will love this combination of chocolate and Nutella and will ask for the recipe! Enjoy!!!

Print

Chocolate Nutella Cupcakes

Course Dessert
Cuisine American
Keyword Chocolate Nutella Cupcakes
Prep Time 30 minutes
Cook Time 22 minutes
Total Time 52 minutes
Servings 24 cupcakes

Ingredients

  • 1 box chocolate cake mix (or your favorite homemade recipe)

Nutella Frosting

  • 1 cup butter
  • 1/2 cup shortening
  • 1 cup Nutella hazelnut spread
  • 4-5 cups powdered sugar
  • 3-4 tbsp milk or water

Instructions

  1. Bake cupcakes as directed on the box.

  2. Make icing while cakes cool. Beat together butter and shortening until smooth.
  3. Add Nutella and mix until smooth.
  4. Slowly add 4 cups of powdered sugar and mix until smooth.
  5. Add 2-3 tbsp of milk or water and mix until smooth.
  6. Add fifth cup of powdered sugar and mix until smooth.
  7. Add more water or milk until the right consistency.
  8. Frost the cupcakes as desired.

Recipe Notes

To add the chocolate pieces on the top of the cupcakes I used chocolates melts. Melt the chocolate in the microwave and spread the melted chocolate on a silicone mat. If you don't have a silicone mat use a cookie sheet and cover with parchment paper. While still warm, add any color sprinkles you desire. Let the chocolate harden, break into pieces and add to the top of the cupcakes for decorations. 

Filed Under: Cupcakes, Desserts

Pumpkin Cheese Ball

November 18, 2018

Every Thanksgiving I find myself making a pumpkin cheese ball and my guests love it! I will be honest and say I’m not a fan of pumpkin but this is different, it’s delicious and dangerous!  I have two things pumpkin that I love and this is my favorite. I will be posting my other pumpkin favorite soon which is pumpkin spiced cupcakes so stay tuned for that. Now let’s focus on this pumpkin cheese ball!  It has a combination of pumpkin (of course), cream cheese, sugars and pumpkin spice. Awwwww is your mouth watering yet? Now get this ball rolling!

With a mixer blend the cream cheese and butter together until light and fluffy. Add the powdered sugar and brown sugar and blend well. Add the pumpkin puree and pumpkin pie spice until combined.

Spoon mixture onto plastic wrap in a ball shape. The mixture is wet so it won’t quite be a ball but do your best to make a ball. It doesn’t need to be perfect. Wrap mixture tightly with plastic wrap and place in the freezer for 4 hours or until firm.

While the ball is freezing make the gingersnap crumbs. Use a food processor to crumble the gingersnaps or if you don’t have a food processor put the gingersnaps in a gallon size bag and roll over with a rolling pin.

Remove the ball from the freezer and unwrap the ball. Let it sit out for about 5 minutes. It will not look perfect but will look fine once the crumbs are on it. This will allow the gingersnap crumbs to stick better to the ball. Place gingersnap crumbs on a large plate or platter. Roll the ball in the crumbs, pressing the crumbs into the ball. Wrap ball in clean piece of plastic wrap and store in the freezer until serving.

Remove from freezer about an hour before serving. Serve with graham crackers, apple slices, or gingersnap cookies. Make sure you try the pumpkin cheese ball with everything cause each bite is different!  ENJOY!!!!


Print

Pumpkin Cheese Ball

Servings 12 people

Ingredients

INGREDIENTS

  • 2 8 ounce packages cream cheese slightly softened
  • 1/4 cup butter softened
  • 2 cups powdered sugar
  • 3 tbsp brown sugar
  • 3/4 cup pumpkin puree
  • 1 tbsp pumpkin pie spice see notes for substitute
  • 1 1/2 cups crushed gingersnap cookies
  • graham crackers
  • apples
  • gingersnap cookies additional for dipping

Instructions

INSTRUCTIONS

  1. With a mixer blend the cream cheese and butter together until light and fluffy. Add the powdered sugar and brown sugar and blend well. Add the pumpkin puree and pumpkin pie spice until combined.
  2. Spoon mixture onto plastic wrap in a ball shape. The mixture is wet so it won't quite be a ball but do your best to make a ball or pumpkin shape. It won't be perfect. Wrap mixture tightly with plastic wrap and place in the freezer for 4 hours or until firm. I like to tie a rubber band at the top to hold the plastic wrap tight but it's not necessary.

  3. While the ball is freezing make the gingersnap crumbs. Use a food processor to crumble the gingersnaps or if you don't have a food processor put the gingersnaps in a gallon size bag and roll over with a rolling pin.

  4. Remove the ball from the freezer and unwrap the ball. Let it sit out for about 5 minutes. It will not look perfect but will look fine once the crumbs are on it. This will allow the gingersnap crumbs to stick better to the ball. Place gingersnap crumbs on a large plate or platter. Roll the ball in the crumbs, pressing the crumbs into the ball. Wrap ball in clean piece of plastic wrap and store in the freezer until serving.

  5. To serve: Remove from the freezer about a half hour before serving. The ball can also be stored in the refrigerator for a day or two and will be in a softer state. Any longer than that, it should be stored in the freezer.
  6. Cut into wedges and serve with graham crackers, apple slices, or gingersnap cookies. 

Recipe Notes

Notes:

If you don't have Pumpkin Pie Spice you can make your own. The substitute for 1 Tablespoon of Pumpkin Pie Spice is: 1 1/2 teaspoons cinnamon, 1/2 teaspoon nutmeg, 1/2 teaspoon ginger, 1/4 teaspoon allspice.

If you want to make a smaller batch cut the recipe in half. It's just as good and better for a smaller group.


Filed Under: Appetizers

Mini Chicken Pot Pie

November 12, 2018

I’ve been making chicken pot pies for years so I wanted to share my recipe. I turned them into mini chicken pot pies for all the people that like single servings. You can also make this recipe as a whole pie too. Since I’m posting this right before thanksgiving it’s excellent with your left over turkey so make a turkey pot pie instead of chicken.

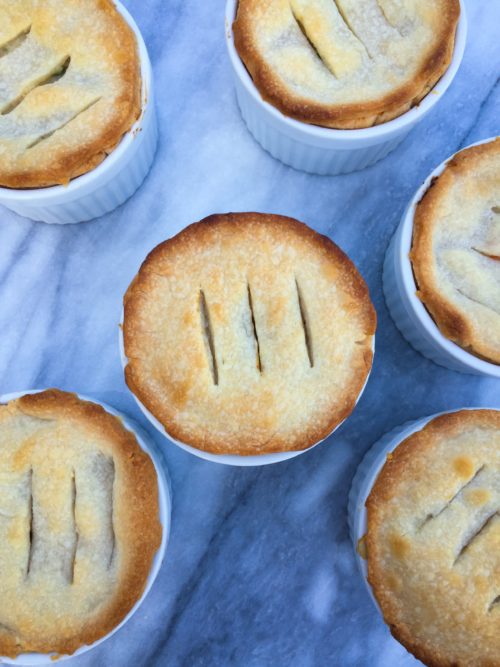
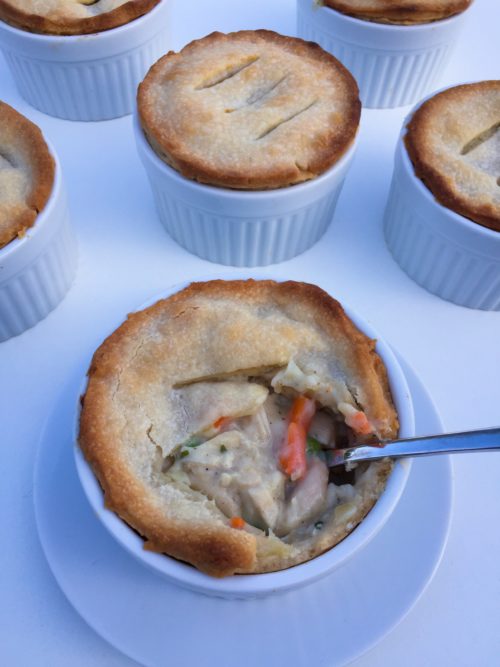
You can make your own pie crust or buy it from the store. It’s so much easier to buy it and it tastes just as good. I’ve made it both ways.  I like to use rotisserie chicken for my pot pies but you can use any type of chicken you want.
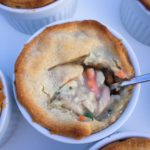
Since I’m usually cooking for one or two people I thought using the ramekins and having single servings was a better idea.  It’s great for reheating the next day as well.  Eating these mini chicken pot pies for a few days will not be a disappointment.

Bake the mini chicken pot pies and devour! It will be hot and steamy on the very first bite!

ENJOY!!!

Print

Mini Chicken Pot Pie

Course Main Course
Cuisine American
Keyword Mini Chicken Pot Pie
Servings 6 pies

Ingredients

  • 2 15 ounce pie crust 2 should come in one package
  • 1-3 cups chicken see notes
  • 1/4 cup butter
  • 1/3 cup flour
  • 1/3 cup chopped onion
  • 2 cloves garlic minced
  • 3/4 tsp salt
  • 1/2 tsp pepper
  • 1 1/2 cups chicken broth
  • 1/2 cup milk
  • 2 cups mixed vegetables

Instructions

  1. Preheat oven to 425 degrees

  2. Spray non stick spray in the bottom of pie pan or ramekins. Divide the pie crust and place the crust into 6 ramekins. If you are making a whole pie place one pie crust in 9 inch pie pan.

  3. In medium sauce pan, melt butter over medium heat. Add onion and garlic, cook until tender, about 2 minutes. 

  4. Stir in flour, salt and pepper. Cook stirring constantly, until mixture is bubbly, remove from heat.

  5. Stir in chicken broth and milk. Heat to boiling, stirring constantly. Boil and stir 1 minute.

  6. Stir in chicken and vegetables and remove from heat.

  7. Spoon chicken filling over the crust and place pie crust over the filling.  Flute edges and cut 3 slits on the top layer of the pie crust. If using a pie pan cut slits in several places all over the pie. 

  8. Bake at 425 degrees for 25 - 30 minutes or until the crust is golden brown.

Recipe Notes

You can use any type of chicken you want.  I usually use a rotisserie chicken.

Filed Under: Everyday Meals

Flatbread Pizza

November 10, 2018

I had some left over dough from my pull apart bread recipe that I totally love.  I decided to use it and make flatbread pizza with a pesto sauce that I picked up at my local Trader Joe’s.  Its simple and quick if you already have the dough prepared.  If not make some dough and cook a lot of flat bread pizzas.

I used the Trader Joe’s Pesto alla Genovese Basil Pesto for the base and topped it with  mozzarella cheese and sliced cherry tomatoes. I also added the everything but the bagel seasoning on top.  Trader Joe’s is the best for sauces and seasonings.

You can top your pizza with anything you want. Throw it in the over at 475 degrees for about 10-15 mins or until the edges are golden brown. Enjoy!


Print

Flat Bread Pizza

Cuisine Italian
Keyword Flat Bread PIzza

Ingredients

Ingredients:

  • 2 tsp Red Star® Platinum yeast
  • 1 tbsp granulated sugar
  • 3/4 cup milk warm
  • 3 tbsp unsalted butter at room temperature
  • 1 large egg
  • 2 1/3 cups all-purpose flour spoon & leveled, plus more as needed
  • 1 tsp salt

Cream Cheese / Butter Filling

  • 2 ounces brick style cream cheese at room temperature
  • 6 tbsp unsalted butter at room temperature
  • 1-2 teaspoons dried oregano
  • 1-2 teaspoon dried basil

Instructions

Directions:

Make the dough:

  1. Place the yeast and sugar in the bowl of a stand mixer fitted with a dough hook or paddle attachment. Or, if you do not own a stand mixer, a regular large mixing bowl. Heat the milk on the stove or in the microwave until warm to touch. Pour warm milk on top of yeast/sugar. Whisk gently to combine, then loosely cover with a clean kitchen towel and allow to sit for 5-10 minutes. The mixture will be frothy after 5-10 minutes.
  2. If you do not have a mixer, you can mix by hand in this step. Add the butter, egg, flour, and salt. Beat on low speed for 3 minutes. Dough will be soft. Transfer it to a lightly floured work surface. Using lightly floured hands, knead it for 1 minute. If the dough is too sticky to handle, add 1-3 more Tablespoons of flour, but you want a very soft dough. Shape into a ball.
  3. Place the dough in a greased bowl (I use nonstick spray to grease) and cover with plastic wrap or aluminum foil. Place in a slightly warm environment to rise until doubled in size, around 60-90 minutes. For this warm spot, I suggest using the oven. Preheat to 200°F (93°C), then turn the oven off after preheating. Place the covered bowl inside and shut the oven door. This is your warm environment.
  4. As the dough rises, prepare the filling in the next steps.

Make the cream cheese / butter filling:

  1. In a large bowl spoon all of the filling ingredients together until combined. Cover tightly and set aside until ready to use.
  2. Punch down the dough to release the air. Add the cream cheese filling to the dough and knead together.

  3. Cover with plastic wrap or aluminum foil and allow to rise once again in a slightly warm environment until puffy, about 45 minutes.
  4. Preheat oven to 475 degrees.

  5. Roll out the dough and make a flatbread pizza shape, top with any kind of sauce and add your toppings. Bake for 10-15 minutes of until the edges are golden brown.


Filed Under: Everyday Meals

Harry Potter Cake

November 5, 2018

One of my friends loves Harry Potter so I made her a Harry Potter Cake!  Any kid or even an adult would love to have this cake if they are a fan of Harry Potter.

I used the same cake recipe as my Naked Cake and I use buttercream frosting in the middle of the cake and red velvet for the top of the frosting. I wanted a deep red for the frosting of the cake so red velvet seemed to fit perfectly. Red and yellow are the colors of Harry Potter so I needed to make sure the whole cake were those colors.

Separate the batter into two bowls.  Add yellow food coloring to one bowl batter and red into the other.  Pour the batter into two separate 9 inch round pans and bake at 350 degrees for 30-35 mins.

While the cake is baking make the red velvet frosting.  Side note:  I had extra buttercream from a previous cake so I used that in the middle. If you don’t want to make a separate batch of buttercream for the middle just use the red velvet for the middle.

Let the cake cools completely. Cut the top of the cakes with a serrated knife to even out the top of the cake.

Place the red cake on the bottom and spread the top of the cake with buttercream or red velvet frosting. Stack the yellow cake on top and coat the whole cake with frosting. Cut out 4 long strips of fondant and lay the strips on top of the cake. Like the picture below.  Since I had the left over buttercream frosting I added yellow food coloring and used a round tip to pipe yellow dots around the cake. To get the Harry Potter logo I found a logo online and printed the logo and cut it out so I could trace the pattern using black fondant. Once the logo is cut out place it on top of the cake.

I had the glasses in my Halloween box from a Where’s Waldo costume and it worked perfectly. I got them at the local party store.

To make the happy birthday sign I printed happy birthday in red on yellow paper. Cut out diamond shapes around the letters and make sure to have enough paper to fold the diamonds in half so it can lay over the string.  I used two wooden dowels to hold the sign up.

Print

Harry Potter Cake

Course Dessert
Keyword Harry Potter Cake
Prep Time 1 hour
Cook Time 35 minutes
Total Time 1 hour 35 minutes
Servings 12 slices

Ingredients

Ingredients

Cake

  • 3 3/4 cups all purpose flour sifted
  • 1 tsp baking powder
  • 3/4 tsp tsp baking soda
  • 1 tsp salt
  • 1 1/2 cups unsalted butter room temperature
  • 2 cups granulated sugar
  • 5 large eggs room temperature
  • 1 tbsp pure vanilla extract
  • 1 3/4 cups buttermilk room temperature

Vanilla Buttercream (see notes)

  • 1 1/2 cups unsalted butter room temperature
  • 5 - 6 cups confectioners' sugar
  • 5 - 6 tbsp heavy cream
  • 1 tsp pure vanilla extract

Red Velvet Frosting

  • 1 cup unsalted butter room tempature
  • 1 8 ounce cream cheese room tempature
  • 2 1/2 tsp vanilla extract
  • 2 tsp gel based food coloring
  • 4 1/2 cups confectioners’ sugar
  • 1/4 cup unsweetened cocoa powder

Black and yellow fondant for decorating

Instructions

Instructions

Making the Cake

  1. Preheat oven to 350°F (177°C). Grease and lightly flour three 9-inch cake pan
  2. Whisk the flour, baking powder, baking soda, and salt together in a large bowl. Set aside.
  3. Using a handheld or stand mixer fitted with a paddle or whisk attachment, beat the butter and sugar together on high speed until smooth and creamy, about 3 minutes. Scrape down the sides and up the bottom of the bowl with a rubber spatula as needed.
  4. On medium-high speed, add 1 egg at a time, beating well after each addition. Beat in the vanilla extract. Scrape down the sides and up the bottom of the bowl with a rubber spatula as needed.
  5. With the mixer on low speed, add the dry ingredients in three additions alternating with the buttermilk, beginning and ending with the dry ingredients, and mixing each addition just until incorporated. Do not overmix this batter. The batter will be smooth, velvety, and slightly thick.
  6.  Pour/spread batter evenly into the 2 prepared cake pans.

  7. Bake for around 30-35 minutes or until the cakes are baked through. To test for doneness, insert a toothpick into the center of the cake. If it comes out clean, it is done. Allow cakes to cool completely in the pans set on a wire rack. The cakes must be completely cool before frosting and assembling.

Buttercream Frosting

  1. In a large bowl using a hand-held mixer or stand mixer fitted with a whisk or paddle attachment, beat the butter on medium speed until creamy - about 2 minutes.
  2. Add 5 and 1/2 cups confectioners' sugar, 5 Tablespoons heavy cream, and the vanilla extract, with the mixer running on low. Increase to high speed and beat for 3 full minutes.
  3. Add 1/2 cup more confectioners' sugar if frosting is too thin, 1 more Tablespoon cream if frosting is too thick.
  4. Yields about 4.5 cups of frosting.

Red Velvet Frosting

  1. Using an electric stand mixer fitted with paddle attachment, or handheld mixer and large bowl, beat butter on medium speed until creamy. Add cream cheese; beat until fully incorporated. Add vanilla and food coloring and mix until well blended. Gradually increase mixer speed to high and continue beating until light and fluffy, scraping down the sides of bowl as necessary with rubber spatula.
  2. In a large bowl, whisk together sifted confectioners’ sugar and cocoa. Gradually add confectioners’ sugar and cocoa mixture, beating on low speed (stir), until well combined. Beat on high speed until well combined and smooth while scraping down sides of bowl as necessary, about 2 minutes.

Assemble and decorate the cake:

  1. First, using a large serrated knife, slice a thin layer off the tops of the cakes to create a flat surface. Discard or save and eat later.
  2. Place 1 cake layer on your cake stand, cake turntable, or serving plate. Spread frosting evenly on top. 

  3. Top with 2nd cake layer and evenly cover the entire cake with frosting.

  4. Use a bench scraper to smooth out the frosting on the sides of the cake
  5. Cut out 4 long strips of yellow fondant and lay the strips on top of the cake.See picture for reference.  Since I had the left over buttercream frosting I added yellow food coloring and used a round tip to pipe yellow dots around the cake. 

  6. To get the Harry Potter logo I found a logo online and printed the logo and cut it out so I could trace the pattern using black fondant. Once the logo is cut out place it on top of the cake. 

Recipe Notes

Please note that you don't need to make a full batch of buttercream frosting for this recipe.  Cut the recipe in half if you want buttercream in the middle of the cake instead of red velvet. I also added yellow buttercream around the cake. I just wanted to list the buttercream frosting if you wanted the exact same cake. 

Filed Under: Cakes, Desserts

Primary Sidebar

Hello and Welcome

Hi! I'm Holly and welcome to my personal blog and thank you for taking the time to look through my recipes and hiking adventures. I hope you enjoy them as much as me. Stay connected to see upcoming blog posts! I'm excited to have you join!

Recent Posts

  • Chicken Tortilla Soup
  • Beef Bowls
  • Ice Cream Sandwiches
  • Mint Chocolate Delights
  • Peanut Butter Cookies

Archives

  • August 2022
  • April 2022
  • February 2022
  • January 2021
  • May 2020
  • April 2020
  • February 2020
  • November 2019
  • October 2019
  • August 2019
  • July 2019
  • June 2019
  • May 2019
  • April 2019
  • March 2019
  • February 2019
  • January 2019
  • December 2018
  • November 2018
  • October 2018
  • September 2018
  • August 2018
  • July 2018
  • June 2018
  • May 2018

Categories

Don’t Miss These!

Chocolate Chip Cookie Cake

Easy Deviled Eggs

Monster Cake

Marshmallow Caramel Rice Krispie Treats

Most Popular Recipes

Plum Muffins

Peanut Butter Blondie

Footer

My Favorites

stay connected

  • Facebook
  • Instagram
  • Pinterest

Don’t miss a recipe or an adventure!

Copyright© 2023 · Brunch Pro Theme by Feast Design Co.