• Skip to primary navigation
  • Skip to main content
  • Skip to primary sidebar
  • Skip to footer
  • Home
  • Recipes
  • Hiking
  • Contact

Holly in the PNW

The girl that can't sit still!

Archives for July 2018

Blueberry Mini Pies

July 30, 2018

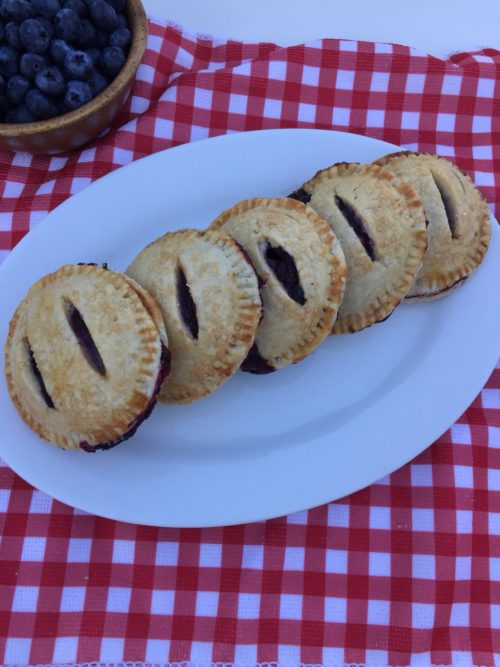
Summer blueberry picking is one of my favorite things to do and making mini blueberry mini pies to share with my friends and family.

The other day I went out blueberry picking with my girlfriends in North Bend at Bybee Farms which is 30 mins from Seattle. I also hike in North Bend a lot after work so it’s one of my favorite places to visit. It was a lovely HOT summer day to pick some delicious blueberries.  We picked over 9 pounds each so that means blueberry mini pies to make!

These blueberry mini pies are so easy to make and they are pretty quick!  Start by making the blueberry filling first since it needs to cool for 30 minutes.

The dough will make 5 blueberry mini pies.  You can double the dough recipe to make more. Roll out the dough and cut out 3.5 inch circles.  I used a cookie cutter I purchased from amazon.

https://www.amazon.com/Ateco-14403-3-5-Inch-Stainless-Cutter/dp/B002A8QOUU/ref=as_li_ss_tl?ie=UTF8&linkCode=sl1&tag=sallsbakiaddi-20&linkId=9c4ef3174120198d585eb15042a7cbb1

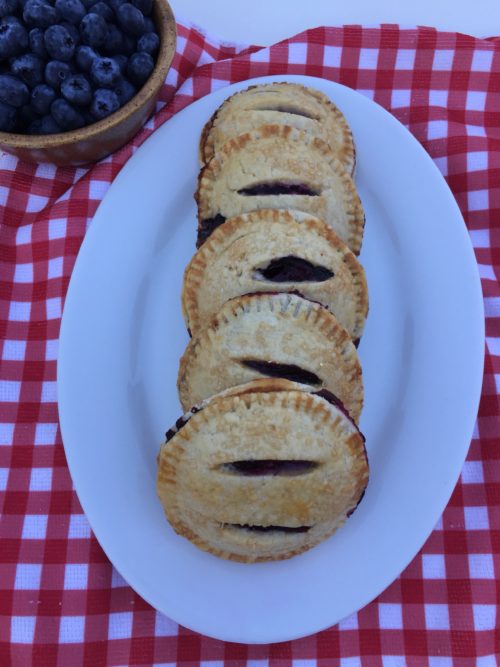
Assemble the blueberry mini pies and top with course sugar if desired. Serve them warm and top with vanilla ice cream!

Print

Blueberry Mini Pies


Course Dessert
Keyword Blueberry Mini Pies
Prep Time 30 minutes
Cook Time 30 minutes
Resting Time 25 minutes
Total Time 1 hour 25 minutes
Servings 5 pies

Ingredients

Pie Crust

  • 2 cups all purpose flour
  • 1 tsp salt
  • 2/3 cup plus 2 tbsp shortening
  • 4 - 5 tbsp water
  • 1 egg for top of crust
  • course sugar optional

Blueberry filling

  • 2 cups fresh blueberries
  • 1 1/2 tbsp cornstarch
  • 1/3 cup granulated sugar
  • 1 splash lemon juice

Instructions

Blueberry filling

  1. Combine the blueberries, cornstarch, granulated sugar, and lemon juice together in a medium saucepan or skillet over low-medium heat. While occasionally stirring, bring to a simmer. Allow to simmer for 2 minutes. Remove from heat and allow to cool uncovered at room temperature for 30 minutes. 

Pie Crust

  1. Measure flour and salt into bowl. Cut in shortening thoroughly. Sprinkle in water, 1 tablespoon at a time, mixing until all flour is moistened and dough almost cleans side of the bowl. (1 or 2 teaspoons water can be added if needed).

  2. Gather dough into a ball and turn the dough about a quarter turn after every few rolls. At any sign of sticking, sprinkle some flour underneath then keep rolling. 

  3. Roll out until it's about 12 inches in diameter and about 1/8th - 1/4th inch thick. Using your cookie cutter, cut into circles. Re-roll any scraps and cut into circles. 

  4. Refrigerate cut circles for at least 15 minutes before filling the hand pies.

  5. Meanwhile, preheat oven to 375°F (191°C). Line one large baking sheet with parchment paper or silicone baking mats.

Fill the mini pies

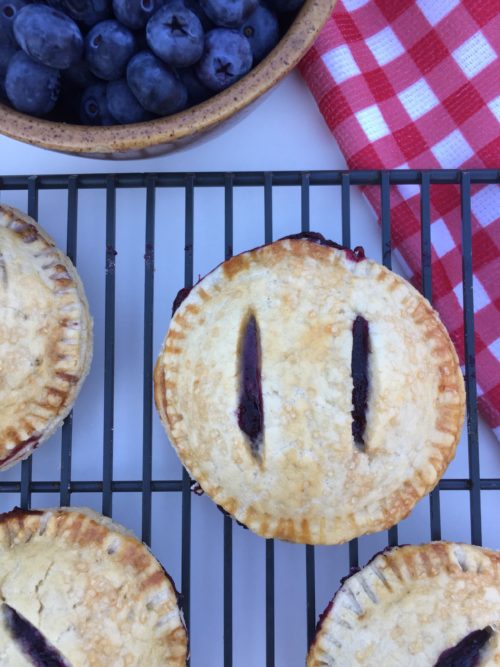
  1. Arrange half of the circles about 3 inches apart on prepared baking sheets. These are the bottom crusts. Using a sharp knife, cut slits into the remaining circles. These are the top crusts. The slits act as vents so that steam can escape as the hand pies bake. Place about 2 Tablespoons of filling in the center of each bottom crust. (Or however much fits while leaving the edges bare.) Place top crust on top. Press your fingers all around the edges to seal, then crimp with a fork. If the hand pies lost some shape, use your hands to form a round circle again. It's OK if some filling juice is leaking out. Lightly brush the top of the pie crust with egg wash mixture. Sprinkle with coarse sugar, if desired.
  2. At this point the hand pies can be baked, but if they don't feel cool to touch anymore, freeze for 10 minutes before baking. The colder they are going into the oven, the better they'll hold their shape.
  3. Bake for about 28-32 minutes or until they’re golden brown on top and around the edges. Rotate pans halfway through baking. Remove from the oven and allow the hand pies to cool on the baking sheets for 5 minutes, then transfer to a wire rack to cool until ready to handle. 

Filed Under: Desserts

Chicken Marinade

July 19, 2018

This chicken marinade is nice and juicy! Add this chicken marinade to any chicken meal. I make it a lot and it tastes the best when you BBQ the chicken on the grill. I usually grill chicken breasts or you can cut up the breasts and make really good chicken skewers out of them.

 Combine all ingredients and add marinade to the chicken over night to get the best flavoring.

Now fire up that grill and start grilling some chicken! This is 4 chicken breasts.

I suggest to soak the skewers in water for about 20 minutes before you grill.  Grill the chicken for about ten minutes and rotate the skewers so the chicken doesn’t burn.

Serve the chicken with rice and your favorite vegetable.  I added fresh basil to my rice and it was a nice kick to the whole meal.

I hope you enjoy this chicken marinade! I’ve also used the chicken marinade when I baked the chicken in the over or the Instant Pot.  All are great options.

Print

Chicken Marinade

Course Main Course
Keyword Chicken Marinade
Prep Time 10 minutes
Total Time 10 minutes

Ingredients

  • 4 chicken breasts
  • 3/4 cup vegetable oil
  • 1/3 cup soy sauce (less sodium may be used)
  • 1/4 cup worcestershire sauce
  • 1/4 cup red wine vinegar
  • 3 tbsp lemon juice
  • 1 tbsp dry mustard
  • 1 1/4 tsp black pepper

Instructions

  1. In a medium bowl, mix together oil, soy sauce, Worcestershire sauce, wine vinegar, and lemon juice. Stir in mustard powder and pepper. 

  2. Put the 4 chicken breasts in a zip lock bag and pour the marinate all over the chicken. I usually marinate the chicken over night. You can also put the chicken and marinate in a shallow dish.  The longer you marinate, the more flavor it will have.

Filed Under: Grilling

Watermelon Frosé (Frozen Rosé)

July 16, 2018

I love watermelon I mean love it! I usually sit on the couch or sit outside with a huge bowl of watermelon in my lap and demolish at least half of the watermelon. Yes I have issues but I can never stop eating it. Oh wait that’s most food. On a hot summer day I love to drink this watermelon frosé! It’s light and refreshing!

All you need is watermelon and a bottle of Rosè and maybe a splash of vodka.

Easy!

This was a fun recipe to sample. I tried a few versions. My favorite was watermelon, Rosè and a splash of vodka. Cut up some watermelon and freeze it. For the Rosè get two ice cube trays and pour the Rosè into the trays and freeze.

Blend the frozen watermelon and Rosè ice cubes together and you have a refreshing drink. Add a splash of vodka for a kick. Serve the watermelon frosè in a martini glass or a mini watermelon for some fun.

You can also leave the alcohol out and have a watermelon slushie. I think I drank two huge glasses in one sitting of the virgin drink. It’s so good on a hot summer day! Plus the young kids will love it too.

Remember drink responsibly and don’t drink and drive.

Print

Watermelon Frose (Frozen Rose)

Course Drinks
Keyword Watermelon Frose

Ingredients

  • 4 cups frozen watermelon
  • 6 cubes frozen rose

Instructions

  1. Cut up watermelon cubes and put them in plastic freezer bag or container, and freeze overnight or at least 6 hours.

  2. Fill up 2 ice cube trays with the wine and freeze overnight or at least 6 hours.
  3. Place the frozen watermelon and frozen wine cubes in a blender and blend all together.  If it's a little too thick you can add any left over wine or fresh watermelon and it should blend easier. 

  4. Pour into glasses and top with a splash of vodka if you like. 

Recipe Notes

When you blend the frozen watermelon and Rose together use your judgement on how much wine or watermelon to add. You can't make this recipe wrong. You can add more watermelon and less wine or more wine and less watermelon. Make it your own. My recipe is  just an outline. Enjoy!

Filed Under: Drinks

Cake Roll for 4th of July

July 2, 2018

Who doesn’t want a Cake Roll for 4th of July?! The 4th of July is just around the corner and I decided to make a cake roll! This cake roll is fun to make and it’s so patriotic with the red, white and blue colors for the 4th of July.  Let’s get rolling!

This cake roll will add extra pizazz to your 4th of July parties!

Start off my mixing the cake ingredients. I used Duncan Hines classic white cake mix but I’m sure you can use any brand of cake mix.  In the picture below you will also see the Wilton colored paste that I used.

Here is the outcome of the colors once divided up after mixing the cake roll batter.

Here comes the fun part. Pour each batter color into a sandwich bag. Start layers of colored stripes at an angle across the pan. Alternate blue and red until complete. Now Bake!

When it comes out of the oven immediately flip it over onto a new piece of parchment paper. Let it cool for ten minutes.

After 10 mins roll the cake roll.

Once completely rolled put the cake roll in the refrigerator for an hour. It may cool longer than an hour.

Unroll the cake roll and top the cake with the cream cheese frosting. The cake might split when you unroll it but take your time and be careful.  You can cover the splits with the filling.  Once the filling is spread over the cake roll tightly for the last time.

Slice up the cake roll and serve to all your friends and family at your 4th of July BBQ!  Happy 4th!

Print

Cake Roll - 4th of July

Course Dessert
Prep Time 40 minutes
Cook Time 12 minutes
Resting 1 hour
Total Time 52 minutes
Servings 10 slices

Ingredients

Ingredients

Cake

  • 1 box white cake mix
  • 1 cup sugar
  • 1 cup all purpose flour
  • 1 cup water
  • 3 eggs
  • 1 tsp vanilla extract
  • 1 cup plain greek yogurt

Filling

  • 1 package cream cheese 8oz room tempature
  • 1 cup powdered sugar
  • 6 tbsp butter softened
  • 1 tsp vanilla extract

Instructions

  1. In a large mixing bowl, combine cake mix, sugar and flour. Mix to combine.
  2. Add in water, eggs, vanilla extract, and yogurt to the dry ingredients and mix well using an mixer. Mix for approximately two minutes or until well blended

  3. Line the bottom of a 10 x 15-inch jelly roll pan with parchment paper spray the parchment paper with baking spray.

  4. Divide batter equally among 2 bowls.
  5. Use red and blue color paste to each bowl of batter until you get a rich color. Paste will give a darker color than standard coloring. I like to use Wilton paste.
  6. Pour batter into individual sandwich sized zip-lock bags, zip to close.

  7. Snip the tips off the bags and start layers of colored stripes at an angle across one pan. Alternate blue and red until complete. You will have a lot left over batter. Make another cake roll if you wish or make cupcakes with the remaining batter.

  8. Bake for about 10 - 12 minutes.

  9. Immediately flip cakes out of their pans, peel off the parchment paper, flip over onto a clean piece of parchment paper and immediately roll up the cake along with the parchment paper. Let it sit at room temperature for 10 minutes, then refrigerate for one hour or more until cool.

Cream Cheese Filling

  1. Make the filling by beating cream cheese, powdered sugar, butter, and vanilla until well blended.

  2. When the cake is cooled, unroll carefully, peeling the parchment paper off as you go.

  3. Spread the frosting over the top of the cake, then tightly re-roll.

  4. Refrigerate until ready to serve, cut into slices to serve.

Filed Under: Cakes, Desserts

Primary Sidebar

Hello and Welcome

Hi! I'm Holly and welcome to my personal blog and thank you for taking the time to look through my recipes and hiking adventures. I hope you enjoy them as much as me. Stay connected to see upcoming blog posts! I'm excited to have you join!

Recent Posts

  • Chicken Tortilla Soup
  • Beef Bowls
  • Ice Cream Sandwiches
  • Mint Chocolate Delights
  • Peanut Butter Cookies

Archives

  • August 2022
  • April 2022
  • February 2022
  • January 2021
  • May 2020
  • April 2020
  • February 2020
  • November 2019
  • October 2019
  • August 2019
  • July 2019
  • June 2019
  • May 2019
  • April 2019
  • March 2019
  • February 2019
  • January 2019
  • December 2018
  • November 2018
  • October 2018
  • September 2018
  • August 2018
  • July 2018
  • June 2018
  • May 2018

Categories

Don’t Miss These!

Simple Chocolate Truffles

Number Cookie Cake

Curry Couscous Salad

Ombre Vanilla Cake

Most Popular Recipes

Wonton Soup

Chocolate Almond Cookie Pudding Cups

Footer

My Favorites

stay connected

  • Facebook
  • Instagram
  • Pinterest

Don’t miss a recipe or an adventure!

Copyright© 2023 · Brunch Pro Theme by Feast Design Co.