• Skip to primary navigation
  • Skip to main content
  • Skip to primary sidebar
  • Skip to footer
  • Home
  • Recipes
  • Hiking
  • Contact

Holly in the PNW

The girl that can't sit still!

Archives for May 2018

Little Si

May 9, 2018

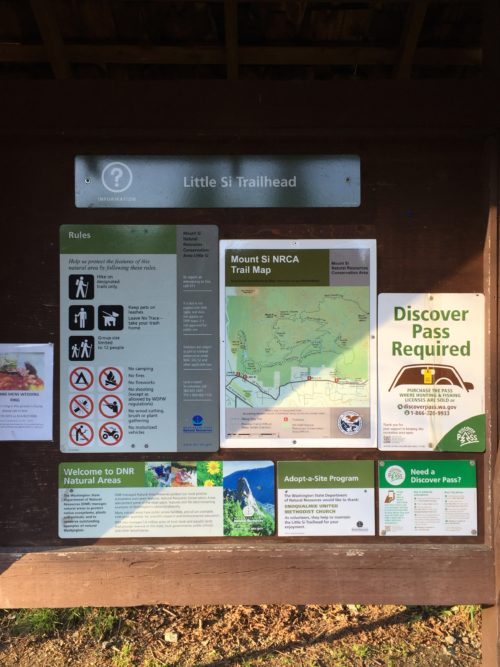
Living in Seattle and being able to drive 45 minutes to hike has it’s perks!  It’s so great to get out of the busy city and out into the Wilderness.  I try and hike once a week and the first hike this Spring was Little Si in North Bend. I’m so glad it’s lighter later in the evenings so we are able to do this.

It’s a short hike that took us one hour each way.  Remember to always take water with you!


LOCATION

Snoqualmie Region — North Bend Area

View map below

LENGTH

4.7 miles, roundtrip

ELEVATION

Gain: 1300 ft.
Highest Point: 1550 ft.
On our way up it was an easy incline.
   
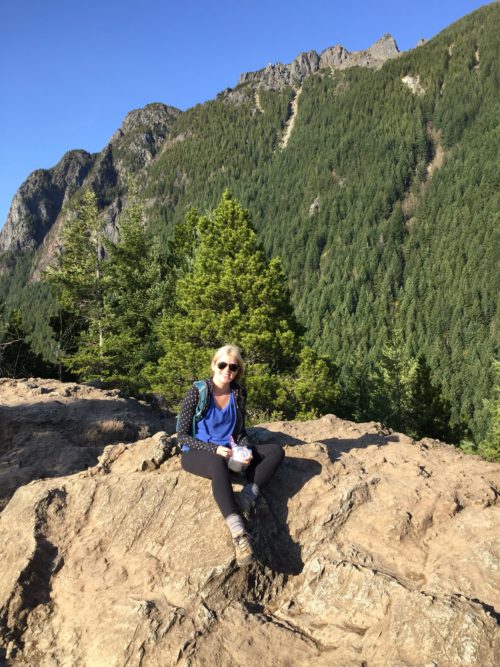
Reached the top in an hour and it was a nice clear day. We always bring our dinner and rest at the top to enjoy the views. My staple item is PB&J and my homemade trail mix. I will share my trail mix recipe in an upcoming post.
    
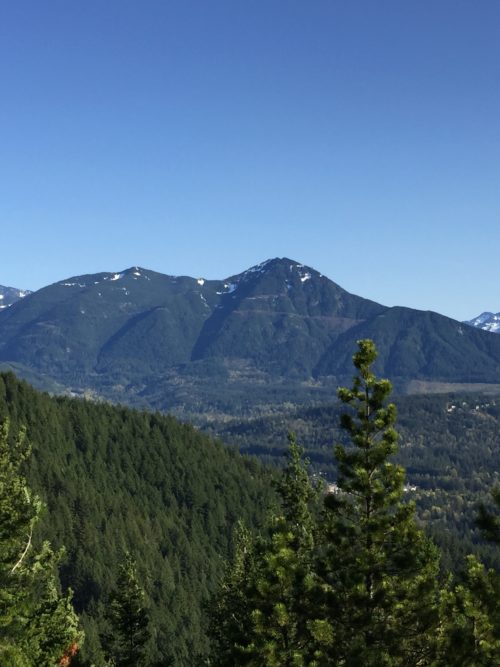
Heading back down and had to take this shot. My favorite picture of the night.
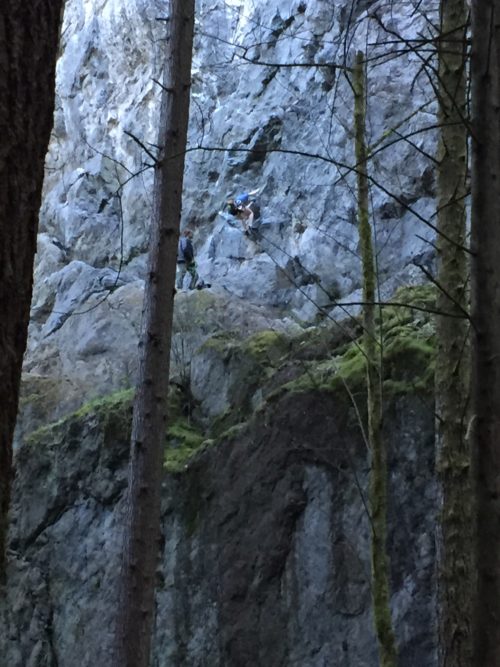
There might be a surprise in store for you when hiking. On our way down we saw some people rock climbing. It was really neat to see their talent.  They are so brave!
If you want more information on the hike please comment below and I will answer any questions you might have. Enjoy hiking in the PNW!

Filed Under: Hiking

Pineapple Chicken with Rice

May 8, 2018

Whenever I think of pineapple I think of paradise! Sitting on a beach drinking Pina Coladas all day long. I decided to bring a fresh Pineapple home and prepare Pineapple Chicken with Rice for my family.

I was recently in the store and I was walking through the produce section and noticed that the pineapples were on sale. I thought to myself I need to make a pineapple dish and I bought a couple to experiment with.  I did some research on different types of pineapple dishes and this was my end result. It was so delicious and I even served it to my family that were visiting from out of town. They loved it!

You can also hollow out the pineapple and serve the meal in that! It will be a hit I promise!

Print

Pineapple Chicken with Rice

Course Main Course
Prep Time 20 minutes
Cook Time 15 minutes
Total Time 35 minutes
Servings 4 people

Ingredients

  • 2 pounds Chicken Breast
  • 1 tbsp Olive Oil extra virgin
  • 1/4 cup Pineapple Juice
  • 2 tbsp Low Sodium Soy Sauce may use regular
  • 2 tbsp Chicken Broth
  • 2 tbsp Hoisin Sauce
  • 1/4 cup Brown Sugar may use less if you don't want it too sweet
  • 1 clove Garlic minced
  • 1 tsp cornstarch
  • 1 cup diced pineapple

Instructions

  1. In a medium saucepan, whisk together the pineapple juice, soy sauce, chicken stock, hoisin sauce, brown sugar, garlic and cornstarch. Bring the mixture to a boil and cook until the mixture has reduced to about 1 cup and is the consistency of thick syrup. Set the sauce aside.
  2. Add the olive oil to a large nonstick skillet set over medium-high heat. Add the chicken to the pan and season it with salt and pepper. Cook the chicken, stirring, until it is no longer pink, about 5 minutes. Drain off any liquids then add the sauce to the pan and stir until combined. Add the pineapple and cook, stirring, for an additional 1 minute.

  3. Serve over rice

Filed Under: Everyday Meals

Coffee Cake

May 6, 2018

Coffee Cake is one of my all time favorite morning treats. It sure is delightful with a hot cup of coffee or tea.

Every time I walk into a coffee shop I stare at the pastry case and I want to shovel all their coffee cake into my mouth!  I decided to try and make my own.   I pretty much ate the entire pan in one weekend. Let’s say I can’t keep this around.  I hope you enjoy this as much as I did!


Print

Coffee Cake

Course Breakfast
Prep Time 15 minutes
Cook Time 30 minutes
Total Time 45 minutes
Servings 8

Ingredients

Cake

  • 1 package Yellow Cake Mix mix only, not prepared
  • 1 cup Plain Greek Yogurt
  • 1/4 cup Butter
  • 1 tsp Vanilla Extract

Crumble topping

  • 1 1/4 cups Flour
  • 2/3 cup Brown Sugar
  • 1/2 cup Sugar
  • 1 tsp Cinnamon
  • 1/2 cup Butter chilled & cut into cubes

Instructions

  1. Preheat oven to 350 and grease a 9 x13 inch baking dish with cooking spray.

  2. Prepare the cake. Combine cake mix, egg, greek yogurt, melted butter, and vanilla and mix until combined. It's okay if the batter still has some lumps.

  3. To make the crumble. Whisk together flour, brown sugar, sugar, salt, and cinnamon. Cut in chilled butter until crumbly. Set aside. 

  4. Spoon half the cake batter in the bottom of the greased baking dish. Take half of the crumble mixture and evenly sprinkle over the first layer of batter. Grease a rubber spatula and gently spread the remaining batter over the crumble (see note). Top with remaining crumble.

  5. Bake for 30-35 minutes until an inserted toothpick comes out clean. Serve warm.

Recipe Notes

This takes a little finessing but it's worth it if you just work with it. If you don't want to worry about working with the batter (which is thick) to make the layers, you can spread all of the batter in the pan, then top with all of the crumble and bake as directed.


Filed Under: Desserts

Easy Deviled Eggs

May 1, 2018

My whole family insists on me bringing my Easy Deviled Eggs every time we have a family gathering. They are so easy and quick to make! I bring these to Easter dinner every year. These will make a great addition to any event or potluck and will be devoured quickly!

I used a piping bag and the star tip to create this design. Using the star tip makes them all look uniform or you can play with the design a little. If you don’t have a piping bag just scoop the yolk filling into the egg whites with a spoon.

Enjoy!!

Print

Easy Deviled Eggs

Course Appetizer
Keyword Deviled Eggs
Servings 12

Ingredients

  • 12 eggs hard boiled
  • 3/4 cup mayonnaise
  • 1 tbsp dry mustard ground
  • 1 tsp pepper
  • salt to taste
  • paprika to garnish

Instructions

  1. Hard boil the eggs (see recipe notes) and peel. Cut the eggs lengthwise. Remove the yolks and place in a medium size bowl. Place the egg whites on a serving platter.

  2. Add the mayonnaise, dry mustard, pepper and salt to taste to the bowl with the yolks.

  3. Beat all ingredients together until smooth. 

  4. Evenly disperse heaping teaspoons of the yolk mixture into the egg whites. Or use a piping bag with a star tip to fill each egg white half with the yolk mixture. Sprinkle with paprika and serve.

Recipe Notes

I used my Instant Pot to hard boil my eggs. You could use this method or see below for stovetop method. Either method you choose will work!

Instant Pot Method:

PREPARATION

  1. 5-Minute Quick Pressure Release Method: 
    • Pour 1 cup of water into the Instant Pot and place a steamer basket or the trivet into the pot. Gently place up to 12 eggs into the basket or on top of the trivet, taking care not to crack the eggs as you add them. Secure the lid and set the Pressure Release to Sealing. Select the Manual setting and set the cooking time for 5 minutes at high pressure.
    • While the eggs are cooking, prepare an ice bath. When the timer goes off, let the pressure release naturally for 5 minutes, then move the Pressure Release to Venting to release the remaining steam. Open the pot and transfer the eggs to the ice bath to cool. Peel when ready to serve.

Stovetop Method:

  1. Place eggs in a single layer in a saucepan and cover with enough water that there's 1 1/2 inches of water above the eggs. Heat on high until water begins to boil, then cover, turn the heat to low, and cook for 1 minute. Remove from heat and leave covered for 14 minutes, then rinse under cold water continuously for 1 minute.

Filed Under: Appetizers

Mini Pretzel Bites with Cheese Sauce

May 1, 2018

Mini Pretzel Bites with Cheese Sauce are a great appetizer for any party! These mini pretzel bites will be gobbled up in no time and your guests will secretly wish you made a double or even a triple batch.

The cheese sauce gives it a little extra kick to the nice soft salted mini pretzels.  Cheese sauce is just an added bonus! YUMMY!

Find a huge bowl or platter and serve away. They will be gone is minutes! If you don’t want to have cheese sauce with the pretzels add another condiment like mustard or ranch. Having them by themselves is even good!


Print

Mini Pretzel Bites with Cheese Sauce

Prep Time 1 hour
Servings 5 Dozen

Ingredients

  • 1 1/2 cups warm water plus 9 more cups for step 5
  • 1 packet Red Star Platinum instant yeast
  • 1 tsp salt
  • 1 tbsp light brown sugar
  • 1 tbsp unsalted butter previously melted and not scorching hot
  • 3.75 - 4.25 cups all-purpose flour more for the counter surface
  • 1/2 cup baking soda
  • 1 large egg beaten
  • coarse sea salt for sprinkling

Cheese Sauce

  • 1/4 cup unsalted butter
  • 1/4 cup all-purpose flower
  • 2 cups whole milk
  • 2 cups sharp cheddar cheese grated
  • 2 tbsp hot sauce
  • 1 tsp red chili flakes
  • salt & pepper to taste

Instructions

  1. Whisk the yeast into 1 and 1/2 cups warm water. Allow to sit for 1 minute. Some clusters of yeast may remain. Add salt, brown sugar, and melted butter. Whisk until fairly combined. Slowly add 3 cups of flour, 1 cup at a time. Mix with a wooden spoon (or dough hook attached to stand mixer) until dough is thick. Add 3/4 cup more flour until the dough is no longer sticky. If it is still sticky, add up to 1/4 cup more. Poke the dough with your finger - if it bounces back, it is ready to knead.
  2. Turn the dough out onto a lightly floured surface. Knead the dough for about 3 minutes, then shape into a ball. Place in a large greased mixing bowl. I usually use nonstick spray to grease it, but olive oil works too. Cover and let the dough rest in a warm area for about 10 minutes.
  3. Preheat oven to 425°F (218°C). Line two large baking sheets with parchment paper or silicone baking mats. Set aside.
  4. With a sharp knife, cut ball of dough into 6 sections. Roll the dough into six 20-inch long ropes. Cut the rope into 1.5 inch pieces to make bites.
  5. Combine 9 cups of water and the baking soda in a large pot and bring to a rapid boil. Drop 8-10 pretzel bites into water and let sit for 20 seconds. Remove with a spatula and place onto the prepared baking sheet. Make sure the bites aren't touching.
  6. Brush beaten egg over each pretzel bite. Sprinkle with sea salt. Bake batches for 15 minutes each, or until golden brown.
  7. Remove from oven and serve with cheese sauce, mustard, ranch or any condiment you enjoy. Pretzel bites remain fresh for up to 3 days in an airtight container, though they will lose some softness.

Cheese Sauce

  1. Melt the butter in a saucepan over medium heat. Sprinkle the flour over the top, stirring constantly until a thick paste forms, 1 to 2 minutes.
  2. Slowly add the milk to the flour/butter paste in a steady stream, whisking constantly. Continue cooking, whisking constantly until the mixture thickens, about 5 minutes. It should be thick but still pourable. Add the cheese, whisking constantly until it is melted. Add the hot sauce and red chili flakes. Taste, then add salt and pepper to taste. Add more cayenne and/or hot sauce if preferred.
  3. The sauce will thicken upon cooling. Store leftovers covered tightly in the refrigerator. Heat over stovetop or in the microwave before serving again.

Filed Under: Appetizers

Chocolate Cake Pops

May 1, 2018

Chocolate Cake Pops are the perfect dessert if you don’t want to binge on eating a lot of cake. Bite size means personal size! But you can eat more than one of these chocolate cake pops. Trust me I ate more than one.

Get ready to have some fun making these chocolate cake pops.  It’s a process but it’s fun from the beginning and they turn out delicious.  I couldn’t believe how perfect the ratio was between the cake and frosting. My mouth is watering as I type this cause I want to eat more!

Chocolate cake pops are fun to decorate anyway you want.  I used two different types of sprinkles but you can use anything to make them your way. Get creative! Sprinkles, dust powder, mini candies and you can even get other colors in the coating to make swirl shapes with different colors.

These are great as a gift and even take them to your next party. Wrap them up in cellophane mini bags and tie them with ribbon. People will love you after they eat these chocolate cake pops!


Print

Chocolate Cake Pops

Course Dessert
Prep Time 1 hour
Resting time 2 hours
Servings 40 cake pops

Ingredients

  • 1 cup all-purpose flour spoon & level
  • 1 cup granulated sugar
  • 6 tbsp unsweetened natural cocoa powder
  • 1/2 tsp baking soda
  • 1/4 tsp salt
  • 1/2 cup vegtable oil
  • 2 large eggs at room tempature
  • 1/2 cup hot water

Chocolate Frosting

  • 6 tbsp unsalted butter soften, at room tempature
  • 3/4 cup confectioners' sugar
  • 1/2 cup unsweetened natural cocoa powder
  • 2-3 tsp heavy cream or milk
  • 1/2 tsp pure vanilla extract

Chocolate Coating

  • 12 ounces candy melts or coating
  • sprinkles
  • lollipop sticks

Instructions

  1. Preheat oven to 350°F (177°C). Grease a 9-inch pan (round or square)

Chocolate Cake

  1. Whisk the flour, granulated sugar, cocoa powder, baking soda, and salt together in a large bowl. Set aside. Whisk the oil, eggs, and vanilla together in a medium bowl. Pour the wet ingredients into the dry ingredients, add the hot water, and whisk everything together until combined. Make sure there are no pockets of dry ingredients hiding.
  2. Pour the batter evenly into the prepared pan. Bake for 25-27 minutes or until a toothpick inserted in the center comes out clean. Allow the cake to cool completely in the pan set on a wire rack.

Choloate Frosting

  1. With a handheld or stand mixer fitted with a paddle attachment, beat the butter on medium speed until creamy, about 2 minutes. This isn't a lot of butter and it will get stuck on the sides of the bowl, so you may need to scrape down the sides of the bowl with a rubber spatula to really help get it creamed. Add confectioners' sugar, cocoa powder, 2 teaspoons of heavy cream/milk, and vanilla extract with the mixer running on low. Increase to high speed and beat for 3 minutes until it really comes together. Add another teaspoon of milk/cream if it looks a little too thick.

  2. Crumble the cooled cake into the bowl on top of the frosting. Make sure there are no large lumps. Turn the mixer on low and beat the frosting and cake crumbles together until combined.
  3. Measure 1 scant Tablespoon of moist cake mixture and roll into a ball. Place balls on a lined baking sheet. Refrigerate for 2 hours or freeze for 1 hour.
  4. Melt the coating in a 2-cup liquid measuring cup (best for dunking!). Use a microwave or you can use a double boiler and pour some at a time into the liquid measuring cup. Let the coating cool down for a few minutes before you begin dipping. If it's too hot when you dip, the coating will crack.

Coat the cake balls

  1. Remove only 2-3 cake balls from the refrigerator at a time. (Keep the rest cold!) Dip a lollipop stick about 1/2 inch into the coating, then insert into the center or the cake ball. Only push it about halfway - 3/4 through the cake ball. Dip the cake ball into the coating until it is completely covered. Make sure the coating covers the base of the cake ball where it meets the lollipop stick. Very gently tap the stick against the edge of the measuring cup to allow excess coating to drop off. Decorate the top with sprinkles and place upright into a styrofoam block, box (flip the box upside down and poke the lollipops into the bottom of the box) or even tall shot glasses work. Repeat with remaining cake balls, only working with some out of the refrigerator at a time. The cake balls must be very cold when dipping!

  2. Coating will set within an hour. Store cake pops in the refrigerator for up to 1 week. You may freeze the cake pops up to 3 months.

Recipe Notes

If you don't want to use a lollipop stick you can always use a toothpick to dip the cake balls into the coating but make sure to stick the toothpick all the way in so it can hold the weight of the ball while dipping.

Filed Under: Desserts

Vanilla Naked Cake with Raspberry Filling

May 1, 2018

Vanilla Naked Cake with Raspberry Filling will make any Easter a better one! Making this will make everyone’s belly extremely happy after your home cooked meal. This cake is heavy and delightful and it won’t disappoint.

Three layers of vanilla naked cake with raspberry filling and vanilla frosting between each layer.

I dyed hard boiled eyes with shaving cream and food coloring to add decorations to the vanilla naked cake. This is a great project for kids.  Dyed Eggs

You can decorate naked cakes with several options such as edible flowers, berries, nuts, seeds, fresh herbs, sprinkles or anything you can think of. I even used edible green Easter grass that I found at my local Fred Meyer.

This was probably one of the best cakes I’ve made. It was moist and dense at the same time with great flavoring. Be prepared to eat more than one piece!


Print

Vanilla Naked Cake with Raspberry Filling

Course Dessert
Prep Time 45 minutes
Cook Time 25 minutes
Total Time 6 hours
Servings 12 servings

Ingredients

Cake

  • 3 3/4 cups all purpose flour sifted
  • 1 tsp baking powder
  • 3/4 tsp baking soda
  • 1 tsp salt
  • 1 1/2 cups unsalted butter room temperature
  • 2 cups granulated sugar
  • 5 large eggs room temperature
  • 1 tbsp pure vanilla extract
  • 1 3/4 cups buttermilk room temperature

Vanilla Buttercream

  • 1 1/2 cups unsalted butter room temperature
  • 5 - 6 cups confectioners' sugar
  • 5 - 6 tbsp heavy cream
  • 1 tsp pure vanilla extract

Raspberry Filling

  • 8 ounces fresh raspberries or frozen
  • 1 tbsp water
  • 3 tbsp granulated sugar
  • 1 tbsp cornstarch
  • 1/4 cup water

Instructions

Making the Cake

  1. Preheat oven to 350°F (177°C). Grease and lightly flour three 9-inch cake pan.

  2. Whisk the flour, baking powder, baking soda, and salt together in a large bowl. Set aside.
  3. Using a handheld or stand mixer fitted with a paddle or whisk attachment, beat the butter and sugar together on high speed until smooth and creamy, about 3 minutes. Scrape down the sides and up the bottom of the bowl with a rubber spatula as needed. 
  4. On medium-high speed, add 1 egg at a time, beating well after each addition. Beat in the vanilla extract. Scrape down the sides and up the bottom of the bowl with a rubber spatula as needed. 

  5. With the mixer on low speed, add the dry ingredients in three additions alternating with the buttermilk, beginning and ending with the dry ingredients, and mixing each addition just until incorporated. Do not overmix this batter. The batter will be smooth, velvety, and slightly thick.
  6. There is about 8 cups of batter total, so each layer will be 2 and 2/3 cups. Pour/spread batter evenly into prepared cake pans. 

  7. Bake for around 25-26 minutes or until the cakes are baked through. To test for doneness, insert a toothpick into the center of the cake. If it comes out clean, it is done. Allow cakes to cool completely in the pans set on a wire rack. The cakes must be completely cool before frosting and assembling.

Making the Buttercream Frosting

  1. In a large bowl using a hand-held mixer or stand mixer fitted with a whisk or paddle attachment, beat the butter on medium speed until creamy - about 2 minutes. 

  2. With the mixer running on low, add 5 and 1/2 cups confectioners' sugar, 5 tablespoons heavy cream, and the vanilla extract. Increase to high speed and beat for 3 full minutes. 

  3. Add 1/2 cup more confectioners' sugar if frosting is too thin, 1 more tablespoon cream if frosting is too thick. 

  4. Yields about 4.5 cups of frosting.

Making the Raspberry Filling

  1. Place raspberries, 1 tablespoon water, and white sugar in a blender and pulse several times to chop raspberries; blend until pureed, about 30 seconds.
  2. Whisk cornstarch with 1/4 cup water until thoroughly combined; pour mixture into the raspberry mixture in the blender and blend again until smooth.
  3. Pour raspberry mixture into a saucepan and simmer over low heat until thickened, about 5 minutes. Let the raspberry filling cool.

Assemble and decorate the cake:

  1. First, using a large serrated knife, slice a thin layer off the tops of the cakes to create a flat surface. Discard or save and eat later.  

  2. Place 1 cake layer on your cake stand, cake turntable, or serving plate. Spread 1 and 1/2 cups of frosting evenly on top. Spread the raspberry filling right on top of the frosting (several spoonfuls) until the frosting is covered with the filling. Use your own judgement on how much to use. 

  3. Top with 2nd cake layer and evenly cover the top with another 1 and 1/2 cups of frosting and more raspberry filling. 

  4. Top with the third cake layer. Spread the remaining frosting on top and all around the sides using an icing spatula.
  5. Use a bench scraper to smooth out the frosting on the sides of the cake. 

  6. Decorate the cake with garnishes.
  7. Refrigerate the cake for 2-3 hours or up to 1 day before slicing and serving. If chilling for more than a few hours, loosely cover with plastic wrap after 1 hour of refrigeration (the frosting will "set" after about 1 hour and the plastic wrap won't really ruin your frosting at that point). And if you're chilling for more than a few hours, I suggest decorating with garnishes right before serving.

  8. Cover and store leftover cake at room temperature for 1-2 days or in the refrigerator for up to 1 week.

Recipe Notes

6 hours of total time includes resting time for the cake and raspberry filling to completely cool. 

Filed Under: Cakes, Desserts

Primary Sidebar

Hello and Welcome

Hi! I'm Holly and welcome to my personal blog and thank you for taking the time to look through my recipes and hiking adventures. I hope you enjoy them as much as me. Stay connected to see upcoming blog posts! I'm excited to have you join!

Recent Posts

  • Chicken Tortilla Soup
  • Beef Bowls
  • Ice Cream Sandwiches
  • Mint Chocolate Delights
  • Peanut Butter Cookies

Archives

  • August 2022
  • April 2022
  • February 2022
  • January 2021
  • May 2020
  • April 2020
  • February 2020
  • November 2019
  • October 2019
  • August 2019
  • July 2019
  • June 2019
  • May 2019
  • April 2019
  • March 2019
  • February 2019
  • January 2019
  • December 2018
  • November 2018
  • October 2018
  • September 2018
  • August 2018
  • July 2018
  • June 2018
  • May 2018

Categories

Don’t Miss These!

Bagel Bites

Cake Roll for 4th of July

Mason Jar Soup

Chicken Tortilla Soup

Most Popular Recipes

Blueberry Mini Pies

Artichoke Parmesan Dip

Footer

My Favorites

stay connected

  • Facebook
  • Instagram
  • Pinterest

Don’t miss a recipe or an adventure!

Copyright© 2023 · Brunch Pro Theme by Feast Design Co.