• Skip to primary navigation
  • Skip to main content
  • Skip to primary sidebar
  • Skip to footer
  • Home
  • Recipes
  • Hiking
  • Contact

Holly in the PNW

The girl that can't sit still!

Archives for April 2019

7-Layer Bean Dip

April 29, 2019

When I get invited to a BBQ I have two staple items that I bring: 7-layer bean dip and Asian Cabbage Salad (coming to the blog soon!). Now that the sun is shining, people are itching to sit outdoors and fire up their backyard grills. I love bringing my 7-layer bean dip. Can’t go wrong with any type of dip and chips. YUM! Plus Cinco De Mayo is right around the corner and you always need a 7-layer bean dip to add to the mix of Mexican foods!

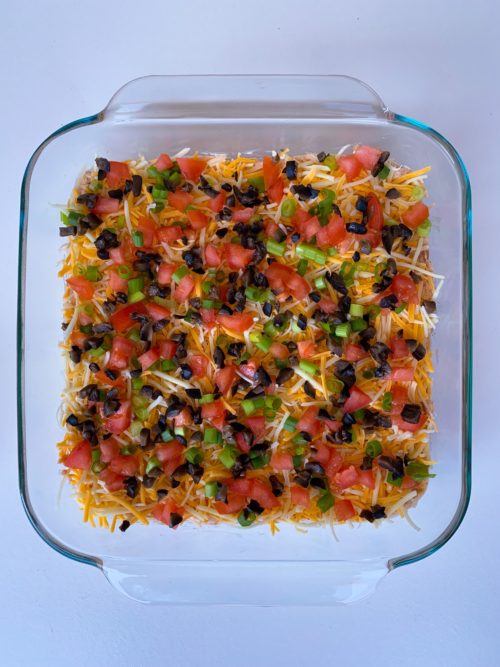
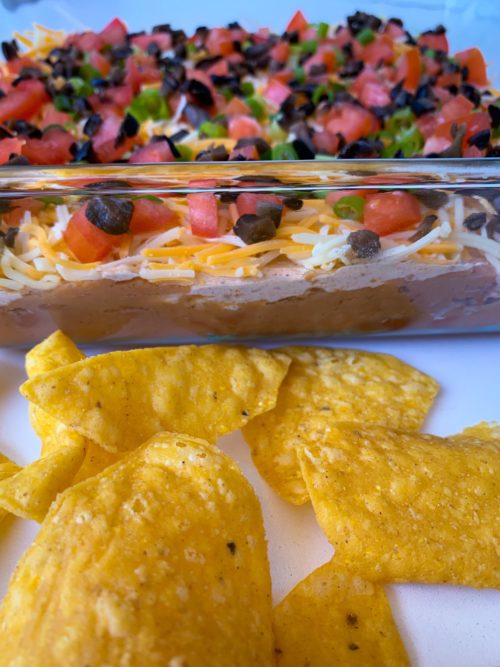
Refried beans, sour cream mixed with taco seasoning, shredded cheese, diced roma tomatoes, green onions and chopped olives. You can also add jalapenos and cilantro.

Grab those tortilla chips and dig in!  Serve with some salsa on the side if desired.

Enjoy!!!

Print

7-layer bean dip

Course Appetizer
Cuisine Mexican
Keyword 7-layer bean dip
Prep Time 15 minutes
Servings 12 servings

Ingredients

  • 1 14 ounce can refried beans
  • 1 6 ounce regular or fat free sour cream
  • 1 package taco seasoning
  • 1 cup shredded cheese (or more)
  • 1 roma tomatoe (diced)
  • 3 green onions (chopped)
  • 1 small can chopped olives (a few handfuls)

Instructions

  1. In a 9 X 9 glass or metal pan. Layer the bottom of the pan with refried beans. Add the taco seasoning to the sour cream and stir. Add the mixture over the refried beans, layer with cheese, diced tomatoes, green onions and handful of olives.

  2. For the cheese, tomatoes, green onions and olives you can add more if you desire.

Recipe Notes

You can double the recipe and use a 9x13 pan if you need it for a bigger group. I've made both sizes.


Filed Under: Appetizers, Grilling

Chocolate Peanut Butter Rice Krispie Treats

April 22, 2019

Yes another Rice Krispie treat! Again, my favorite cereal that makes amazing treats! Chocolate Peanut Butter Rice Krispie Treats might be the best one by far. I love peanut butter, and chocolate to top it off. Great combo of course!  These are another quick and easy recipe to make in a pinch when you don’t have a lot of time.

Surprisingly this recipe doesn’t call for marshmallows. First layer is the peanut butter, corn syrup, brown sugar, granulated sugar and a pinch of salt. Then simply finish it off with the easy chocolate topping.

I took all the Chocolate Peanut Butter Rice Krispie Treats to work and they were devoured within minutes!

Enjoy!!!

Print

Chocolate Peanut Butter Rice Krispie treats

Course Dessert
Cuisine American
Keyword Chocolate Peanut Butter Rice Krispie treats
Prep Time 15 minutes
Cook Time 5 minutes
Total Time 20 minutes
Servings 16 pieces

Ingredients

BARS

  • 1 cup light corn syrup
  • 1/2 cup granulated sugar
  • 1/2 cup light brown sugar
  • 1 cup creamy peanut butter at room temperature (don't use natural)
  • 1 pinch sea salt
  • 5 cups Rice Krispies

TOPPING

  • 1 cup semisweet chocolate chips
  • 3 tbsp whole milk
  • 2 tbsp creamy peanut butter at room temperature (don't use natural)

Instructions

Bars

  1. Line an 8.5x11-inch baking pan with parchment paper. Make sure the parchment paper is hanging over the sides. It will be easier to get the bars out of the pan when they are done. Set aside.

  2. Add the corn syrup, brown sugar and granulated sugar in a large saucepan over medium-low heat and stir to combine. Bring to a boil, stirring constantly. Once boiling, remove from the heat and immediately stir in peanut butter and a pinch of sea salt. Mix until well combined. Quickly stir in Rice Krispies. Spread into the prepared baking pan. Lightly grease your hands and press the mixture evenly in the pan. The harder you pack the mixture down into the pan the more dense the bars will be. For a lighter bar, press gently.

Topping

  1. In a small saucepan over low heat, combine chocolate chips, whole milk and peanut butter. Cook, stirring frequently until completely melted and smooth. Pour over the top of the bars and spread evenly.

  2. Let the chocolate topping cool. Remove the bars from the pan, cut and serve. 

Filed Under: Desserts

Caramel Popcorn with Almonds

April 8, 2019

It’s baseball season and it reminds me of caramel popcorn at the ball park! I had left over caramel sauce from my Marshmallow Caramel Rice Krispie Treats so I decided to pop some popcorn to finish off the sauce. The sauce worked perfectly with popcorn and I threw in some almonds. Caramel popcorn with almonds is a great little sweet snack!

Get your air popper out and grab those kernels and pop away! Fresh air popped popcorn is my favorite, but you can also use microwave popcorn.

Instead of paying $10 per bag at the ballpark, you can make your own for a lot less and it makes a lot more! You can sit on your couch and watch the game and eat this yummy treat and be just as happy.

If you’re not a fan of baseball, grab your favorite movie and devour this caramel popcorn with almonds. It will go quick!

Enjoy!!!

Print

Caramel Popcorn with Almonds

Course Appetizer, Dessert
Cuisine American
Keyword Caramel Popcorn with Almonds
Prep Time 20 minutes
Cook Time 10 minutes
Total Time 30 minutes
Servings 8 people

Ingredients

  • 1 cup popcorn
  • 6 ounces caramels (wrapped)
  • 1/2 cup heavy cream
  • 1/2 tbsp unsalted butter
  • 1 cup almonds
  • salt (to taste)

Instructions

  1. Grab a bowl or large pot. Pop the popcorn over the stove or use an air popper (you can use microwave popcorn as well). Add the almonds to the popcorn.

  2. In a medium saucepan place the unwrapped caramels, heavy cream and butter. Over medium heat stir constantly until creamy.

  3. Let the caramel sauce cool (about 10 minutes) then pour all over popcorn. Stir with a wooden spoon until covered evenly. Sprinkle salt over caramel popcorn if desired. 

Recipe Notes

Popcorn will last for a few days in an airtight container.

Filed Under: Appetizers, Comfort Foods, Desserts

Marshmallow Caramel Rice Krispie Treats

April 8, 2019

Anytime I have something in my cupboard taking up space, I always find something to make. I had both leftover marshmallows and caramels so I went out and bought my favorite cereal and decided to make Marshmallow Caramel Rice Krispie Treats. You have the softness of the marshmallow, the sweetness from the caramel and the crispiness from the cereal. It’s just a great combo. Did I mention they are bite-sized?! Of course, they are! If you check out my other recipes, I have a lot of bite-sized recipes.

Marshmallow Caramel Rice Krispie Treats are quick, easy and painless to make. You only need 5 ingredients to make these treats and they are ready to eat in under 40 minutes!

In a medium sauce pan, over medium heat combine the caramels, butter and heavy cream. Stir constantly until the caramels are melted with a nice creamy texture.

Insert a toothpick into the marshmallow, dip and coat the marshmallow in the caramel mixture. Tap off the excess sauce. Sprinkle Rice Krispies all over the dipped marshmallow.  Transfer to baking sheet, make sure you cover the baking sheet with parchment paper. Let rest for 30 minutes.

Enjoy!!!

You will probably have left over caramel sauce at the end of making these. It all depends on how many marshmallows you have. I made 36 and had sauce left over so I made Caramel Popcorn with Almonds.

Print

Course Dessert
Cuisine American
Keyword Marshmallow Caramel Rice Krispies Treat
Prep Time 30 minutes
Cook Time 10 minutes
Total Time 40 minutes
Servings 36 pieces

Ingredients

  • 1 11 oz bag wrapped caramels
  • 1 cup heavy cream
  • 1 tbsp butter
  • 1 bag large marshmallows (36 marshmallows)
  • 4 cups Rice Krispies cereal

Instructions

  1. In a medium saucepan place the caramels, heavy cream and butter. Over medium heat stir constantly until creamy.

  2. Using a toothpick dip each marshmallow into the caramel mixture. Tap off the excess.

  3. Pour the Rice Krispies in a medium size bowl and sprinkle the Rice Krispies over the caramel marshmallow until it's covered.

  4. Line a baking sheet with parchment paper and place the covered marshmallow on the baking sheet. Remove the toothpick if desired.  

  5. Let them rest for 30 minutes.

Filed Under: Desserts

Oreo Chocolate Cake

April 5, 2019

This Oreo Chocolate Cake is a great option to take to any party. Who doesn’t like Oreos?! Everyone will be drooling over your dessert. It’s made with vanilla buttercream frosting with smashed up Oreos incorporated in the frosting. You can make this a two- or three-layer cake. Another great option (which I have made many times) is to make cupcakes. Whatever your heart desires or your party needs call for, your Oreo Chocolate Cake will be a hit!

Whip up that cake mix, bake it, smash up some Oreo’s and frost it!

Grab a slice of Oreo Chocolate Cake with a tall glass of milk! Did I mention you need to have a large slice?! It’s nice and rich and the milk will go perfectly.

Bring it to parties, make it for yourself or make it as a birthday cake!

Enjoy!!!

Print

Oreo Chocolate Cake

Course Cake, Dessert
Cuisine American
Keyword Oreo Chocolate Cake
Prep Time 30 minutes
Cook Time 20 minutes
Resting time 1 hour
Total Time 1 hour 50 minutes
Servings 12 slices

Ingredients

  • 1 box chocolate cake mix (make as directed on box)

Oreo Buttercream frosting

  • 1 package Oreos divided
  • 1 1/2 cups unsalted butter room temperature
  • 4 - 5 cups confectioners' sugar
  • 1/4 cup heavy cream
  • 2 tsp pure vanilla extract

Instructions

  1. Mix the cake batter as directed on box. Make the cake with two cake pans or 24 cupcakes. If making cake, divide up the batter equally between the two pans you will be using. Once baked, let the cakes cool completely.  

Oreo Vanilla Butter Cream Frosting

  1. With a handheld or stand mixer fitted with a paddle attachment, beat the butter on medium speed until creamy, about 2 minutes. Add 4 and 1/2 cups confectioners’ sugar, heavy cream, and vanilla extract. Beat on low speed for 30 seconds, then increase to high speed and beat for 3 full minutes. Add up to 1/2 cup more confectioners’ sugar if frosting is too thin or another tablespoon of cream if frosting is too thick.

  2. Crush up 3/4 of the package of Oreos. I put the Oreos inside a large plastic Ziploc bag and used a rolling pin to crush them up. You can use a food processor as well. 

  3. Add the crushed Oreos to the frosting and beat on low speed to incorporate the Oreos.

  4. Remove the cakes from the pans.

  5. First, using a large serrated knife, slice a thin layer off the tops of the cakes to create a flat surface. Discard or save and eat later.
  6. Place 1 cake layer on your cake stand, cake turntable, or serving plate. Spread frosting evenly on top. Use your own judgement on how much to use. 

  7. Top with 2nd cake layer and evenly cover the top with frosting. Cover the sides of the cake with frosting. Use a bench scraper or a butter knife to smooth out the frosting on the sides of the cake. 

  8. Using a flower tip and a piping bag pipe frosting around the top of the cake. Sprinkle the top with crushed Oreos. Cut a few of the remaining Oreos in half and place on top.


Filed Under: Cakes, Desserts

Ding Dong Cake

April 2, 2019

A Ding Dong cake has always been on my list of things to bake. I loved Ding Dongs as a kid! The middle filling was to die for, I would eat it straight out of the cake. I finally had the perfect opportunity to make a Ding Dong cake for my boyfriend’s birthday. As a kid Ding Dongs were one of his favorites as well, so what a perfect opportunity to make an adult sized Ding Dong cake!

I used a bundt pan and cut the cake in half after it was completely cooled. It needs to be completely cooled before adding the filling or the filling will melt all over the cake. Add all the filling on the bottom layer of the cake and attach the top layer.  Place the cake on a wire rack and place parchment paper under the wire rack for easy clean up.

Heat up the heavy cream and butter in the microwave until it boils and add a full bag (2 cups) of chocolate chips and stir. Once the chocolate is melted, pour all over the cake. Let the chocolate set for maybe 15 – 20 minutes. Transfer the cake to a serving plate or cake stand.  I use this cake lifter to transfer my cakes if not already on a cake board.

Chill for 1 – 2 hours in the fridge before serving.

Your guests will tell you it tastes just like a Ding Dong! Make sure you have tin foil for leftovers because if there happens to be any left, they will definitely want to take some home. Be sure to store in the fridge.

Enjoy!!!

Print

Ding Dong Cake

Course Cake, Dessert
Cuisine American
Keyword Ding Dong Cake
Prep Time 40 minutes
Cook Time 45 minutes
Resting time 1 hour
Total Time 2 hours 25 minutes
Servings 12 Slices

Ingredients

Cake

  • 1 Devil's food chocolate cake mix
  • 1 3.9 oz instant chocolate pudding mix
  • ¾ cup vegetable oil
  • ¾ cup water
  • 4 eggs
  • ½ cup sugar
  • ½ cup sour cream
  • 1 tsp vanilla

Filling

  • 5 tbsp flour
  • 1 cup milk
  • 1½ tsp vanilla
  • 1 cup butter
  • 1¼ cup sugar

Ganache Frosting

  • 2 cups chocolate chips milk chocolate or semi-sweet
  • 1 cup heavy cream
  • 1½ tbsp butter

Instructions

Cake

  1. Preheat oven to 350 degrees F.

  2. In a large mixing bowl combine all of the cake ingredients and mix until well blended, about 3 - 4 minutes. 

  3. Grease a bundt pan with butter or non stick cooking spray and flour. You don't want to have the cake stick to the pan.

  4. Bake for 40 to 45 minutes. The cake will be done when a toothpick inserted comes out clean. Flip the pan upside down and place cake on a wire rack. Cool completely. The cake must be completely cooled before applying the filling. 

Filling

  1. Pour milk and flour into a medium sauce pan and whisk together very well to make sure no lumps are formed.

  2. Place pan on stove and turn the heat to medium and stir constantly to make a roux (see notes).

  3. Remove the roux mixture from the heat and add vanilla. Allow to cool.

  4. While the mixture is cooling, cream butter and sugar together in a medium bowl. The sugar may take up to 10 minutes to properly dissolve.

  5. Add the cooled roux to the butter mixture and beat again at a higher speed until well blended and the sugar is completely dissolved.

  6. Carefully cut the cake in half with a serrated knife. Remove the top half and set aside.

  7. Spoon filling over the bottom half of the cake and spread evenly.

  8. Replace the top of the cake on top of the filling. 

Ganache Topping

  1. In a microwave safe dish heat butter and heavy cream until it begins to boil (about 2 minutes).

  2. Pour in chocolate chips and stir until melted and smooth.
  3. Carefully place the cake back on the wire rack with parchment paper under the wire rack.

  4. Drizzle ganache topping all over the cake with a large spoon. 

  5. After the ganache is set (15 - 20 minutes) carefully move cake to cake stand or serving plate.

  6. Refrigerate cake for 1 to 2 hours before serving.

Recipe Notes

What is a Roux?

Roux is made by cooking equal parts flour and fat together until the raw flavor of the flour cooks out and the roux has achieved the desired color. Butter is the most commonly used fat, but you can also make roux with heavy cream, oil, bacon grease, or other rendered fats. It's used to thicken soups, sauces and even the filling for this ding dong cake.

Filed Under: Cakes, Desserts

Primary Sidebar

Hello and Welcome

Hi! I'm Holly and welcome to my personal blog and thank you for taking the time to look through my recipes and hiking adventures. I hope you enjoy them as much as me. Stay connected to see upcoming blog posts! I'm excited to have you join!

Recent Posts

  • Chicken Tortilla Soup
  • Beef Bowls
  • Ice Cream Sandwiches
  • Mint Chocolate Delights
  • Peanut Butter Cookies

Archives

  • August 2022
  • April 2022
  • February 2022
  • January 2021
  • May 2020
  • April 2020
  • February 2020
  • November 2019
  • October 2019
  • August 2019
  • July 2019
  • June 2019
  • May 2019
  • April 2019
  • March 2019
  • February 2019
  • January 2019
  • December 2018
  • November 2018
  • October 2018
  • September 2018
  • August 2018
  • July 2018
  • June 2018
  • May 2018

Categories

Don’t Miss These!

Pull Apart Bread

Reese’s Sugar Cookies

Mini Chicken Pot Pie

Red Velvet Cake Roll

Most Popular Recipes

Oreo Chocolate Cake

Vanilla Naked Cake with Raspberry Filling

Footer

My Favorites

stay connected

  • Facebook
  • Instagram
  • Pinterest

Don’t miss a recipe or an adventure!

Copyright© 2023 · Brunch Pro Theme by Feast Design Co.