• Skip to primary navigation
  • Skip to main content
  • Skip to primary sidebar
  • Skip to footer
  • Home
  • Recipes
  • Hiking
  • Contact

Holly in the PNW

The girl that can't sit still!

Archives for September 2018

Cat Cake

September 30, 2018

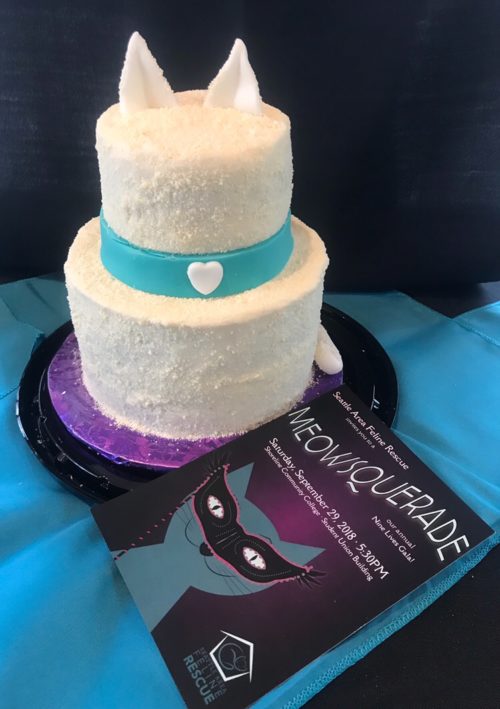
In a previous post when I posted my White Chocolate Raspberry Cake I mentioned I was making a cat cake for the Seattle Area Feline Rescue for their Nine Lives Gala. I donated this cat cake for their dessert dash. It was a fun cake to make and I’m so glad I was a part of it.  I hope they raised a lot of money to save some kitties. In this post I will share how I made the cat cake.

I’ll only be sharing what equipment you need. For the cake recipe please use my White Chocolate Raspberry Cake recipe.  A helpful hint when applying the white chocolate to the cake make sure you apply it right after you frost the cake. I waited too long and the white chocolate didn’t stick as well because the frosting harden up a bit.

Equipment needed:

Two 6 inch pans. I use these from Wilton

Two 4 inch pans. I use these from Wilton

Fondant for the ears, tail and collar.

Fondant Heart cut and press for the collar. You can use any decorations you want for the collar.

Fondant roller or rolling pin.  I suggest using the fondant rolling pin since it’s a lot easier to use and the fondant doesn’t really stick to this.

I always like to buy from Hobby Lobby and Joann Fabrics because they have daily coupons that I use for 40 – 50% off one regular priced item. You need to download their app on your phone. Sometimes Amazon is still cheaper.  I’m a bargain shopper!

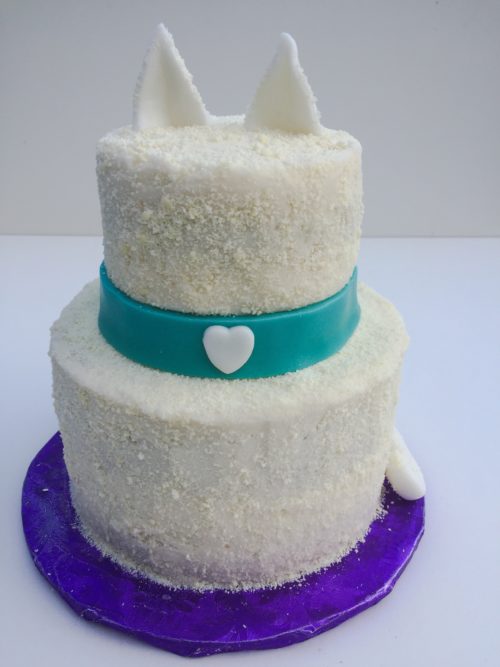
When rolling out the fondant roll it out to a 1/4 inch thick.  For the ears I cut out two triangles that were  a little more round. Press the triangles together and unfold them to get a crease in the middle of the ears. Cut slits on the top of the cake as the same size of the ears and attach the ears to the top of the cake. The slits help the ears stay in place so they won’t fall over. I used a little bit of water on the outside of the ears and sprinkled them with white chocolate to give them some texture.

Cut a one inch strip of colored fondant and wrap it around the second layer of the cake for the collar. Punch out a heart from the fondant and attach it to the collar.  If the heart doesn’t stick to the collar use a little bit of water so it sticks to the collar.

For the tail use your imagination. All I did was roll the fondant in a strip and I wrapped it around the cake and added some bends and curl to the end of the tail.  To attach the tail cut out a circle in the back of the cake and stick the tail in the circle of the cake.  Apply more frosting around the tail to make sure it doesn’t move. Add more white chocolate if needed.  Here’s a picture for your reference. It’s not perfect but it worked!

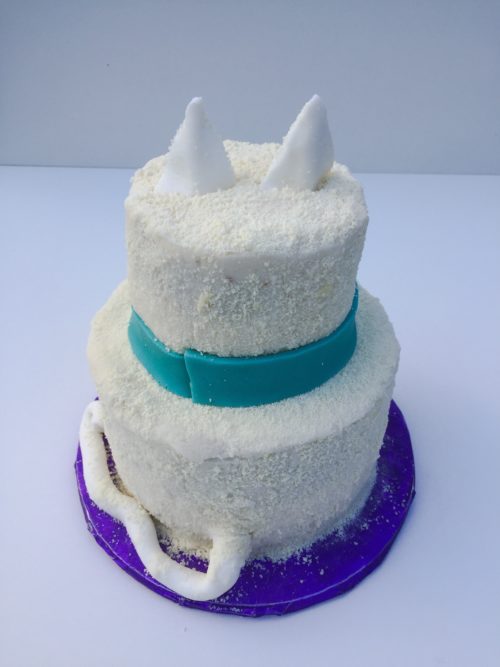
Here is more of a side view of the cake so you can see more of the tail.

I’m so happy that I could contribute for such a good cause! Who doesn’t love kitties and cat cakes?!


Filed Under: Cakes, Desserts

Pull Apart Bread

September 24, 2018

I love homemade bread and I’m trying to master my skills. This pull apart bread will melt in your mouth. If you like the everything but the bagel seasoning from Trader Joe’s you’ll love this pull apart bread!

Let’s start with the yeast don’t let yeast scare you it’s simple. I use red star yeast. Add the yeast, salt and warm milk to a mixing bowl. Whisk together, it will be frothy. Cover with a clean towel for ten minutes. Add the butter, egg, flour and salt in the mixing bowl and beat on low speed for about 3 minutes. Lightly flour your clean counter surface and kneed dough into a ball. Let your dough rise in a warm environment for about 60 minutes. You can preheat your oven to 200 degrees and shut it off and stick your dough in there. Cover your mixing bowl with plastic wrap or aluminum. Keep the door open closed. You want your dough to double in size.

While the dough is rising make your spread. You can use any type of spread you want for the middle. I used a little bit of cream cheese, butter, oregano and basil.

Preheat your oven to 350 degrees. Once your dough has doubled in size poke down on the dough and kneed again on a lightly floured surface. Roll out the dough. You want the dough to be about a 1/4 inch thick. Add the spread all over the dough.

Cut out circles. I use this Cookie Cutter which is a perfect size.

Grease a loaf pan. Fold the circles in half and place them upright in the loaf pan.

Melt two tablespoons butter and pour over prepared bread circles and sprinkle with everything but the bagel seasoning.

Bake for 30-35 mins until golden brown at 350 degrees.

This bread is so soft it will just melt in your mouth. I served it at a football party and it was gone in seconds! You might want to make a double batch!

Look at this middle! So soft!

Pull apart and devour! You won’t regret making this one!

Print

Pull Apart Bread

Course Side Dish
Keyword Pull Apart Bread
Servings 12 slices

Ingredients

Ingredients:

  • 2 tsp Red Star® Platinum yeast
  • 1 tbsp granulated sugar
  • 3/4 cup milk warm
  • 3 tbsp unsalted butter at room temperature
  • 1 large egg
  • 2 1/3 cups all-purpose flour (spoon & leveled), plus more as needed
  • 1 tsp salt

Cream Cheese / Butter Filling

  • 2 ounces brick style cream cheese at room temperature
  • 6 tbsp unsalted butter at room temperature
  • 1-2 teaspoons dried oregano
  • 1-2 teaspoon dried basil

Instructions

Directions:

  1. Make the dough: Place the yeast and sugar in the bowl of a stand mixer fitted with a dough hook or paddle attachment. Or, if you do not own a stand mixer, a regular large mixing bowl. Heat the milk on the stove or in the microwave until warm to touch. Pour warm milk on top of yeast/sugar. Whisk gently to combine, then loosely cover with a clean kitchen towel and allow to sit for 5-10 minutes. The mixture will be frothy after 5-10 minutes.

  2. If you do not have a mixer, you can mix by hand in this step. Add the butter, egg, flour, and salt. Beat on low speed for 3 minutes. Dough will be soft. Transfer it to a lightly floured work surface. Using lightly floured hands, knead it for 1 minute. If the dough is too sticky to handle, add 1-3 more Tablespoons of flour, but you want a very soft dough. Shape into a ball.
  3. Place the dough in a greased bowl (I use nonstick spray to grease) and cover with plastic wrap or aluminum foil. Place in a slightly warm environment to rise until doubled in size, around 60-90 minutes. For this warm spot, I suggest using the oven. Preheat to 200°F (93°C), then turn the oven off after preheating. Place the covered bowl inside and shut the oven door. This is your warm environment.
  4. As the dough rises, prepare the filling and topping in the next steps and grease a 9x5-inch loaf pan.
  5. Make the cream cheese / butter filling: In a large bowl spoon all of the filling ingredients together until combined. Cover tightly and set aside until ready to use. 

  6. Assemble the bread: Punch down the dough to release the air. Place dough on a lightly floured work surface and with a floured rolling pin, roll out until the dough is about 1/4 inch thick. Spread cream cheese filling on top. Using a 3.5 - 4 inch circle cookie cutter, cut into circles. I get about 12 circles. Fold circles in half and line in prepared baking pan, round side up.

  7. Cover with plastic wrap or aluminum foil and allow to rise once again in a slightly warm environment until puffy, about 45 minutes.
  8. Adjust the oven rack to the lower third position then preheat oven to 350°F.

  9. Brush dough with the 2 Tablespoons of melted butter and sprinkle with everything but the bagel seasoning on top. Use as much of the seasoning as you want.

  10. Bake until golden brown, about 30-35 minutes. If you find the top of the loaf is browning too quickly, tent with aluminum foil. Remove from the oven and place on a wire rack. Cool for 10 minutes in the pan, then remove from the pan and serve warm.

Filed Under: Appetizers, Everyday Meals

White Chocolate Raspberry Cake

September 14, 2018

White chocolate raspberry cake is in the works! Last week I got asked to make a cake for the Seattle Area Feline Rescue for their Meowsquerade Gala. They have a dessert dash! How fun is that?! I had an idea so I needed to practice and this is what I came up with. White chocolate raspberry cake. Yummy! I will publish the gala cake once it’s over so please stay tuned.

Sometimes I take the easy road and I like to use box cake mixes. Honestly I love them! They always turn out nice and moist. Let’s face it most of the time the frosting and the filling make the cake anyway.  Bake the cake in two round 6 inch pans. I use these Wilton 6 inch pans. Spray the pans with cooking spray and place parchment paper on the bottom of the pan. Spray the parchment with the cooking spray too. We don’t want the cake sticking to the bottom of the pan. I do this with all my cakes. While the cake is baking make the raspberry filling. I used the same raspberry filling as my vanilla naked cake recipe.

Let the raspberry filling and cake cool completely before you add the filling to the top of cake. While the filling and cakes are cooling shave the white chocolate with a cheese grater/zester. I used a 4 ounce white chocolate baking bar by Ghirardelli. I used a little over half of the shavings on the cake but it’s nice to have extra just in case you need more than you thought.

Make the frosting as per instructions. When the cakes are completely cooled cut the top of the cakes off so you have a flat surface on each cake. Take one cake and cover the top with frosting.  Apply the raspberry filling over the frosting. Try and keep the filling on the lighter side because you need to add the other cake on top of the filling.  If you have too much filling it will spill over the edges and it’s difficult to frost the rest of the cake.

Add the other cake on top of the filling.  Spread the rest of the frosting all over the cake. Try and keep the frosting even. I used this scraper.  Now apply the white chocolate shavings to the frosting.  You need to press the white chocolate against the frosting or it wont stick. Do it gently with your hands. Once it’s all over the cake top with raspberries!

Time to dig in and slice this white chocolate raspberry cake up! I got a lot of compliments and people had two slices (I did too) when I brought it over for a birthday party.


Print

White Chocolate Raspberry Cake

Course Dessert
Keyword White Chocolate Raspberry Cake
Servings 12 slices

Ingredients

Ingredients

  • 1 box white cake mix make as directed on box
  • 1 4 ounce white chocolate baking bar (ghirardelli)

Raspberry Filling

  • 1 tbsp water
  • 8 ounces fresh raspberries or frozen
  • 3 tbsp granulated sugar
  • 1 tbsp cornstarch
  • 1/4 cup water

Vanilla Buttercream

  • 1 1/2 cups unsalted butter room temperature
  • 5 - 6 cups confectioners' sugar
  • 5 - 6 tbsp heavy cream
  • 1 tsp pure vanilla extract

Instructions

Cake

  1. Preheat over to 350 degrees. Spray 2 - 6 inch pans and spray with cooking spray. Place parchment paper on bottom of pan and spray the parchment too. Make the cake as per instructions on the box. Bake for 25 - 30 minutes. To make sure it's done stick a tooth pick into the cake and if it comes out clean the cake is done.

  2. Grate the white chocolate baking bark into a small bowl and set aside. 

Making the Buttercream Frosting

  1. In a large bowl using a hand-held mixer or stand mixer fitted with a whisk or paddle attachment, beat the butter on medium speed until creamy - about 2 minutes.
  2. Add 5 and 1/2 cups confectioners' sugar, 5 Tablespoons heavy cream, and the vanilla extract, with the mixer running on low. Increase to high speed and beat for 3 full minutes.
  3. Add 1/2 cup more confectioners' sugar if frosting is too thin, 1 more Tablespoon cream if frosting is too thick.
  4. Yields about 4.5 cups of frosting.

Making the Raspberry Filling

  1. Place raspberries, 1 tablespoon water, and white sugar in a blender and pulse several times to chop raspberries; blend until pureed, about 30 seconds.
  2. Whisk cornstarch with 1/4 cup water until thoroughly combined; pour mixture into the raspberry mixture in the blender and blend again until smooth.
  3. Pour raspberry mixture into a saucepan and simmer over low heat until thickened, about 5 minutes. Let the raspberry filling cool.

Assemble and decorate the cake:

  1. First, using a large serrated knife, slice a thin layer off the tops of the cakes to create a flat surface. Discard or save and eat later.
  2. Place 1 cake layer on your cake stand, cake turntable, or serving plate. Spread frosting evenly on top. Spread the raspberry filling right on top of the frosting several spoonfuls until the frosting is covered with the filling. Use your own judgement on how much to use.

  3. Top with 2nd cake layer and evenly cover the top with more frosting and cover the rest of the cake with frosting.

  4. Use a bench scraper to smooth out the frosting on the sides of the cake. Top with raspberries. 


Filed Under: Cakes, Desserts

Red Velvet Cake Roll

September 6, 2018

It was my friend’s birthday and we both love red velvet cake so I thought I would try to master my cake rolling skills. These cake rolls are a bit finicky. So I decided to make this red velvet cake roll and see if my rolling skills were better than my last one that I made it July.

Make your red velvet cake batter as per instructions. Let it cool and roll it up. Some recipes say to use a thin towel which I did this time around but I think parchment paper works better. I didn’t get step by step pictures because I have a 4th of July Cake Roll that has them. Click the link on how to roll the red velvet cake roll. 4th of July Cake Roll

While the cake is cooling make the cream cheese frosting. Once the cake is cooled unroll it and apply the cream cheese frosting on top of the red velvet cake roll. Roll it back up without the towel or parchment paper. Don’t get discourage if the cake breaks it will still roll up nicely and the cream cheese frosting will keep it all together.

Add more powdered sugar to the top of the roll if you want. Slice up the red velvet cake roll and share away. People loved the cake roll idea when I served it at the birthday party.


Print

Red Velvet Cake Roll

Course Dessert
Keyword Red Velvet Cake Roll
Servings 12 slices

Ingredients

Ingredients:

  • 1 cup minus 1 Tablespoon all-purpose flour
  • 3 tbsp unsweetened natural cocoa powder
  • 1 tsp baking powder
  • 1/2 tsp salt
  • 4 large eggs room temperature
  • 1/2 cup granulated sugar
  • 1/4 cup packed light brown sugar
  • 2 tbsp vegetable oil
  • 2 tbsp milk
  • 1 tsp white vinegar helps the red color stand out
  • 1 tbsp red food coloring or paste
  • 2 tsp pure vanilla extract

For Rolling

  • 1 cup confectioners' sugar

Cream Cheese Frosting

  • 6 ounces block cream cheese softened to room temperature
  • 1/4 cup unsalted butter softened to room temperature
  • 1 3/4 cups confectioners' sugar
  • 1 tsp pure vanilla extract

Instructions

Directions: Read all instructions before starting

  1. Preheat oven to 350°F. Spray a 10x15 inch baking pan with nonstick spray so the parchment paper sticks. Then line it with parchment paper so the cake seamlessly releases when it's done. Spray or grease the parchment paper too.

  2. Sift the flour, cocoa powder, baking powder, and salt together. Set aside.

  3. Using a hand mixer or a stand mixer fitted with whisk attachment, beat the eggs for 5 minutes on high speed. They will be light and very fluffy. On medium speed, beat in the granulated sugar, brown sugar, oil, milk, vinegar, food coloring, and vanilla until combined. 

  4. Stop the mixer, pour in the sifted dry ingredients, then beat on low until the batter is completely combined.

  5. Spread batter evenly into prepared pan. Give the pan a shake to make sure the batter is level and reaches the corners. Bake for 17 minutes or until the cake springs back when you poke it with a finger.
  6. Meanwhile, lay a thin kitchen towel or parchment paper flat on the counter. Sprinkle with 1 cup of confectioners' sugar. Once the cake comes out of the oven, immediately invert it onto the towel or parchment paper. Peel off the parchment paper then, starting with the narrow end, begin rolling the cake up with the towel. Do this slowly and gently. The cake will be warm as it just came out of the oven.

  7. Allow the cake to cool completely rolled up in the towel or parchment paper.

  8. Make the frosting: In a large bowl using a hand-held or stand mixer fitted with a paddle or whisk attachment, beat the cream cheese for 1 minute on high speed until completely smooth and creamy. Beat in the butter until combined. Add the confectioners' sugar and vanilla and beat on medium-high speed until combined and creamy.
  9. Gently and slowly unroll the cake. Flatten it out and spread frosting evenly on top, leaving about a 1/2 inch border around the cake. Gently and slowly roll the cake back up, without the towel or parchment paper this time. Make sure you're rolling it tightly. Some frosting may spill out the sides.

  10. Dust with more confectioners' sugar, if desired.

Filed Under: Cakes, Desserts

Blackberry Cake

September 1, 2018

My friend’s mom loves to bake just as much as me and she sent me this blackberry cake recipe and wanted me to put it on the blog. I’ve been picking so many blackberries so this was perfect timing. I told her of course I would do that since she is so amazing and she’s pretty much a second mom to me.  This blog post is for you Joanne!  She made up an amazing moist, fluffy, whipped cream blackberry cake.  It will melt in your mouth especially that homemade whipped topping.

Make the cake mix as directed on the back on the box. I used Betty Crocker’s Super Moist French Vanilla cake. I’m sure any vanilla cake box will work.  While the cake is in the oven make the blackberry mixture.  Combine the blackberries, sugar and cornstarch in a medium size pot and bring to a boil.  You can mash the berries with a spoon if you prefer not to have bigger berries in the filling. I smashed them up a little bit. You want the mixture to be a little runny so it soaks into the cake.

Set the mixture aside and let it cool. Once the cake is done let it cool for about 15 minutes. Poke holes all over the cake. I used a straw to get bigger holes.  Let the cake completely cool along with the blackberry mixture.

Once cooled pour the blackberry mixture all over the cake. Spread with a spatula.

Make the whipped topping by combining the heavy cream and powdered sugar. Do not over whip or it will start to turn into butter.  Once it’s all whipped together spread all over the blackberry mixture. I used a pipping bag and tip for mine but you can use a spatula to spread the whipped cream all over.  Add blackberries to the top of the whipped cream. The Blackberry cake is now complete!

Now slice that cake up and enjoy the softness of this delicious cake!  Happy Labor Day Weekend!

Make sure to store the cake in the fridge after serving. It still tastes delicious after a couple of days.

Print

Blackberry Cake

Course Dessert
Keyword Blackberry Cake
Prep Time 45 minutes
Cook Time 30 minutes
Total Time 1 hour 15 minutes
Servings 12 slices

Ingredients

  • 1 box Vanilla Cake Mix Bake as directed

Blackberry Mixture

  • 3 cups fresh blackberries
  • 1/2 cup granulated sugar
  • 1 1/2 tbsp cornstarch

Whipped Topping

  • 16 ounces heavy cream (make sure it's very cold)
  • 1/2 cup powdered sugar
  • 1 tsp vanilla extract

Instructions

  1. Bake the cake as directed on the box

Blackberry Mixture

  1. In a medium sauce pot combine the blackberries, sugar and cornstarch and bring to a boil.  You can mash the berries with a spoon if you prefer not to have bigger berries in the filling. I smashed them up a little bit. You want the mixture to be a little runny so it soaks into the cake. Let it completely cool.

  2. Once the cake is out of the oven let it cool for about 15 mintues and poke holes all over the cake. I used a straw.  

  3. Pour the blackberry mixture all over the cake once the mixture is cooled.

Whipped Cream

  1. Combine heavy cream, powdered sugar and vanilla into a mixing bowl with the whisk attachment. (Tip: I stick my bowl and whisk into the freezer for about 10 minutes to make sure it's very cold)

  2. Whip on high speed. Cream will initially bubble a little bit, then start to thicken.
  3. Whip on high speed until stiff peaks form, for a total whipping time of about 5-7 minutes. When you remove the whisk and get little peaks that don’t tip over, you are done. Make sure not to over mix! It quickly goes from smooth whipped cream to curdled whipped cream, so watch it closely.


Filed Under: Cakes, Desserts

Primary Sidebar

Hello and Welcome

Hi! I'm Holly and welcome to my personal blog and thank you for taking the time to look through my recipes and hiking adventures. I hope you enjoy them as much as me. Stay connected to see upcoming blog posts! I'm excited to have you join!

Recent Posts

  • Chicken Tortilla Soup
  • Beef Bowls
  • Ice Cream Sandwiches
  • Mint Chocolate Delights
  • Peanut Butter Cookies

Archives

  • August 2022
  • April 2022
  • February 2022
  • January 2021
  • May 2020
  • April 2020
  • February 2020
  • November 2019
  • October 2019
  • August 2019
  • July 2019
  • June 2019
  • May 2019
  • April 2019
  • March 2019
  • February 2019
  • January 2019
  • December 2018
  • November 2018
  • October 2018
  • September 2018
  • August 2018
  • July 2018
  • June 2018
  • May 2018

Categories

Don’t Miss These!

Pineapple Chicken with Rice

Pumpkin Toffee

Gooey Chocolate Chip Cookies

Pull Apart Bread

Most Popular Recipes

Peanut Butter Blossoms

Mini Chicken Pot Pie

Footer

My Favorites

stay connected

  • Facebook
  • Instagram
  • Pinterest

Don’t miss a recipe or an adventure!

Copyright© 2023 · Brunch Pro Theme by Feast Design Co.