• Skip to primary navigation
  • Skip to main content
  • Skip to primary sidebar
  • Skip to footer
  • Home
  • Recipes
  • Hiking
  • Contact

Holly in the PNW

The girl that can't sit still!

Archives for May 2019

Gooey Chocolate Chip Cookies

May 15, 2019

Today is National Chocolate Chip Cookie Day! I’ve made a ton of different types of chocolate chip cookies in my day but these ones are my favorite… chewy, gooey and oh so soft! Gooey Chocolate Chip Cookies are where it’s at! Check out my other chocolate chip cookie recipes from my blog. Skillet Chocolate Chip Cookie,  Salted Chocolate Cookies & Chocolate Chip Cookie Cake.

No mixer required to make these delicious cookies. With a recipe this easy you just might find yourself making these chocolate chip cookies over and over!

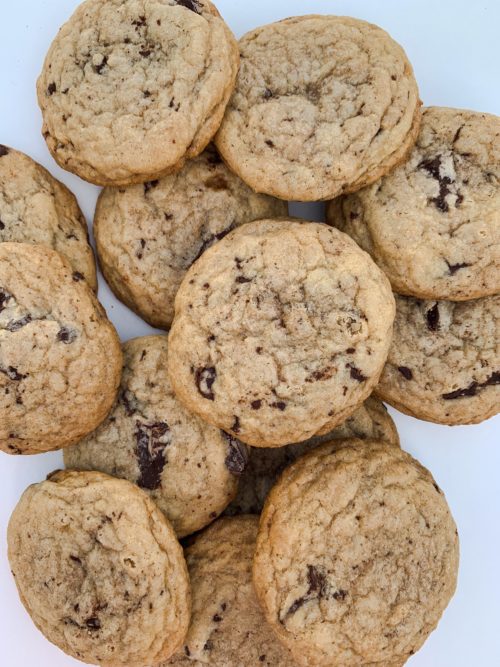
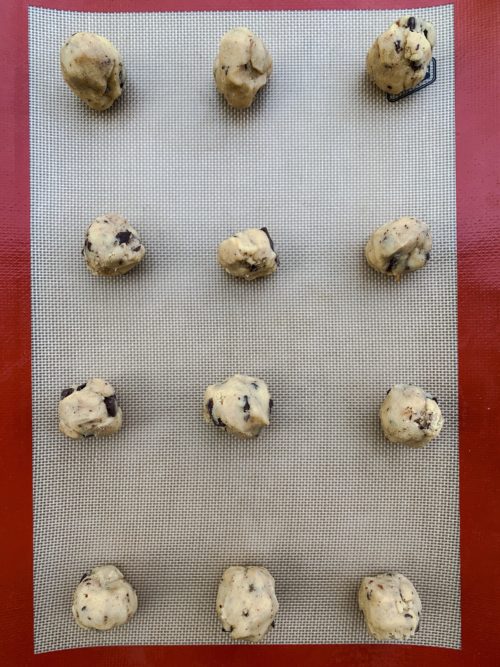
I always try and make thick cookies no matter what kind I’m making. I have two tricks to try and make this happen.  First, chill the dough for a couple of hours or over night. Second, shape the cookies tall rather than wide on the cookie sheet.

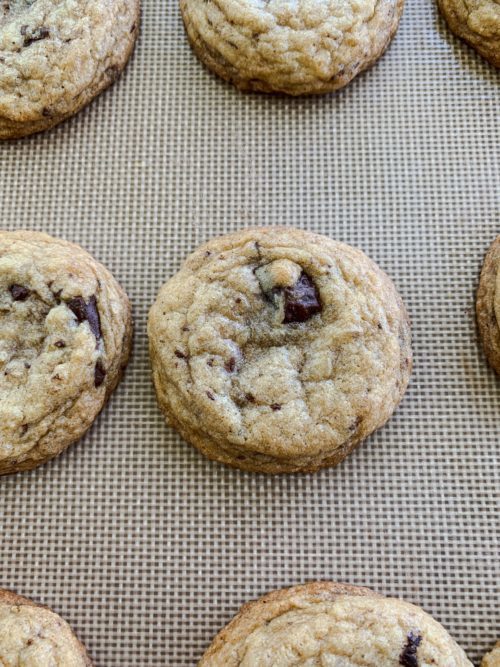
To get them gooey and soft bake for 11 minutes. They will look slightly under cooked when you pull them out of the oven. Leave them on the cookie sheet for about 10 minutes, they will continue to cook before transferring them to a wire rack to cool completely.

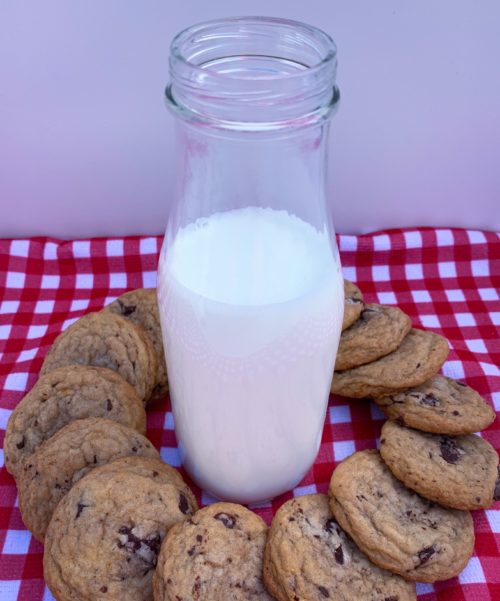
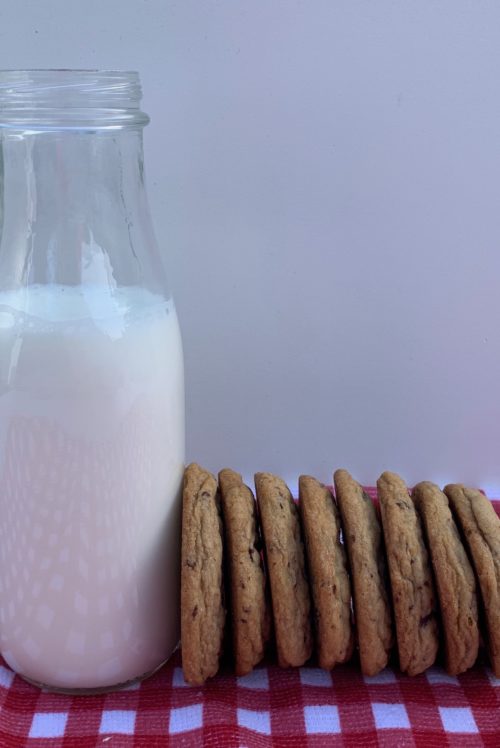
As they are cooling on a wire rack make sure to eat one or two while they are warm, it’s the best! Don’t forget the milk to eat along with your warm gooey chocolate chip cookie!

Enjoy!!!

Print

Gooey Chocolate Chip Cookies

Course Cookies, Dessert
Cuisine American
Keyword Gooey Chocolate Chip Cookies
Prep Time 15 minutes
Cook Time 11 minutes
Total Time 26 minutes
Servings 36 medium size cookies

Ingredients

  • 2 1/4 cups all-purpose flour (spoon & leveled)
  • 1 1/2 tsp cornstarch
  • 1 tsp baking soda
  • 1/2 teaspoon salt
  • 3/4 cup unsalted butter melted & slightly cooled
  • 3/4 cup packed light or dark brown sugar
  • 1/2 cup granulated sugar
  • 1 large egg + 1 egg yolk at room temperature
  • 2 tsp pure vanilla extract
  • 1 cup semi-sweet chocolate chips or chocolate chunks (or more)

Instructions

Instructions

  1. Whisk the flour, baking soda, cornstarch, and salt together in a large bowl. Set aside.
  2. In a medium bowl, whisk the melted butter, brown sugar and granulated sugar together until no brown sugar lumps remain. Whisk in the egg, then the egg yolk and lastly the vanilla extract.

  3. Pour the wet ingredients into the dry ingredients and mix together with a large spoon or rubber spatula. Add the chocolate chips or chocolate chunks. 

  4. Cover the dough and chill in the refrigerator for 2-3 hours or overnight. Chilling is mandatory. I highly recommend chilling the cookie dough overnight for less spreading.

  5. Take the dough out of the refrigerator and allow to slightly soften at room temperature for 10 minutes.
  6. Preheat oven to 325°F. Line two large baking sheets with parchment paper or silicone baking mats. 

  7. Roll the dough into balls, about 1 tablespoon of dough each. Roll the cookie dough balls to be taller rather than wide. This will allow the cookies to be on the thick side. Place 12 balls of dough onto each cookie sheet. 

  8. Bake the cookies for 11 minutes. The cookies will look under baked. They will continue to bake on the cookie sheet. Allow to cool on the cookie sheet for 10 minutes before transferring to a wire rack to cool completely.

Recipe Notes

You can make the cookie dough and chill it in the refrigerator for up to 2-3 days. Allow to come to room temperature then continue with step 4.

Cookies stay fresh covered at room temperature for up to 1 week or freeze cookies up to 3 months. 

Filed Under: Cookies, Desserts

Ombre Vanilla Cake

May 10, 2019

I was lucky enough to make this cake for a dear friend and I think she thoroughly enjoyed it! This would also be a great cake to make for Mother’s Day! Ombre cakes are fun to make so don’t let the design scare you. This Ombre Vanilla Cake turned out to be pretty in pink. You can add several colors for this cake design. If you have the time, it’s also really pretty when you use multiple colors!

I used the same recipe as my Naked Vanilla Raspberry Cake (minus the raspberry sauce).

To make this cake I suggest the following:

  • A cake (preferably round)
  • Butter cream frosting
  • food coloring (I suggest gel but liquid will work too)
  • piping bag
  • piping tip – #12 wilton
  • small offset spatula
  • turn table

Add enough food coloring to your icing to achieve the color you want. Put the icing into the piping bag.

If you haven’t done this technique before I would suggest practicing on a cutting board before you start. Begin by piping four dots in a row. The dots should just touch each other and be about the diameter of a quarter (you can experiment with different sizes). Grab your offset spatula and gently bring it down onto the middle of the bottom icing dot. Press down and drag. Repeat with each dot. Scrape the excess icing off your spatula back onto the icing bowl.

Ok, let’s start the process!!!

Give your cake a crumb coat of buttercream.

Starting at the bottom of the cake, pipe dots until you have reached the top of the cake.  Using the technique you practiced above, cover your entire cake using the petal effect. When you get to the last row the easiest way to finish is just with a vertical row of dots. Make that the back of your cake. Continue and give the top of your cake the petal effect as well.

I’ve seen cakes done with the same technique going up the cake (instead of around) and you can mix it up on the top of the cake doing rows in different directions. Use your creativity!

I really enjoy doing the Ombre effect!

Enjoy!!!

Print

Ombre Vanilla Cake

Course Cake, Dessert
Cuisine American
Keyword Ombre Vanilla Cake
Prep Time 45 minutes
Cook Time 25 minutes
Resting time 1 hour
Total Time 2 hours 10 minutes
Servings 12 servings

Ingredients

Cake

  • 3 3/4 cups all purpose flour sifted
  • 1 tsp baking powder
  • 3/4 tsp baking soda
  • 1 tsp salt
  • 1 1/2 cups unsalted butter room temperature
  • 2 cups granulated sugar
  • 5 large eggs room temperature
  • 1 tbsp pure vanilla extract
  • 1 3/4 cups buttermilk room temperature

Vanilla Buttercream

  • 1 1/2 cups unsalted butter room temperature
  • 5 - 6 cups confectioners' sugar
  • 5 - 6 tbsp heavy cream
  • 1 tsp pure vanilla extract

Instructions

Making the Cake

  1. Preheat oven to 350°F (177°C). Grease and lightly flour three 9-inch cake pans.

  2. Whisk the flour, baking powder, baking soda, and salt together in a large bowl. Set aside.
  3. Using a handheld or stand mixer fitted with a paddle or whisk attachment, beat the butter and sugar together on high speed until smooth and creamy, about 3 minutes. Scrape down the sides and up the bottom of the bowl with a rubber spatula as needed.
  4. On medium-high speed, add 1 egg at a time, beating well after each addition. Beat in the vanilla extract. Scrape down the sides and up the bottom of the bowl with a rubber spatula as needed.
  5. With the mixer on low speed, add the dry ingredients in three additions alternating with the buttermilk, beginning and ending with the dry ingredients, and mixing each addition just until incorporated. Do not overmix this batter. The batter will be smooth, velvety, and slightly thick.
  6. There is about 8 cups of batter total, so each layer will be 2 and 2/3 cups. Pour/spread batter evenly into prepared cake pans.
  7. Bake for around 25-26 minutes or until the cakes are baked through. To test for doneness, insert a toothpick into the center of the cake. If it comes out clean, it is done. Allow cakes to cool completely in the pans set on a wire rack. The cakes must be completely cool before frosting and assembling.

Making the Buttercream Frosting

  1. In a large bowl using a hand-held mixer or stand mixer fitted with a whisk or paddle attachment, beat the butter on medium speed until creamy, about 2 minutes.

  2. With the mixer running on low, add 5 and 1/2 cups confectioners' sugar, 5 tablespoons heavy cream, and the vanilla extract. Increase to high speed and beat for 3 full minutes.
  3. Add 1/2 cup more confectioners' sugar if frosting is too thin, 1 more tablespoon cream if frosting is too thick.
  4. Yields about 4.5 cups of frosting.

Assemble and Decorate the Cake

  1. First, using a large serrated knife, slice a thin layer off the tops of the cakes to create a flat surface. Discard or save and eat later.
  2. Place 1 cake layer on your cake stand, cake turntable, or serving plate. Spread frosting evenly on top.

  3. Top with 2nd cake layer and evenly cover the top with more frosting.

  4. Top with the third cake layer and evenly cover the top with more frosting. Cover the sides with a crumb coat finish of frosting.

  5. Use a bench scraper to smooth out the frosting on the sides of the cake.
  6. Decorate cake with the ombre effect and follow the instructions above. 

  7. Refrigerate the cake for 2-3 hours or up to 1 day before slicing and serving. If chilling for more than a few hours, loosely cover with plastic wrap after 1 hour of refrigeration (the frosting will "set" after about 1 hour and the plastic wrap won't really ruin your frosting at that point).

Recipe Notes

Cover and store leftover cake in the refrigerator for up to 1 week.

Filed Under: Cakes, Desserts

Asian Cabbage Salad

May 8, 2019

I remember the first time I had this Asian Cabbage Salad. My roommate from years ago made it for me and I couldn’t stop eating it! I immediately grabbed the recipe from her and this is my go to salad when I need to make something for a BBQ or potluck at work. It’s easy and simple to make and it makes a lot for a big crowd.

Grab a bigger size bowl, chop up the cabbage and green onions. Mix up the dressing and pour all over the salad mixture. Once stirred, add the toasted toppings of almonds, sunflower seeds, sesame seeds and top ramen noodles. Stir again until well combined.

Grab a couple of bowls and share!

Enjoy!!!

Print

Asian Cabbage Salad

Course Salad
Cuisine American, Chinese
Keyword Asain Cabbage Salad
Prep Time 15 minutes
Cook Time 10 minutes
Total Time 25 minutes
Servings 12 servings

Ingredients

  • 1 head cabbage (rinsed)
  • 1 bunch green onions
  • 1 package chicken top ramen (separated)
  • 1/4 cup sliced almonds
  • 1/4 cup sunflower seeds (salted or unsalted)
  • 3 tbsp sesame seeds

Dressing

  • 1/2 cup vegetable oil
  • 3 tsp vinegar
  • 2 tbsp sugar
  • 1/4 tsp salt
  • 1/4 tsp pepper
  • 1 packet top ramen seasoning

Instructions

  1. Rinse and chop the green onion. Chop the cabbage and rinse thoroughly. Combine chopped green onion and cabbage in large bowl. 

  2. Preheat oven to 350 degrees. Line a cookie sheet with tin foil. Remove the top ramen noodles and break them apart and place them on cookie sheet. Add the sliced almonds, sunflower seeds and sesame seeds. Bake for 10-15 minutes or until toasted brown. Watch them carefully so they do not burn.

  3. When the toppings are baking make the dressing. In a salad dressing container or small bowl combine the top ramen seasoning, oil, water, vinegar, sugar, salt and pepper. If you are using a salad dressing container shake until well combined. If you are using a bowl whisk until well combined. 

  4. Add dressing to salad mixture and mix until well combined. Add toppings to the salad and mix again. 

Filed Under: Everyday Meals, Grilling

Vanilla Checkered Cake

May 1, 2019

My blog turned one today! I can’t believe it’s been a year since I took the leap of starting a blog. I’ve always wanted to start a blog and I finally did it and I couldn’t be happier to share all of my recipes and hiking adventures with YOU!

I’ve posted 51 blog posts in my first year, making this one #52! It’s been a fun year of baking, hiking and blogging. Soon enough I will be adding more hiking posts. Thank you for making this fun for me and following my page. Tell your friends about my blog if you love it as much as me!

I made this Vanilla Checkered Cake to celebrate my one year anniversary of my blog! YAY! Turning one is fun!

Don’t let the inside of the cake scare you, it’s easier than you think. But if you don’t want to attempt the checkered cake you can just leave it all one color. Either way it’s delish! You can’t go wrong with vanilla cake and vanilla buttercream. All the details of this cake will be in the recipe. I really enjoyed making this Vanilla Checkered Cake!

Enjoy!!!

Print

Vanilla Checkered Cake

Course Cake, Dessert
Cuisine American
Keyword Vanilla Checkered Cake
Prep Time 1 hour
Cook Time 30 minutes
Resting time 1 hour
Total Time 2 hours 30 minutes
Servings 12 slices

Ingredients

  • 1 box vanilla cake mix
  • 1 3oz box vanilla pudding
  • 1 cup water
  • 1/3 cup vegetable oil
  • 3 large eggs

Vanilla Butter Cream

  • 1 cup unsalted butter at room tempature
  • 4-5 cups confectioners’ sugar
  • 1/4 cup whole milk
  • 2 tbsp pure vanilla extract
  • salt to taste
  • black gel food coloring

Instructions

  1. Preheat oven to 350 degrees. Grease two 6 inch pans and set aside.

  2. Combine cake mix, vanilla pudding, water, oil and eggs in a mixing bowl. With the paddle attachment mix until well combined when no lumps appear. 

  3. Pour half the batter into one pan. Add the black food coloring. I usually dip a knife into the gel food coloring and add it that way. You don't need much. Mix the food coloring until incorporated. Pour the black batter into the other greased pan. Bake cakes for 26 - 31 minutes. Poke a tooth pick in the middle until it comes out clean. 

  4. Let the cakes completely cool on a wire rack.

Vanilla Buttercream

  1. While the cake is cooling make the frosting. With a handheld or stand mixer fitted with a paddle attachment, beat the butter on medium speed until creamy – about 2 minutes. Add 4 and 1/2 cups confectioners’ sugar, the heavy cream, and vanilla extract. Beat on low speed for 30 seconds, then increase to high speed and beat for 3 full minutes. Add up to 1/2 cup more confectioners’ sugar if frosting is too thin or another tablespoon of cream if frosting is too thick. Add a pinch of salt if frosting is too sweet. 

Assembling the cake

  1. Once the cakes are completely cooled cut the top of the cakes off with a serrated knife and make the tops even.

  2. You will need a 4 inch and a 2 inch cookie cutter for the next steps (you can also use a template and cut your circles out with a knife). You will need to cut two circles from each layer.

  3. First, insert the smallest circular cutter into the center of each layer. Carefully remove the centers, leaving them intact.

  4. Cut your larger circles. The idea is to make the width of the cake in each of your rings as equal as possible, so that the squares of your checkerboard will all appear to be equal in size.

  5. You will have a few circles to piece back together. When you put the cakes together alternate colors. If you have white on the outside, black will be the second layer and the inside layer will be white. Black on the outside, white in the middle and the inside layer will be black.

  6. Apply a layer of frosting to the top of the bottom cake. Stack your cakes on top of each other. Put a good crumb coat on… as in, a crumb coat that conceals the cake underneath. It can be sloppy and uneven, but you should not be able to see what color the cake is.

    *crumb coat explanation below!

  7. To get the rosette effect on the cake you will need to use tip #1M and a piping bag. Fill the bag up with buttercream. If you have an appropriately sized coupler you can use that, or you can just insert the tip into the bag and cut off the excess.

  8. To make your rose, start in the center, then slowly move your tip in a circle around the center point. I wanted a single rose to span the side of the cake so I looped around my center point twice. Try to end in the same place each time.

  9. Go all the way around the cake and complete with one last rose! Then go back and add the roses to the top using the same method.

  10. When making flowers that big, you are bound to have some empty spaces in the cake. Go back in and add dollops of stars with the tip.

Recipe Notes

I also added some silver sprinkles on the crumb coat to give it a little extra crunch when you bite into the cake!

*A crumb coat is a thin layer of frosting applied all over the cake that seals in stray crumbs before the roses are piped onto the cake.

Filed Under: Cakes, Desserts

Primary Sidebar

Hello and Welcome

Hi! I'm Holly and welcome to my personal blog and thank you for taking the time to look through my recipes and hiking adventures. I hope you enjoy them as much as me. Stay connected to see upcoming blog posts! I'm excited to have you join!

Recent Posts

  • Chicken Tortilla Soup
  • Beef Bowls
  • Ice Cream Sandwiches
  • Mint Chocolate Delights
  • Peanut Butter Cookies

Archives

  • August 2022
  • April 2022
  • February 2022
  • January 2021
  • May 2020
  • April 2020
  • February 2020
  • November 2019
  • October 2019
  • August 2019
  • July 2019
  • June 2019
  • May 2019
  • April 2019
  • March 2019
  • February 2019
  • January 2019
  • December 2018
  • November 2018
  • October 2018
  • September 2018
  • August 2018
  • July 2018
  • June 2018
  • May 2018

Categories

Don’t Miss These!

Brookie – Peanut Butter Brownies topped with Chocolate Chip Cookies

Ding Dong Cake

Gooey Chocolate Chip Cookies

Lemon Orzo Chickpea Salad

Most Popular Recipes

White Chocolate Raspberry Cheesecake Cookies

Mason Jar Soup

Footer

My Favorites

stay connected

  • Facebook
  • Instagram
  • Pinterest

Don’t miss a recipe or an adventure!

Copyright© 2023 · Brunch Pro Theme by Feast Design Co.