• Skip to primary navigation
  • Skip to main content
  • Skip to primary sidebar
  • Skip to footer
  • Home
  • Recipes
  • Hiking
  • Contact

Holly in the PNW

The girl that can't sit still!

Archives for August 2018

Blackberry Pie Bars

August 26, 2018

I’ve been picking a lot of blackberries on a trail behind my house so I’ve been experimenting with blackberry recipes. This one was a winner. Blackberry Pie Bars! I’ll be bummed once the blackberries are all gone.  I just love picking any type of berries and finding a delicious recipe to try.  These blackberry pie bars are simple to make and taste great!

Start off by making the crumble. You will need a food processor for this step. This will be the bottom and the top of the blackberry pie bars. Crumble is my weakness and I love it on any type of dessert.

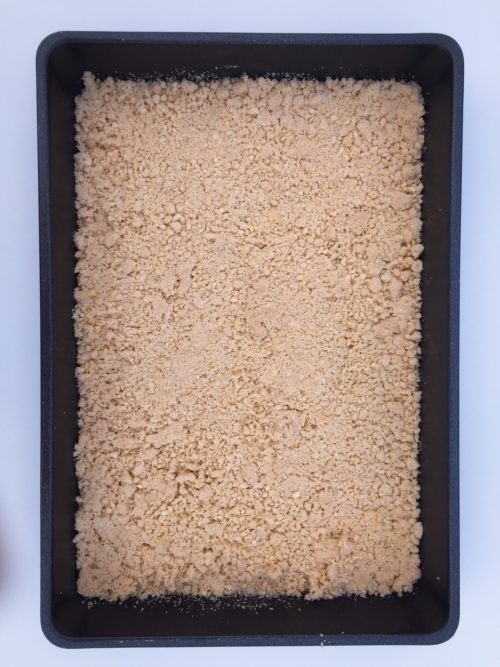
Grease a 9 x 13 pan and add the half of the crumble onto the bottom of the pan. If you want more on the bottom and less on top that is up to you either way it will be good. Lightly pat the crumble to the bottom of the pan.

In a separate bowl make the blackberry mixture that will go on top of the crumble. Use a fork to mix the blackberry mixture. I smashed some of the berries up so they weren’t full size berries throughout the pie.

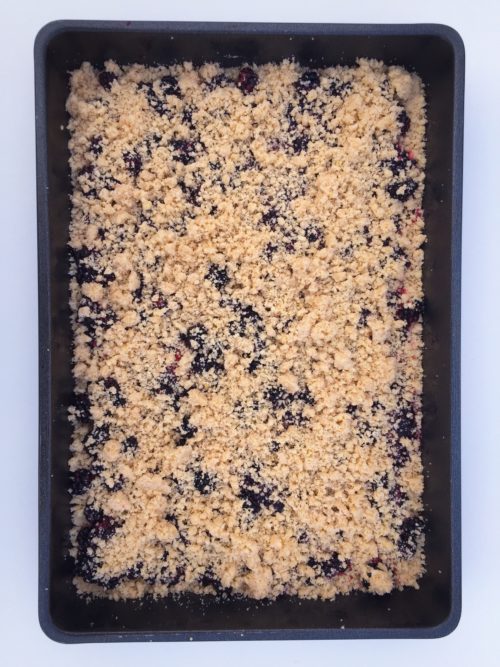
Add the blackberry mixture on top of the crumble. Once the blackberry mixture is completely spread over the bottom of the crumble add the remaining crumble on top of the blackberry mixture.

Bake in the oven for 35-40 minutes or until the crumble on top is lightly brown. Don’t over bake or the bottom will burn.

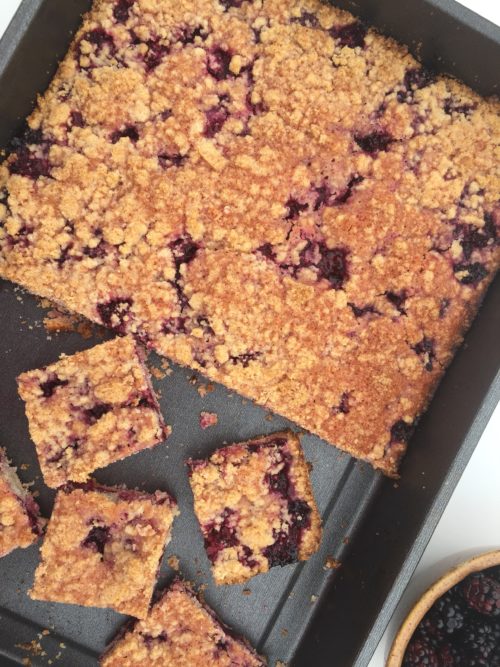
Cut up some squares and eat away!

Serve them at a family or friend gathering and people will love these blackberry pie bars with the best crumble on top and bottom.

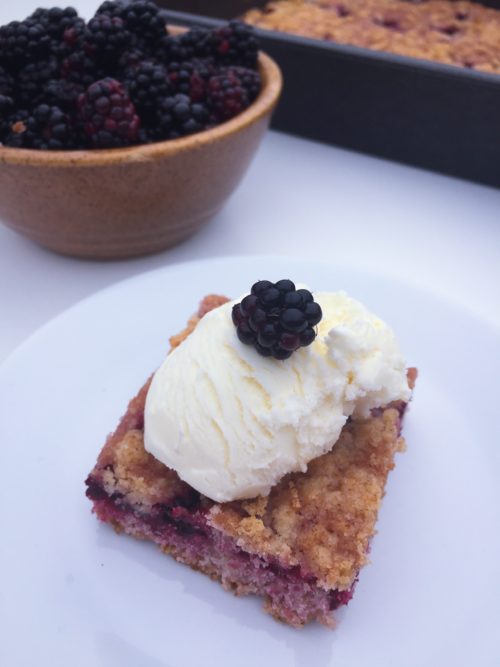
They are pretty tasty with a scoop of vanilla ice cream!

Print

Blackberry Pie Bars

Course Dessert
Keyword Blackberry Pie Bars
Prep Time 20 minutes
Cook Time 40 minutes
Total Time 1 hour
Servings 24 pie bars

Ingredients

INGREDIENTS:

  • 3 cups all-purpose flour
  • 1 1/2 cups sugar divided
  • 1 tsp baking powder
  • 1 tsp cinnamon
  • 1/4 tsp salt
  • Zest and juice of one lemon divided
  • 1 cup 2 sticks cold unsalted butter, cut into 1 inch slices
  • 1 large egg
  • 2 tsp vanilla extract
  • 4 cups fresh blackberries
  • 3 tsp cornstarch

Instructions

DIRECTIONS:

  1. Preheat the oven to 375°F. Grease a 9×13 inch pan.
  2. In a food processor, pulse together flour, 1 cup of sugar, baking powder, cinnamon, salt and lemon zest. 

  3. Add the butter, egg and vanilla extra. Pulsing until dough is crumbly. Lightly pat half of dough into the bottom of the prepared pan, saving the remaining dough for the topping.

  4. In a medium bowl, stir together the remaining 1/2 cup sugar, cornstarch and lemon juice. Gently mix in the blackberries (if you wish smash some of the blackberries). Sprinkle the blackberry mixture evenly over the bottom crumble. Sprinkle the remaining crumble over the berry mixture.

  5. Bake in preheated oven for about 35 - 40 minutes, or until top is slightly brown (you are only looking for the top to slightly brown, don't bake too long because the bottom will burn).

  6. Cool completely before cutting into squares. Store in an airtight container.

Filed Under: Desserts

Chocolate Chip Cookie Cake

August 21, 2018

Who doesn’t like a six layer Chocolate Chip Cookie Cake with Peanut Butter Chocolate frosting?! This cake is delicious in every way!

To start make the chocolate chip cookie mix and divide into six even balls. This is showing only four balls but indeed I did make six. I used a food scale to weigh out the balls but if you don’t have one just eye ball it.

Add the cookie dough to the baking pans. Place parchment paper at the bottom of the pan and grease it. I cut out parchment paper and fit it to the bottom of the pan. Make sure you do this so the cake won’t stick to the pan. It will be an easy release.

I only have 2 six inch round pans so I had to bake my cakes in 3 batches. Bake for about 17-20 minutes.

Make the peanut butter chocolate frosting and assemble. Add chocolate chips to the top. You can make any type of frosting to go with this cake so if you don’t like peanut butter make another flavor.

Cut out a huge piece and devour! It’s great with vanilla ice cream too! Enjoy!

Print

Chocolate Chip Cookie Cake

Course Dessert
Keyword Chocolate Chip Cookie Cake
Prep Time 30 minutes
Cook Time 20 minutes
Total Time 50 minutes
Servings 12 slices

Ingredients

Ingredients

  • 3 cups all-purpose flour (spoon & leveled)
  • 2 tsp cornstarch
  • 1 tsp baking soda
  • 1 tsp salt
  • 1 cup unsalted butter softened to room temperature
  • 1 cup packed light or dark brown sugar
  • 1/2 cup granulated sugar
  • 2 large eggs at room temperature
  • 2 1/2 tsp pure vanilla extract
  • 2 cups mini semi-sweet chocolate chips, plus extra for garnish (regular size is fine too)

Chocolate Peanut Butter Frosting

  • 1/2 cup unsalted butter softened to room temperature
  • 1/4 cup creamy peanut butter*
  • 1 3/4 cups confectioners' sugar (or more)
  • 1/4 cup unsweetened natural or dutch-process cocoa powder
  • 1/2 tsp pure vanilla extract
  • 1 tbsp milk (or more)

Instructions

Directions:

  1. Preheat oven to 350°F (177°C). Grease 2-inch cake pans (or more if you have more than 2), line with parchment paper, then grease the parchment paper. Parchment paper helps the small cookie cakes seamlessly release from the pans.

  2. Make the cookie cake: Whisk the flour, cornstarch, baking soda, and salt together in a medium bowl. Set aside.
  3. In a large bowl using a hand mixer or a stand mixer fitted with a paddle attachment, beat the butter, brown sugar, and granulated sugar together on medium-high speed until smooth and creamed, about 2 minutes. Add the eggs and vanilla extract and beat on high speed until combined, about 1 minute. Scrape down the sides and up the bottom of the bowl and beat again as needed to combine.
  4. Add the dry ingredients to the wet ingredients and mix on low until combined. With the mixer running on low speed, stir in the mini chocolate chips. Dough will be thick and sticky.

  5. Divide cookie dough between however many cake pans you're using. Press evenly into each. I only have 2 6-inch cake pans, so I baked in batches. If baking in batches, cover any cookie dough that isn't being used and set aside at room temperature.

  6. Bake for 17 - 20 minutes or until the cake layers are lightly brown on top and a toothpick inserted in the center comes out mostly clean. Allow cakes to cool for 10 minutes in the pans. Run a sharp knife around the edges, then carefully invert the pan so the warm cookie cake slides out. (At this point you can clean out pans, grease, line with parchment, grease parchment, then bake remaining cakes if needed.) Set the baked cakes on a wire rack to cool completely. The cakes must be completely cool before frosting and assembling.

Make the frosting

  1. With a handheld or stand mixer fitted with a paddle or whisk attachment, beat the butter and peanut butter together on medium speed until creamy and smooth, about 2 minutes. Add confectioners' sugar, cocoa powder, vanilla extract, and 1 Tablespoon milk. Mix on low speed for 30 seconds, then increase to high speed and beat for 2 minutes. Add another Tablespoon of milk if frosting is too thick. If too thin add more confectioners' sugar. 

Assemble and decorate

  1. Place 1 cake layer on your cake stand or serving plate. Evenly cover the top with frosting. Continue layering the cake layers and frosting. Spread the remaining frosting all over the top and sides, if there's any leftover for the sides! If desired, top with chocolate chips. Slice and serve.

Filed Under: Desserts

Plum Muffins

August 4, 2018

A friend of mine brought me some plums from her plum tree and she told me to bake something yummy so I came up with plum muffins. I’ve never tried to bake with plums before and I’m so glad I did. The plum muffins were very moist and delicious.  So don’t judge until you make these plum muffins.

Sift flour, baking powder, and baking soda into a large bowl. Add the sugar.

In a separate bowl whisk together the eggs, olive oil and greek yogurt until smooth.

Wash the plums and chop into pieces. You can use more or less plums. If you use more they will be more flavorful.

Slowly stir the yogurt mixture into the dry ingredients in the large bowl, until just combined. Do not over stir this will make the muffins too dense. You want these plum muffins nice and moist. Gently stir in the plums, with just a few turns.

Line the muffin pan with parchment paper and add about 2 tablespoons of plum muffin batter to the pan. Sprinkle the top with coarse sugar if you desire. The recipe makes about 14 muffins.

Bake the plum muffins for 18 – 20 minutes or golden brown at 350 degrees.

Serve warm! Enjoy these plum muffins for your morning breakfast. It will be a good start to your day!

You can also serve the muffins with a little bit of butter. Try these and don’t be scared to try something out of the ordinary. Plum Muffins will be on my summer list always! Hopefully my friend brings me plums every year!


Print

Plum Muffins

Course Breakfast, Dessert
Keyword Plum Muffins
Prep Time 20 minutes
Cook Time 20 minutes
Total Time 40 minutes
Servings 14 muffins

Ingredients

  • 2 cups all purpose flour sifted
  • 2 tsp baking powder sifted
  • 1/2 tsp baking soda sifted
  • 1/2 cup granulated sugar
  • 2 eggs
  • 1/2 cup olive oil
  • 1 cup greek yogurt
  • 6 small plums
  • course sugar if desired

Instructions

  1. Preheat the oven to 350ºF

  2. Sift flour, baking powder, and baking soda into a large bowl. Stir in sugar.

  3. In a separate bowl whisk together the eggs, olive oil and greek yogurt, until smooth.

  4. Wash the plums and chop into pieces. You may use more or less plums if you desire.

  5. Slowly stir the yogurt mixture into the dry ingredients in the large bowl, until just combined. Do not over stir this will make the muffins too dense. You want these plum muffins nice and moist. 

  6. Gently stir in the plums, with just a few turns.

  7. Line the muffin pan with parchment paper and add about 2 tablespoons of plum muffin batter to the pan. Sprinkle the top with coarse sugar if you desire.

  8. Bake the plum muffins for 18 - 20 minutes or golden brown.


Filed Under: Breakfast, Desserts

Primary Sidebar

Hello and Welcome

Hi! I'm Holly and welcome to my personal blog and thank you for taking the time to look through my recipes and hiking adventures. I hope you enjoy them as much as me. Stay connected to see upcoming blog posts! I'm excited to have you join!

Recent Posts

  • Chicken Tortilla Soup
  • Beef Bowls
  • Ice Cream Sandwiches
  • Mint Chocolate Delights
  • Peanut Butter Cookies

Archives

  • August 2022
  • April 2022
  • February 2022
  • January 2021
  • May 2020
  • April 2020
  • February 2020
  • November 2019
  • October 2019
  • August 2019
  • July 2019
  • June 2019
  • May 2019
  • April 2019
  • March 2019
  • February 2019
  • January 2019
  • December 2018
  • November 2018
  • October 2018
  • September 2018
  • August 2018
  • July 2018
  • June 2018
  • May 2018

Categories

Don’t Miss These!

Bagel Bites

Oreo Chocolate Cake

Lemon Orzo Chickpea Salad

Vanilla Cake Pops

Most Popular Recipes

Chicken Tortilla Soup

Caramel Popcorn with Almonds

Footer

My Favorites

stay connected

  • Facebook
  • Instagram
  • Pinterest

Don’t miss a recipe or an adventure!

Copyright© 2023 · Brunch Pro Theme by Feast Design Co.