• Skip to primary navigation
  • Skip to main content
  • Skip to primary sidebar
  • Skip to footer
  • Home
  • Recipes
  • Hiking
  • Contact

Holly in the PNW

The girl that can't sit still!

Archives for January 2019

Heart Shaped Sugar Cookies

January 31, 2019

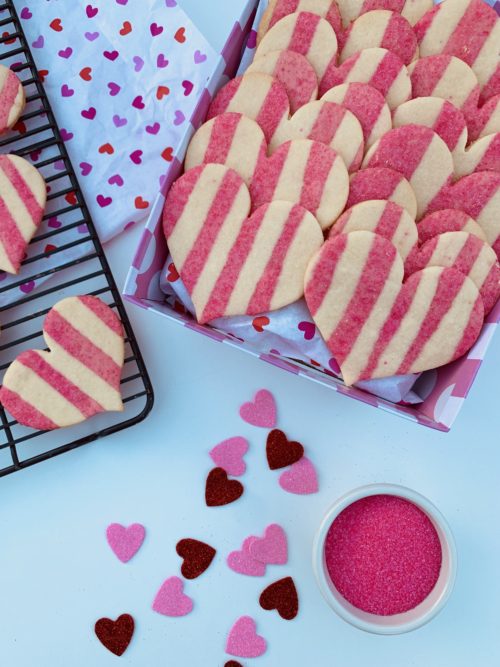
It’s time to show people how much you love them! Whip up some heart shaped sugar cookies for all your loved ones for Valentine’s Day. This is a fun recipe.

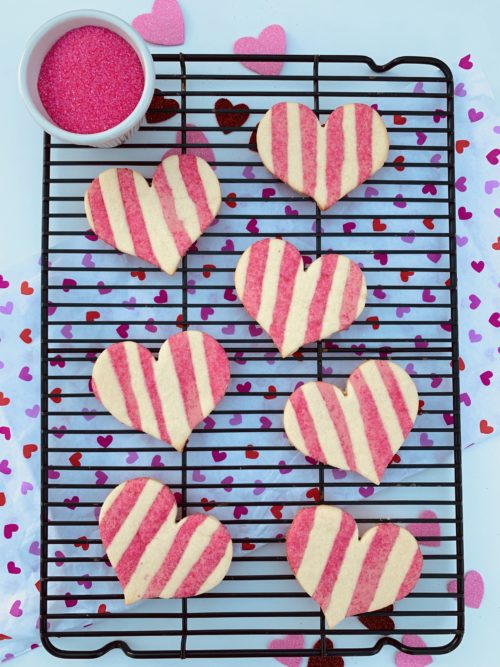
You will make two separate batches of dough so you will need to cut the recipe in half while preparing the dough. This is so you can have half white cookie batter and half pink cookie batter. Once the batter is made you will need to chill the cookie dough for about an hour. You can chill over night as well if you want to prepare the batter a day ahead.

Once the dough is chilled roll out each color separately about 1/4 inch in thickness. Sprinkle sanding sugar all over the pink batter and place a piece of plastic wrap over the batter and roll again. This will allow the sprinkles to stick to the dough and not stick to the rolling pin.

Using a ruler and a knife cut out 1/2 inch stripes. Layer pink and white stripes so they are touching. Add plastic wrap over the dough and roll to create a seal. I’ve found plastic wrap to work great just in case the dough gets a little sticky and it doesn’t stick to the rolling pin.

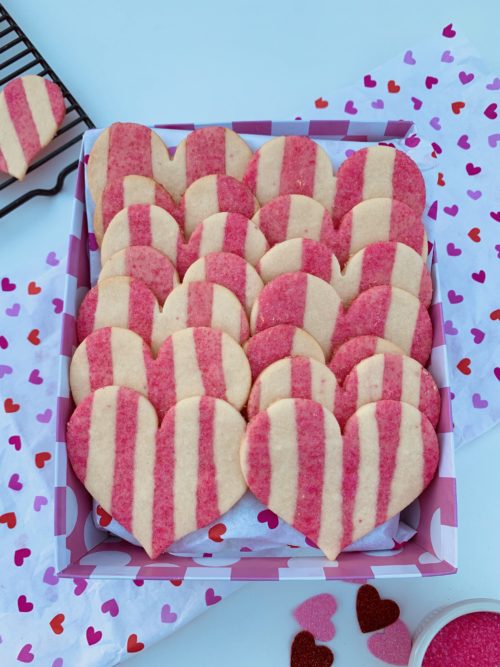
Cut cookies with a heart shaped cookie cutter. Place cookies on a silicone mat or parchment paper. Bake cookies at 350 degrees for 10 minutes. Watch carefully cause you don’t want your cookies to brown. Transfer to wire rack and let them cool.

Happy Valentine’s Day and Enjoy!!!

Print

Heart Shaped Sugar Cookies

Course Cookies, Dessert
Cuisine American
Prep Time 40 minutes
Cook Time 10 minutes
Resting time 1 hour
Total Time 50 minutes
Servings 24 cookies

Ingredients

  • 1 cup unsalted butter at room temperature
  • 1 cup granulated sugar
  • 1 tsp vanilla extract
  • 2 large eggs at room temperature
  • 4 cups all-purpose flour sifted
  • 3/4 cup cornstarch sifted
  • 3/4 tsp kosher salt
  • 1/4 cup pink sanding sugar
  • few drops red/pink food coloring

Instructions

  1. You will cut the recipe in half so please keep this in mind when you are preparing your batter. Two bowls will be required. I made the white batter first and then the pink batter to make sure I kept everything separate. 

  2. Preheat to 350 degrees F.

  3. Remember use half the ingredients. 

    In a standing mixer fitted with a paddle attachment, cream butter, granulated sugar, vanilla and egg together.

  4. Sift flour, cornstarch, salt. Mix until incorporated.

  5. On the second batch add a few drops of red/pink food coloring to the 2nd batch of sugar/butter mixture. Mix until a desired color is reached. Sprinkle ¼ cup pink sanding sugar to one batch. 

  6. Transfer both batters to plastic wrap. 

  7. Roll into a disk and chill for about 1 hour.
  8. Roll out each batter to a 1/4 inch thickness.

  9. When you roll out the pink dough place more sanding sugar on top and place plastic wrap over the dough and re-roll so the sanding sugar sticks to the dough. The plastic wrap helps the sanding sugar stay off the rolling pin. 

  10. Using a ruler and a sharp knife, cut ½ inch strips of each color batter.

  11. Layer pink and white stripes so that they are touching.
  12. Roll to create a seal. I use plastic wrap over the batter so it won't stick to the rolling pin. 

  13. Cut cookies with a heart shaped cutter.
  14. Place cookies on a baking sheet lined with parchment paper or silicone mat. 

  15. Bake for 10 minutes and watch them closely you don't want them to brown. Let cool on a wire rack. 

Filed Under: Cookies, Desserts

Skillet Chocolate Chip Cookie

January 28, 2019

I’ve been in love with my new skillet and trying different recipes. A chocolate chip cookie all in one pan. How easy is that?!?! Comes out golden brown and delicious. Let’s get started!

You don’t need a mixer for this recipe. We will do it the old school way. All you need is a whisk and spoon or rubber spatula. In a medium bowl, whisk the melted butter, brown sugar, and granulated sugar together until no brown sugar lumps remain. Whisk in the egg, then the egg yolk. Whisk in the vanilla extract. Pour the wet ingredients into the dry ingredients and mix together with a large spoon or rubber spatula. Stir the chocolate chips into the batter. I did add some caramel salted chips to the batter since I had some in the cupboard. You can add any flavor and it will taste great! Chill for 2-3 hours.

Preheat your oven to 350 degrees. Grease the bottom of your skillet with olive oil. You don’t need much, a tablespoon is plenty. Use a paper towel to spread the oil on the bottom and sides of the skillet. Add your chocolate chip cookie batter to the skillet and spread evenly. Bake at 350 degrees for 30-35 minutes or until golden brown. Use a toothpick to make sure the center is done to your liking.

Cut a piece out and serve it with ice cream! The cookie was delicious warm right out of the oven.

I had a small skillet and I wanted to make a personal sized cookie so you can use this recipe for personal servings as well. I do love my personal size recipes!

Enjoy!!!

Print

Skillet Chocolate Chip Cookie

Course Cookies, Dessert
Cuisine American
Prep Time 20 minutes
Cook Time 30 minutes
Resting time 1 hour
Total Time 50 minutes
Servings 12 slices

Ingredients

  • 2 1/4 cups all-purpose flour (spoon & leveled)
  • 1 tsp baking soda
  • 1 1/2 tsp cornstarch
  • 1/2 tsp salt
  • 3/4 cup unsalted butter, melted
  • 3/4 cup light or dark brown sugar
  • 1/2 cup granulated sugar
  • 1 large egg + 1 egg yolk at room temperature
  • 2 tsp pure vanilla extract
  • 2 cups semi-sweet chocolate chips
  • 1 tbsp olive oil (for the skillet)

Instructions

  1. Whisk the flour, baking soda, cornstarch, and salt together in a large bowl. Set aside.
  2. In a medium bowl, whisk the melted butter, brown sugar, and granulated sugar together until no brown sugar lumps remain. Whisk in the egg, then the egg yolk. Whisk in the vanilla extract. Pour the wet ingredients into the dry ingredients and mix together with a large spoon or rubber spatula. The dough will be very soft, yet thick. Fold in the chocolate chips. They may not stick to the dough because of the melted butter, but do your best to combine them. Cover the dough and chill in the refrigerator for 2-3 hours or up to 3-4 days. Chilling is mandatory. I highly recommend chilling the cookie dough overnight for less spreading.

  3. Take the dough out of the refrigerator and allow to slightly soften at room temperature for 10 minutes.
  4. Preheat oven to 350 degrees. 

  5. Grease the bottom of your skillet with olive oil. You don't need much, a tablespoon is plenty. Use a paper towel to spread the oil on the bottom and sides of the skillet. Add your chocolate chip cookie batter to the skillet and spread evenly. 

  6. Bake at 350 degrees for 30-35 minutes or until golden brown. Use a toothpick to make sure the center is done to your liking. Serve warm.

Recipe Notes

Make ahead tip: You can make the cookie dough and chill it in the refrigerator for up to 2-3 days. Allow to come to room temperature then continue with step 4. 

When baked the Skillet Cookie stays fresh in a air tight container at room temperature for up to 1 week. 

Filed Under: Cookies, Desserts

Artichoke Parmesan Dip

January 17, 2019

Whenever there’s a party (especially a football party!) I bring my Artichoke Parmesan Dip. Four simple ingredients and people will keep coming back to the bowl every time. Trust me on this one. Make it for your Super Bowl party! I’m sad to see that my Seahawks aren’t in the playoffs any longer but I’ll still be attending a super bowl party with my dip. Who are you routing for?!

All you need is mayonnaise, sour cream, artichoke hearts and shredded parmesan cheese. So easy! Combine all these ingredients and mix it up in a bowl. Cook over medium heat on the stove or bake it in the oven like I did here with biscuits.

Make sure your skillet is greased with a little bit of oil. Open a can of jumbo biscuits and cut each biscuit in half. Roll the dough in a ball and place it around the skillet. Repeat with all biscuits from the can. Brush biscuits with oil or melted butter. Add the dip to the middle and sprinkle with oregano or any type of spice of your liking. Bake at 375 degrees for 20-25 minutes or until the biscuits are golden brown.

Remove from oven and serve warm. You can also serve with tortilla chips or sliced baguette bread. It’s good with it all! The dip is always better warm. Sometimes I put it in my mini crock pot so it stays warm throughout my party.

This is my favorite dip of all time! I remember the first time I made it and I knew Artichoke Parmesan Dip was going to stay in my recipe box.

Enjoy!

Print

Artichoke Parmesan Dip

Ingredients

  • 1/2 cup mayonnaise
  • 1/2 cup sour cream you may use fat free
  • 1 1/4 cup shredded parmesan
  • 1 13 ounce can artichoke hearts cut into small pieces
  • 1 can Pillsbury jumbo biscuits (any brand will work)
  • 2 tbsp melted butter or oil for the top of the biscuits

Instructions

  1. Preheat oven to 375 degrees

  2. Cut artichoke hearts into small pieces.

  3. In a large bowl, combine the mayonnaise, sour cream, artichoke hearts and shredded cheese. Stir until well combined. Set aside.

  4. Cut each biscuit in half. Roll each biscuit half into a ball, using the palm of your hands, and place along the edge of the skillet. Spoon the dip into the center and spread out with a spatula so that it touches the edge of the biscuits.

  5. Brush the biscuits with melted butter or oil and sprinkle with oregano or any seasoning of your liking. Bake for about 20 to 25 minutes or until golden brown and bubbly. Serve warm.

Filed Under: Appetizers

Reese’s Sugar Cookies

January 15, 2019

I was in my kitchen today and was thinking I haven’t baked in awhile so I opened my baking cupboard and just started to grab things out. I had some Reese’s peanut butter cups left over from the holidays and a package of Betty Crocker’s sugar cookie mix. These Reese’s Sugar Cookies are simple and a fun recipe.

Start by making the sugar cookies. Follow the directions on the back of the packaging.  You want to follow the recipe for the cut out option.

Roll out the dough and cut out circles.  I used a measuring cup for my circles. You can use a round cookie cutter, glass or anything in your kitchen that is round.

Line a cookie sheet with a silicone mat or grease the sheet if you don’t have a mat. Position one circle on the cookie sheet and place a Reese’s peanut butter cup in the middle of the dough. I suggest cutting the peanut butter cups in half. You can keep the peanut butter cup whole but the cookie will have a larger bump instead of a minimal one.  I tried it both ways and I like it better cut in half.

Add another circle dough right on top and press the dough circles together.  I used a cake pop stick to dent the edges of the cookie. If you don’t want the dents just firmly press the edges together. I also added some coarse sugar to the top of the cookie.

Bake for 9-10 minutes at 350 degrees.

Let the cookies completely cool and drizzle with melted chocolate. I used Wilton Candy Melts for the chocolate. 

Print

Reese’s Sugar Cookie

Course Cookies
Cuisine American
Prep Time 20 minutes
Cook Time 10 minutes
Resting Time 15 minutes
Total Time 30 minutes
Servings 18 cookies

Ingredients

  • 1 package Sugar Cookie Mix Betty Crocker
  • 9 or 18 Reese’s Peanut Butter cups
  • melted chocolate to drizzle on top

Instructions

  1. Preheat oven to 350 degrees.

  2. Make sugar cookies directed on back of package. Use the cut out option if using Betty Crocker.

  3. Roll out the dough and cut out circles.  I used a measuring cup for my circles. You can use a round cookie cutter, glass or anything in your kitchen that is round.

  4. Line a cookie sheet with a silicone mat or grease the sheet if you don’t have a mat. Position one circle on the cookie sheet and place a Reese’s peanut butter cup in the middle of the dough. I suggest cutting the peanut butter cups in half. You can keep the peanut butter cup whole but the cookie will have a larger bump instead of a minimal one.  I tried it both ways and I like it better cut in half.
  5. Add another circle dough right on top and press the dough circles together.  I used a cake pop stick to dent the edges of the cookie. If you don’t want the dents just firmly press the edges together. I also added some coarse sugar to the top of the cookie.
  6. Bake for 9-10 minutes at 350 degrees.
  7. Let the cookies completely cool on a wire rack and drizzle with melted chocolate. I used Wilton Candy Melts for the chocolate. 


Filed Under: Cookies, Desserts

Primary Sidebar

Hello and Welcome

Hi! I'm Holly and welcome to my personal blog and thank you for taking the time to look through my recipes and hiking adventures. I hope you enjoy them as much as me. Stay connected to see upcoming blog posts! I'm excited to have you join!

Recent Posts

  • Chicken Tortilla Soup
  • Beef Bowls
  • Ice Cream Sandwiches
  • Mint Chocolate Delights
  • Peanut Butter Cookies

Archives

  • August 2022
  • April 2022
  • February 2022
  • January 2021
  • May 2020
  • April 2020
  • February 2020
  • November 2019
  • October 2019
  • August 2019
  • July 2019
  • June 2019
  • May 2019
  • April 2019
  • March 2019
  • February 2019
  • January 2019
  • December 2018
  • November 2018
  • October 2018
  • September 2018
  • August 2018
  • July 2018
  • June 2018
  • May 2018

Categories

Don’t Miss These!

Cinnamon Sugar (Doughnut) Muffins

Chocolate Peanut Butter Rice Krispie Treats

Brookie – Peanut Butter Brownies topped with Chocolate Chip Cookies

Peanut Butter Blossoms

Most Popular Recipes

Beef Bowls

Monster Cake

Footer

My Favorites

stay connected

  • Facebook
  • Instagram
  • Pinterest

Don’t miss a recipe or an adventure!

Copyright© 2023 · Brunch Pro Theme by Feast Design Co.