• Skip to primary navigation
  • Skip to main content
  • Skip to primary sidebar
  • Skip to footer
  • Home
  • Recipes
  • Hiking
  • Contact

Holly in the PNW

The girl that can't sit still!

Desserts

Peach Cobbler

November 3, 2019

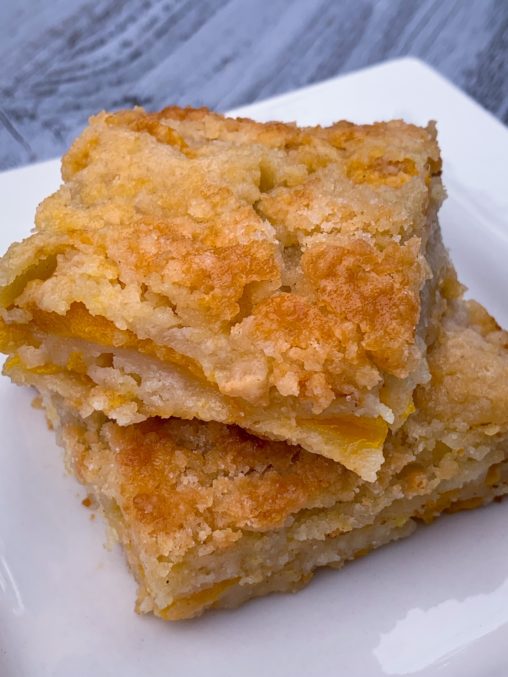
Peach Cobbler was always a favorite growing up in my household. My aunt gave to me some peaches from her tree so I got out my recipe box from my mom. I found our family recipe!! I needed to share this recipe on my blog. It’s too tasty not to share!

Look at that golden topping! My mouth is watering just looking at it!

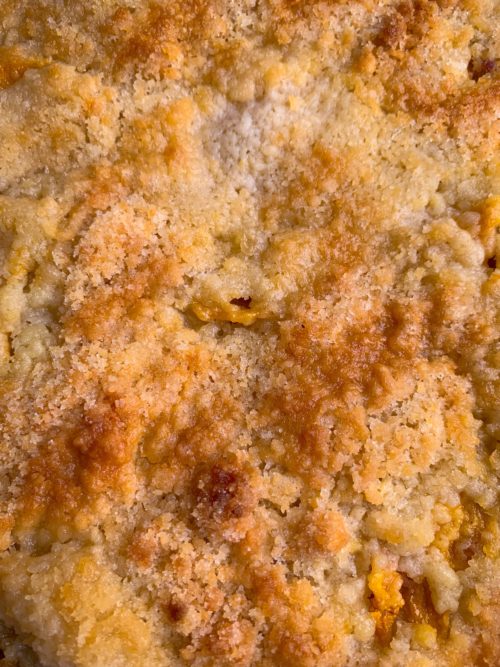
Peach cobbler is fairly simple to make. Layer peaches on the bottom of a prepared 9×9 pan. If you don’t have fresh peaches canned peaches will taste just as good. Combine all dry ingredients in a bowl. Add the egg and mix until crumbly. Sprinkle mixture over peaches. Drizzle the melted butter over the mixture. Bake in the oven for 35-40 minutes or until the top is golden brown.

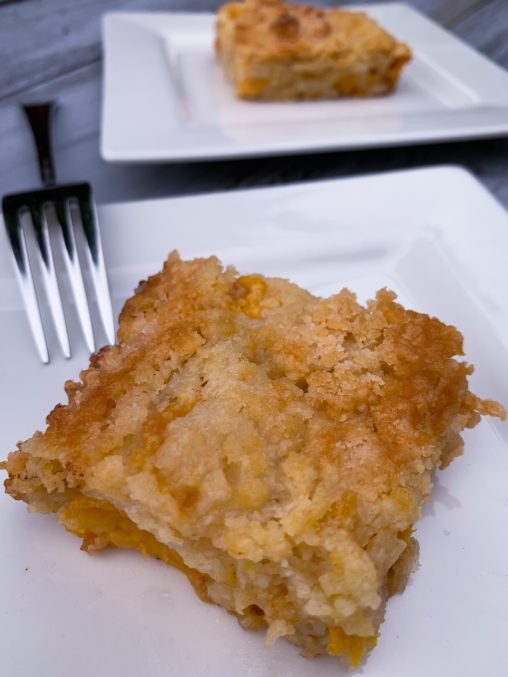
Top with vanilla ice cream or whipping cream if you desire it’s a fantastic touch with peach cobbler!

Enjoy!!

Print

Peach Cobbler

Servings 6 Servings

Ingredients

  • 3 cups sliced peaches
  • 1 tsp lemon juice
  • 1 cup flour
  • 1 cup sugar
  • 1/2 tsp salt
  • 1 egg
  • 6 tbsp butter melted

Instructions

  1. Preheat oven to 375° F. Spray bottom and sides of a 9x9 pan with non-stick cooking spray. Place peaches on bottom of pan. Sprinkle with lemon juice.

  2. Combine all dry ingredients in a bowl. Add the egg and mix until crumbly.

  3. Sprinkle mixture over peaches. Drizzle the melted butter over the mixture.

  4. Bake in the oven for 35-40 minutes or until the top is golden brown.

  5. Top with ice cream or whipping cream for some extra deliciousness!

Filed Under: Desserts

Chocolate Chip Pumpkin Bundt Cake

October 15, 2019

Chocolate chips, pumpkin and some basic ingredients will make this moist and delicious Chocolate Chip Pumpkin Bundt Cake. Yes, I said moist! This is the perfect dessert for  you and because it’s fall.

With all this pumpkin talk I wanted to whip up a quick dessert that anyone (even you!) can make. The chocolate chips add a perfect balance of sweetness to the cake. The powdered sugar sprinkled on top adds the perfect touch to make it look extra fancy.

This is also a great breakfast dish served with a large cup of coffee. It’s also perfect for Sunday football parties since you can feed a large group with this cake. Go Hawks!

Look at this middle! Doesn’t it look divine?!

Cut up a slice and dig in! If you make the slice too small, be warned, you will be back for seconds!

Enjoy!!!

Print

Chocolate Chip Pumpkin Bundt Cake

Course Cake, Dessert
Cuisine American
Keyword Chocolate Chip Pumpkin Bundt Cake
Prep Time 20 minutes
Cook Time 1 hour 5 minutes
Total Time 1 hour 25 minutes

Ingredients

  • 3 cups all-purpose flour
  • 2 tsp baking soda
  • 2 tsp cinnamon
  • 1 tsp pumpkin pie spice
  • ½ tsp salt optional
  • 2½ cups granulated sugar
  • 1 cup vegetable oil
  • 3 eggs
  • 1 tsp vanilla extract
  • 1 can (15 ounce) pumpkin
  • 2 cups semi-sweet chocolate chips
  • powdered sugar for dusting

Instructions

  1. Preheat oven to 350 degrees. Spray 10-inch bundt pan with baking spray and set aside.
  2. In a medium bowl, whisk together the flour, baking soda, cinnamon, pumpkin pie spice and salt.

  3. In a large bowl, beat sugar and vegetable oil until combined. Add eggs, one at a time, beating well after each addition. Add vanilla as you add the last egg.

  4. Alternate adding flour mixture and scoops of pumpkin to the egg mixture, beating well on medium-low after each addition. Stir in chocolate chips.

  5. Pour batter into prepared bundt pan.

  6. Bake for 60 - 65 minutes, or until a toothpick inserted in the center comes out clean. Cool for 10 minutes before cooling on a wire rack. Let cool completely and then dust with powdered sugar before serving.

Filed Under: Cakes, Desserts

Pumpkin Toffee

October 14, 2019

It’s already October and I can’t believe it. I better get on the pumpkin bandwagon like everyone else! Recently I had some delicious toffee at a friend’s house, so I decided to make Pumpkin Toffee. Don’t let candy making scare you, it’s a lot easier than you think!

For this recipe you can use white or dark chocolate. The recipe calls for pecans, walnuts or almonds. Mix it up a bit and make some with each nut or just stick to one. The white toffee I used walnuts and the dark toffee I used almonds. Whatever you choose it all takes good with the pumpkin toffee.

The most important part of this recipe is not to over cook the mixture so you will need a candy thermometer. I’m so glad I purchased a thermometer, I use it for everything now. The one I have is magnetic so it’s handy to keep on the fridge for easy access.

Ingredients to make this delicious Pumpkin Toffee are as follows:

  • Butter
  • Warm water
  • Granulated sugar
  • Salt
  • Light corn syrup
  • Pecans, Walnuts or Almonds
  • Pumpkin Pie Spice
  • White or Dark Chocolate

Follow the directions carefully and you won’t regret it!

This toffee isn’t too hard, when you bite into the chewy goodness, it just melts in your mouth.

Enjoy!!!

Print

Pumpkin Toffee

Course Dessert
Cuisine American
Keyword Pumpkin Toffee
Prep Time 40 minutes
Cook Time 30 minutes
Total Time 1 hour 10 minutes
Servings 1 pound

Ingredients

  • 1 1/2 cups pecans, walnuts or almonds chopped up a little
  • 1 cup unsalted butter cut into pieces, 2 sticks
  • 1/2 cup warm water
  • 1 cup + 1 tablespoon granulated sugar divided
  • 1 tsp salt
  • 1 tsp light corn syrup
  • 1 1/4 tsp pumpkin pie spice divided
  • 6 ounces white or dark chocolate coarsely chopped

Instructions

  1. Toast the chopped pecans, walnuts or almonds: Preheat oven to 300°F (150°C). Line a large baking sheet with parchment paper or a silicone baking mat. Spread the chopped pecans, walnuts or almonds on top and toast for 7-8 minutes or lightly browned. Set aside. 1 cup will be used inside the toffee and the remainder are sprinkled on top.

  2. Make the toffee: While stirring with a wooden spoon, melt the butter over medium heat in a 3-quart heavy-duty saucepan. Once melted, add the water, 1 cup granulated sugar, salt, and corn syrup. Stir constantly until the sugar dissolves, then brush down the sides of the pan with a water-moistened pastry brush. Attach a candy thermometer to the pan, making sure the bulb is not touching the bottom of the pan (if it touches you’ll get an inaccurate reading).

  3. Stir the mixture, every minute as it begins to boil. Rapid bubbles, a thicker consistency, and a slightly darker color form around 240°F (116°C). Continue to stir every minute until it reaches 290°F (143°C; soft crack stage). Watch carefully – the temperature slowly rises in the beginning, but then boasts quickly. If you notice it rising very fast, you can even turn off the heat when the toffee reaches 285°F (141°C), as it will continue to cook in the few seconds after.

  4. Immediately remove the pan from heat and stir in 1 teaspoon pumpkin pie spice and 1 cup toasted pecans, walnuts or almonds. Pour the toffee out onto a silicone baking mat lined baking sheet. Smooth into an even layer. The toffee should be thick and not spread all the way to the edges of the pan. Cool the toffee for 5 minutes.

  5. Meanwhile, get the toppings ready. Mix the remaining 1 tablespoon of granulated sugar with the remaining 1/4 teaspoon of pumpkin pie spice. Melt the white or dark chocolate. You can melt it in a double boiler or use the microwave. I melt it in the microwave in 20 second increments, stopping and stirring after each.

  6. Spread the melted white or dark chocolate on top of the toffee, then sprinkle with remaining pecans, walnuts or almonds and sugar/pumpkin pie spice mix.

  7. Refrigerate toffee for 20 minutes or until chocolate has set. Peel off the silicone baking mat and break toffee into pieces.

Recipe Notes

Store toffee in an airtight container at room temperature in a cool dry place for up to 2 weeks.

Filed Under: Desserts

Baked Sugar Donuts

June 7, 2019

National Donut Day is here! My all-time favorite donut is just a plain ol’ sugar donut. Every time I walk into a donut store I check to see if they have any. It’s easy and simple! These might be a little healthier because they are baked and not fried. But, are any type of donuts really healthy? Ha!

These are made with yeast and they will have to rise twice. So make sure you are prepared to let the dough rest for awhile. They are light and fluffy baked donuts!

You can make these donuts anyway you would like. Make a regular donut with a hole in the middle or you can add jelly or any type of filling to the inside of the donut. I added homemade strawberry jam to these ones! I’ll post my  strawberry jam recipe as soon as we get strawberries in season. It’s my favorite jam and I can’t wait to make more cause now I’m all out!

The jam inside gives it a little kick. You can always leave the sugar off the donuts and add some vanilla or chocolate mousse or other types of flavors that you can think of.

Enjoy!!!

Print

Baked Sugar Donut

Course Dessert
Cuisine American
Keyword Baked Sugar Donuts
Prep Time 30 minutes
Cook Time 10 minutes
Resting time 2 hours
Total Time 40 minutes
Servings 12 donuts

Ingredients

  • 2 1/2 cups all-purpose flour divided (spooned and leveled) plus more for dusting
  • 1/4 cup granulated sugar
  • 1/4 tsp salt
  • 2 1/4 tsp instant yeast quick acting (1 packet = 7 grams)
  • 2/3 cup warm milk 110˚F microwave 35 sec.
  • 4 tbsp unsalted butter melted divided
  • 2 egg yolks
  • 1/2 tsp vanilla extract
  • 1/3 cup jelly or jam (optional)
  • 1/3 cup granulated sugar to roll donuts

Instructions

  1. In a large mixing bowl, whisk together 1 cup flour, 1/4 cup sugar, 2 1/4 tsp (1 packet) instant yeast and 1/4 tsp salt.
  2. Add warm milk, 3 tbsp melted butter, 2 egg yolks and 1/2 tsp vanilla extract, and whisk vigorously to combine well.

  3. Cover with plastic wrap or clean towel and rest at room temperature for 10 minutes, until some bubbles form on the surface.

  4. Add remaining 1 1/2 cups flour, adding just enough until dough holds together and no longer sticks to the sides of the bowl. Knead in the bowl 5 minutes. If dough is really sticking to your hands, dust lightly with flour then continue kneading with clean dry hands. Cover bowl with plastic wrap and let rise in a 100˚F oven for 45 min or at room temperature for 2 hours, or until doubled in size.

  5. Line a baking sheet with parchment paper and preheat oven to 375˚F with rack in the center of the oven.
  6. Turn dough out onto a floured surface and roll the dough out to just under 1/2” thick. Cut circles using a 2 1/2 inch round cookie cutter. Re-roll scraps if needed to make 12 donuts total. Place donuts on prepared baking sheet, cover with a tea towel and let rise in a 100˚F oven for 20 min or at room temperature 45 min, or until puffed. Bake uncovered in the center of a preheated oven at 375˚F for 10-12 minutes or until lightly golden on top.
  7. Right out of the oven, brush each hot bun all over with the remaining 1 tbsp melted butter and roll in a bowl of sugar to coat lightly. Cut a deep slit in the side of each donut and pipe jam with a pastry bag into each one if desired.


Filed Under: Breakfast, Desserts

Chocolate Nutella Basketball Cake

June 1, 2019

I was asked to make a cake for a high school basketball team for a dessert dash. It was a challenge to make but worth it! Plus it’s chocolate nutella so you know it’s tasty! I used the same cake recipe and frosting as my Chocolate Nutella Cupcakes. It’s also a great cake to make for the NBA playoffs since the Golden State Warriors are in the running! Go Warriors!

For the cake I used a half round cake pan. Make sure to coat the pan with lots of non stick spray so the cake doesn’t stick to the pan after it’s baked. Let the cake cool completely. Cut the cake in half and apply frosting to the middle of the cake. Attach the top of the cake and coat the whole cake with rest of the frosting.

I used a half sheet cake board for the background.

I used marshmallow fondant to decorate the outside of the cake.  It’s expensive to buy fondant so I wanted to make my own. Make the fondant, add orange gel food coloring and roll it out to about an 1/8 inch thick and cover the cake with fondant. Decorate the rest of the cake with the rest of the fondant and color the fondant with the corresponding colors for the back board, ball lines and if you want a team name added. When you add the basketball to the cake board make sure you have a round cake board under the basketball cake. The oils will spread onto the half sheet cake board if you don’t have a mini round one directly under the cake. Once the black lines are on the basketball, add the red rim and basket hoop strings.

Enjoy!

Print

Chocolate Nutella Basketball Cake

Course Cake, Dessert
Cuisine American
Keyword Chocolate Nutella Basketball Cake

Ingredients

  • 1 box chocolate cake mix or your favorite homemade recipe

Nutella Frosting

  • 1 cup butter
  • 1/2 cup shortening
  • 1 cup Nutella hazelnut spread
  • 4-5 cups powdered sugar
  • 3-4 tbsp milk or water

Marshmallow Fondant

  • 16 ounce package mini marshmallows
  • 2-5 tbsps water
  • 8 cups powdered sugar
  • 1/3 cup vegetable shortening

Instructions

  1. Bake cake as directed on the box. Let the cake completely cool.

Nutella Icing

  1. Beat together butter and shortening until smooth.

  2. Add Nutella and mix until smooth.
  3. Slowly add 4 cups of powdered sugar and mix until smooth.
  4. Add 2-3 tbsp of milk or water and mix until smooth.
  5. Add fifth cup of powdered sugar and mix until smooth.
  6. Add more water or milk until the right consistency.

Marshmallow Fondant

  1. Place marshmallows and 2 tablespoons of water in a large microwave-safe bowl. 
  2. Microwave for 30 seconds on high; stir until mixed well. Continue microwaving in 30 second intervals until they are melted and smooth.

  3. Place about 5 cups of the powdered sugar on top of the melted marshmallow mixture and gently fold it into the marshmallows.
  4. Grease your hands and your counter-top generously with shortening. Turn marshmallow mixture onto counter and start kneading it like you would dough.
  5. Add more confectioners' sugar as needed and re-grease your hands the counter-top as needed.
  6. If the marshmallow fondant is tearing easily, it is too dry; add water (about 1/2 tablespoon at a time) kneading until fondant forms a firm, smooth elastic ball that will stretch without tearing, about 8 minutes.
  7. To color fondant, add a little gel color to your desired amount and knead it with your hands until it absorbs all of the color. Add more color as needed to reach the desired colored. (I use medical gloves when mixing in the color. It's very helpful while cleaning your hands after).

  8. Follow directions above to assemble and decorate the cake.

Recipe Notes

TO STORE FONDANT:

To store the fondant, coat it with a thin layer of shortening, wrap it tightly with plastic wrap, and the place it in a resealable bag with all the air squeezed out. It will keep well in refrigerator for several weeks.
When ready to use, knead fondant until smooth. Roll out fondant 1/8 inch thick.

Filed Under: Cakes, Desserts

Gooey Chocolate Chip Cookies

May 15, 2019

Today is National Chocolate Chip Cookie Day! I’ve made a ton of different types of chocolate chip cookies in my day but these ones are my favorite… chewy, gooey and oh so soft! Gooey Chocolate Chip Cookies are where it’s at! Check out my other chocolate chip cookie recipes from my blog. Skillet Chocolate Chip Cookie,  Salted Chocolate Cookies & Chocolate Chip Cookie Cake.

No mixer required to make these delicious cookies. With a recipe this easy you just might find yourself making these chocolate chip cookies over and over!

I always try and make thick cookies no matter what kind I’m making. I have two tricks to try and make this happen.  First, chill the dough for a couple of hours or over night. Second, shape the cookies tall rather than wide on the cookie sheet.

To get them gooey and soft bake for 11 minutes. They will look slightly under cooked when you pull them out of the oven. Leave them on the cookie sheet for about 10 minutes, they will continue to cook before transferring them to a wire rack to cool completely.

As they are cooling on a wire rack make sure to eat one or two while they are warm, it’s the best! Don’t forget the milk to eat along with your warm gooey chocolate chip cookie!

Enjoy!!!

Print

Gooey Chocolate Chip Cookies

Course Cookies, Dessert
Cuisine American
Keyword Gooey Chocolate Chip Cookies
Prep Time 15 minutes
Cook Time 11 minutes
Total Time 26 minutes
Servings 36 medium size cookies

Ingredients

  • 2 1/4 cups all-purpose flour (spoon & leveled)
  • 1 1/2 tsp cornstarch
  • 1 tsp baking soda
  • 1/2 teaspoon salt
  • 3/4 cup unsalted butter melted & slightly cooled
  • 3/4 cup packed light or dark brown sugar
  • 1/2 cup granulated sugar
  • 1 large egg + 1 egg yolk at room temperature
  • 2 tsp pure vanilla extract
  • 1 cup semi-sweet chocolate chips or chocolate chunks (or more)

Instructions

Instructions

  1. Whisk the flour, baking soda, cornstarch, and salt together in a large bowl. Set aside.
  2. In a medium bowl, whisk the melted butter, brown sugar and granulated sugar together until no brown sugar lumps remain. Whisk in the egg, then the egg yolk and lastly the vanilla extract.

  3. Pour the wet ingredients into the dry ingredients and mix together with a large spoon or rubber spatula. Add the chocolate chips or chocolate chunks. 

  4. Cover the dough and chill in the refrigerator for 2-3 hours or overnight. Chilling is mandatory. I highly recommend chilling the cookie dough overnight for less spreading.

  5. Take the dough out of the refrigerator and allow to slightly soften at room temperature for 10 minutes.
  6. Preheat oven to 325°F. Line two large baking sheets with parchment paper or silicone baking mats. 

  7. Roll the dough into balls, about 1 tablespoon of dough each. Roll the cookie dough balls to be taller rather than wide. This will allow the cookies to be on the thick side. Place 12 balls of dough onto each cookie sheet. 

  8. Bake the cookies for 11 minutes. The cookies will look under baked. They will continue to bake on the cookie sheet. Allow to cool on the cookie sheet for 10 minutes before transferring to a wire rack to cool completely.

Recipe Notes

You can make the cookie dough and chill it in the refrigerator for up to 2-3 days. Allow to come to room temperature then continue with step 4.

Cookies stay fresh covered at room temperature for up to 1 week or freeze cookies up to 3 months. 

Filed Under: Cookies, Desserts

Ombre Vanilla Cake

May 10, 2019

I was lucky enough to make this cake for a dear friend and I think she thoroughly enjoyed it! This would also be a great cake to make for Mother’s Day! Ombre cakes are fun to make so don’t let the design scare you. This Ombre Vanilla Cake turned out to be pretty in pink. You can add several colors for this cake design. If you have the time, it’s also really pretty when you use multiple colors!

I used the same recipe as my Naked Vanilla Raspberry Cake (minus the raspberry sauce).

To make this cake I suggest the following:

  • A cake (preferably round)
  • Butter cream frosting
  • food coloring (I suggest gel but liquid will work too)
  • piping bag
  • piping tip – #12 wilton
  • small offset spatula
  • turn table

Add enough food coloring to your icing to achieve the color you want. Put the icing into the piping bag.

If you haven’t done this technique before I would suggest practicing on a cutting board before you start. Begin by piping four dots in a row. The dots should just touch each other and be about the diameter of a quarter (you can experiment with different sizes). Grab your offset spatula and gently bring it down onto the middle of the bottom icing dot. Press down and drag. Repeat with each dot. Scrape the excess icing off your spatula back onto the icing bowl.

Ok, let’s start the process!!!

Give your cake a crumb coat of buttercream.

Starting at the bottom of the cake, pipe dots until you have reached the top of the cake.  Using the technique you practiced above, cover your entire cake using the petal effect. When you get to the last row the easiest way to finish is just with a vertical row of dots. Make that the back of your cake. Continue and give the top of your cake the petal effect as well.

I’ve seen cakes done with the same technique going up the cake (instead of around) and you can mix it up on the top of the cake doing rows in different directions. Use your creativity!

I really enjoy doing the Ombre effect!

Enjoy!!!

Print

Ombre Vanilla Cake

Course Cake, Dessert
Cuisine American
Keyword Ombre Vanilla Cake
Prep Time 45 minutes
Cook Time 25 minutes
Resting time 1 hour
Total Time 2 hours 10 minutes
Servings 12 servings

Ingredients

Cake

  • 3 3/4 cups all purpose flour sifted
  • 1 tsp baking powder
  • 3/4 tsp baking soda
  • 1 tsp salt
  • 1 1/2 cups unsalted butter room temperature
  • 2 cups granulated sugar
  • 5 large eggs room temperature
  • 1 tbsp pure vanilla extract
  • 1 3/4 cups buttermilk room temperature

Vanilla Buttercream

  • 1 1/2 cups unsalted butter room temperature
  • 5 - 6 cups confectioners' sugar
  • 5 - 6 tbsp heavy cream
  • 1 tsp pure vanilla extract

Instructions

Making the Cake

  1. Preheat oven to 350°F (177°C). Grease and lightly flour three 9-inch cake pans.

  2. Whisk the flour, baking powder, baking soda, and salt together in a large bowl. Set aside.
  3. Using a handheld or stand mixer fitted with a paddle or whisk attachment, beat the butter and sugar together on high speed until smooth and creamy, about 3 minutes. Scrape down the sides and up the bottom of the bowl with a rubber spatula as needed.
  4. On medium-high speed, add 1 egg at a time, beating well after each addition. Beat in the vanilla extract. Scrape down the sides and up the bottom of the bowl with a rubber spatula as needed.
  5. With the mixer on low speed, add the dry ingredients in three additions alternating with the buttermilk, beginning and ending with the dry ingredients, and mixing each addition just until incorporated. Do not overmix this batter. The batter will be smooth, velvety, and slightly thick.
  6. There is about 8 cups of batter total, so each layer will be 2 and 2/3 cups. Pour/spread batter evenly into prepared cake pans.
  7. Bake for around 25-26 minutes or until the cakes are baked through. To test for doneness, insert a toothpick into the center of the cake. If it comes out clean, it is done. Allow cakes to cool completely in the pans set on a wire rack. The cakes must be completely cool before frosting and assembling.

Making the Buttercream Frosting

  1. In a large bowl using a hand-held mixer or stand mixer fitted with a whisk or paddle attachment, beat the butter on medium speed until creamy, about 2 minutes.

  2. With the mixer running on low, add 5 and 1/2 cups confectioners' sugar, 5 tablespoons heavy cream, and the vanilla extract. Increase to high speed and beat for 3 full minutes.
  3. Add 1/2 cup more confectioners' sugar if frosting is too thin, 1 more tablespoon cream if frosting is too thick.
  4. Yields about 4.5 cups of frosting.

Assemble and Decorate the Cake

  1. First, using a large serrated knife, slice a thin layer off the tops of the cakes to create a flat surface. Discard or save and eat later.
  2. Place 1 cake layer on your cake stand, cake turntable, or serving plate. Spread frosting evenly on top.

  3. Top with 2nd cake layer and evenly cover the top with more frosting.

  4. Top with the third cake layer and evenly cover the top with more frosting. Cover the sides with a crumb coat finish of frosting.

  5. Use a bench scraper to smooth out the frosting on the sides of the cake.
  6. Decorate cake with the ombre effect and follow the instructions above. 

  7. Refrigerate the cake for 2-3 hours or up to 1 day before slicing and serving. If chilling for more than a few hours, loosely cover with plastic wrap after 1 hour of refrigeration (the frosting will "set" after about 1 hour and the plastic wrap won't really ruin your frosting at that point).

Recipe Notes

Cover and store leftover cake in the refrigerator for up to 1 week.

Filed Under: Cakes, Desserts

Vanilla Checkered Cake

May 1, 2019

My blog turned one today! I can’t believe it’s been a year since I took the leap of starting a blog. I’ve always wanted to start a blog and I finally did it and I couldn’t be happier to share all of my recipes and hiking adventures with YOU!

I’ve posted 51 blog posts in my first year, making this one #52! It’s been a fun year of baking, hiking and blogging. Soon enough I will be adding more hiking posts. Thank you for making this fun for me and following my page. Tell your friends about my blog if you love it as much as me!

I made this Vanilla Checkered Cake to celebrate my one year anniversary of my blog! YAY! Turning one is fun!

Don’t let the inside of the cake scare you, it’s easier than you think. But if you don’t want to attempt the checkered cake you can just leave it all one color. Either way it’s delish! You can’t go wrong with vanilla cake and vanilla buttercream. All the details of this cake will be in the recipe. I really enjoyed making this Vanilla Checkered Cake!

Enjoy!!!

Print

Vanilla Checkered Cake

Course Cake, Dessert
Cuisine American
Keyword Vanilla Checkered Cake
Prep Time 1 hour
Cook Time 30 minutes
Resting time 1 hour
Total Time 2 hours 30 minutes
Servings 12 slices

Ingredients

  • 1 box vanilla cake mix
  • 1 3oz box vanilla pudding
  • 1 cup water
  • 1/3 cup vegetable oil
  • 3 large eggs

Vanilla Butter Cream

  • 1 cup unsalted butter at room tempature
  • 4-5 cups confectioners’ sugar
  • 1/4 cup whole milk
  • 2 tbsp pure vanilla extract
  • salt to taste
  • black gel food coloring

Instructions

  1. Preheat oven to 350 degrees. Grease two 6 inch pans and set aside.

  2. Combine cake mix, vanilla pudding, water, oil and eggs in a mixing bowl. With the paddle attachment mix until well combined when no lumps appear. 

  3. Pour half the batter into one pan. Add the black food coloring. I usually dip a knife into the gel food coloring and add it that way. You don't need much. Mix the food coloring until incorporated. Pour the black batter into the other greased pan. Bake cakes for 26 - 31 minutes. Poke a tooth pick in the middle until it comes out clean. 

  4. Let the cakes completely cool on a wire rack.

Vanilla Buttercream

  1. While the cake is cooling make the frosting. With a handheld or stand mixer fitted with a paddle attachment, beat the butter on medium speed until creamy – about 2 minutes. Add 4 and 1/2 cups confectioners’ sugar, the heavy cream, and vanilla extract. Beat on low speed for 30 seconds, then increase to high speed and beat for 3 full minutes. Add up to 1/2 cup more confectioners’ sugar if frosting is too thin or another tablespoon of cream if frosting is too thick. Add a pinch of salt if frosting is too sweet. 

Assembling the cake

  1. Once the cakes are completely cooled cut the top of the cakes off with a serrated knife and make the tops even.

  2. You will need a 4 inch and a 2 inch cookie cutter for the next steps (you can also use a template and cut your circles out with a knife). You will need to cut two circles from each layer.

  3. First, insert the smallest circular cutter into the center of each layer. Carefully remove the centers, leaving them intact.

  4. Cut your larger circles. The idea is to make the width of the cake in each of your rings as equal as possible, so that the squares of your checkerboard will all appear to be equal in size.

  5. You will have a few circles to piece back together. When you put the cakes together alternate colors. If you have white on the outside, black will be the second layer and the inside layer will be white. Black on the outside, white in the middle and the inside layer will be black.

  6. Apply a layer of frosting to the top of the bottom cake. Stack your cakes on top of each other. Put a good crumb coat on… as in, a crumb coat that conceals the cake underneath. It can be sloppy and uneven, but you should not be able to see what color the cake is.

    *crumb coat explanation below!

  7. To get the rosette effect on the cake you will need to use tip #1M and a piping bag. Fill the bag up with buttercream. If you have an appropriately sized coupler you can use that, or you can just insert the tip into the bag and cut off the excess.

  8. To make your rose, start in the center, then slowly move your tip in a circle around the center point. I wanted a single rose to span the side of the cake so I looped around my center point twice. Try to end in the same place each time.

  9. Go all the way around the cake and complete with one last rose! Then go back and add the roses to the top using the same method.

  10. When making flowers that big, you are bound to have some empty spaces in the cake. Go back in and add dollops of stars with the tip.

Recipe Notes

I also added some silver sprinkles on the crumb coat to give it a little extra crunch when you bite into the cake!

*A crumb coat is a thin layer of frosting applied all over the cake that seals in stray crumbs before the roses are piped onto the cake.

Filed Under: Cakes, Desserts

Chocolate Peanut Butter Rice Krispie Treats

April 22, 2019

Yes another Rice Krispie treat! Again, my favorite cereal that makes amazing treats! Chocolate Peanut Butter Rice Krispie Treats might be the best one by far. I love peanut butter, and chocolate to top it off. Great combo of course!  These are another quick and easy recipe to make in a pinch when you don’t have a lot of time.

Surprisingly this recipe doesn’t call for marshmallows. First layer is the peanut butter, corn syrup, brown sugar, granulated sugar and a pinch of salt. Then simply finish it off with the easy chocolate topping.

I took all the Chocolate Peanut Butter Rice Krispie Treats to work and they were devoured within minutes!

Enjoy!!!

Print

Chocolate Peanut Butter Rice Krispie treats

Course Dessert
Cuisine American
Keyword Chocolate Peanut Butter Rice Krispie treats
Prep Time 15 minutes
Cook Time 5 minutes
Total Time 20 minutes
Servings 16 pieces

Ingredients

BARS

  • 1 cup light corn syrup
  • 1/2 cup granulated sugar
  • 1/2 cup light brown sugar
  • 1 cup creamy peanut butter at room temperature (don't use natural)
  • 1 pinch sea salt
  • 5 cups Rice Krispies

TOPPING

  • 1 cup semisweet chocolate chips
  • 3 tbsp whole milk
  • 2 tbsp creamy peanut butter at room temperature (don't use natural)

Instructions

Bars

  1. Line an 8.5x11-inch baking pan with parchment paper. Make sure the parchment paper is hanging over the sides. It will be easier to get the bars out of the pan when they are done. Set aside.

  2. Add the corn syrup, brown sugar and granulated sugar in a large saucepan over medium-low heat and stir to combine. Bring to a boil, stirring constantly. Once boiling, remove from the heat and immediately stir in peanut butter and a pinch of sea salt. Mix until well combined. Quickly stir in Rice Krispies. Spread into the prepared baking pan. Lightly grease your hands and press the mixture evenly in the pan. The harder you pack the mixture down into the pan the more dense the bars will be. For a lighter bar, press gently.

Topping

  1. In a small saucepan over low heat, combine chocolate chips, whole milk and peanut butter. Cook, stirring frequently until completely melted and smooth. Pour over the top of the bars and spread evenly.

  2. Let the chocolate topping cool. Remove the bars from the pan, cut and serve. 

Filed Under: Desserts

Caramel Popcorn with Almonds

April 8, 2019

It’s baseball season and it reminds me of caramel popcorn at the ball park! I had left over caramel sauce from my Marshmallow Caramel Rice Krispie Treats so I decided to pop some popcorn to finish off the sauce. The sauce worked perfectly with popcorn and I threw in some almonds. Caramel popcorn with almonds is a great little sweet snack!

Get your air popper out and grab those kernels and pop away! Fresh air popped popcorn is my favorite, but you can also use microwave popcorn.

Instead of paying $10 per bag at the ballpark, you can make your own for a lot less and it makes a lot more! You can sit on your couch and watch the game and eat this yummy treat and be just as happy.

If you’re not a fan of baseball, grab your favorite movie and devour this caramel popcorn with almonds. It will go quick!

Enjoy!!!

Print

Caramel Popcorn with Almonds

Course Appetizer, Dessert
Cuisine American
Keyword Caramel Popcorn with Almonds
Prep Time 20 minutes
Cook Time 10 minutes
Total Time 30 minutes
Servings 8 people

Ingredients

  • 1 cup popcorn
  • 6 ounces caramels (wrapped)
  • 1/2 cup heavy cream
  • 1/2 tbsp unsalted butter
  • 1 cup almonds
  • salt (to taste)

Instructions

  1. Grab a bowl or large pot. Pop the popcorn over the stove or use an air popper (you can use microwave popcorn as well). Add the almonds to the popcorn.

  2. In a medium saucepan place the unwrapped caramels, heavy cream and butter. Over medium heat stir constantly until creamy.

  3. Let the caramel sauce cool (about 10 minutes) then pour all over popcorn. Stir with a wooden spoon until covered evenly. Sprinkle salt over caramel popcorn if desired. 

Recipe Notes

Popcorn will last for a few days in an airtight container.

Filed Under: Appetizers, Comfort Foods, Desserts

  • « Go to Previous Page
  • Page 1
  • Page 2
  • Page 3
  • Page 4
  • Interim pages omitted …
  • Page 6
  • Go to Next Page »

Primary Sidebar

Hello and Welcome

Hi! I'm Holly and welcome to my personal blog and thank you for taking the time to look through my recipes and hiking adventures. I hope you enjoy them as much as me. Stay connected to see upcoming blog posts! I'm excited to have you join!

Recent Posts

  • Sourdough Focaccia
  • Andes Mint Truffles
  • Cole Slaw
  • Pumpkin Spice Cupcakes
  • Chicken Tortilla Soup

Archives

  • October 2024
  • December 2023
  • October 2023
  • August 2022
  • April 2022
  • February 2022
  • January 2021
  • May 2020
  • April 2020
  • February 2020
  • November 2019
  • October 2019
  • August 2019
  • July 2019
  • June 2019
  • May 2019
  • April 2019
  • March 2019
  • February 2019
  • January 2019
  • December 2018
  • November 2018
  • October 2018
  • September 2018
  • August 2018
  • July 2018
  • June 2018
  • May 2018

Categories

Don’t Miss These!

Little Si

Salted Chocolate Cookies

White Chocolate Raspberry Cake

Sourdough Focaccia

Most Popular Recipes

Plum Muffins

Circus Cookies

Footer

My Favorites

stay connected

  • Facebook
  • Instagram
  • Pinterest

Don’t miss a recipe or an adventure!

Copyright© 2025 · Brunch Pro Theme by Feast Design Co.