• Skip to primary navigation
  • Skip to main content
  • Skip to primary sidebar
  • Skip to footer
  • Home
  • Recipes
  • Hiking
  • Contact

Holly in the PNW

The girl that can't sit still!

Desserts

Skillet Chocolate Chip Cookie

January 28, 2019

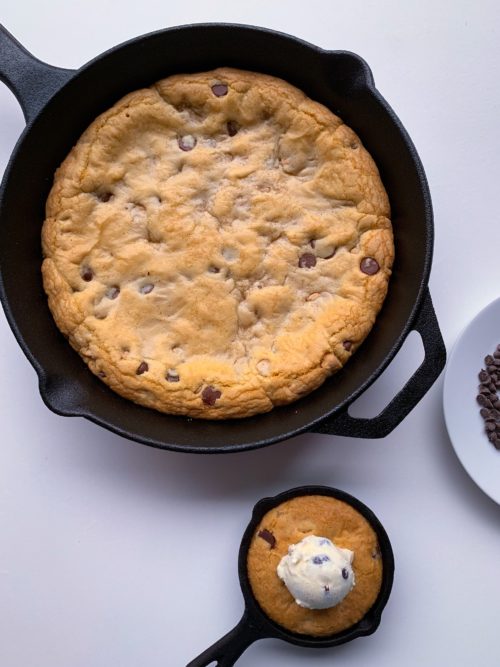
I’ve been in love with my new skillet and trying different recipes. A chocolate chip cookie all in one pan. How easy is that?!?! Comes out golden brown and delicious. Let’s get started!

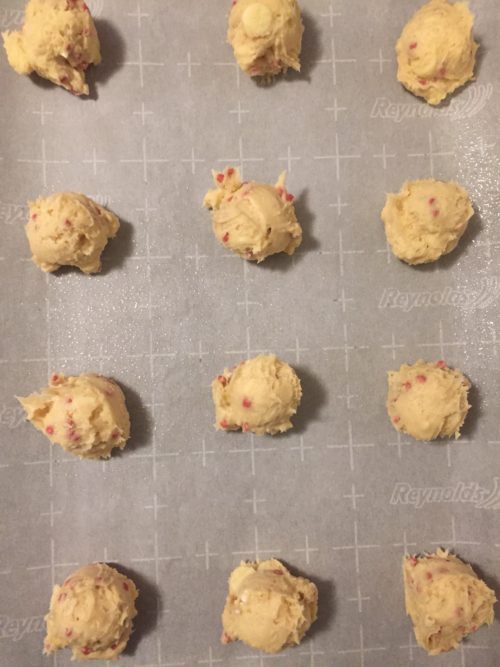
You don’t need a mixer for this recipe. We will do it the old school way. All you need is a whisk and spoon or rubber spatula. In a medium bowl, whisk the melted butter, brown sugar, and granulated sugar together until no brown sugar lumps remain. Whisk in the egg, then the egg yolk. Whisk in the vanilla extract. Pour the wet ingredients into the dry ingredients and mix together with a large spoon or rubber spatula. Stir the chocolate chips into the batter. I did add some caramel salted chips to the batter since I had some in the cupboard. You can add any flavor and it will taste great! Chill for 2-3 hours.

Preheat your oven to 350 degrees. Grease the bottom of your skillet with olive oil. You don’t need much, a tablespoon is plenty. Use a paper towel to spread the oil on the bottom and sides of the skillet. Add your chocolate chip cookie batter to the skillet and spread evenly. Bake at 350 degrees for 30-35 minutes or until golden brown. Use a toothpick to make sure the center is done to your liking.

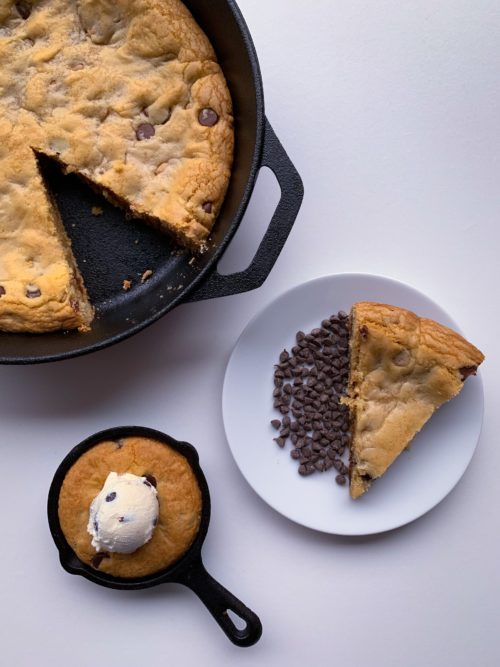
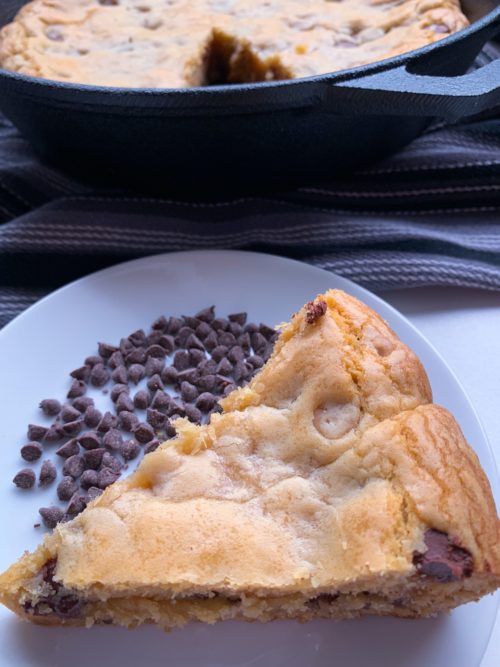
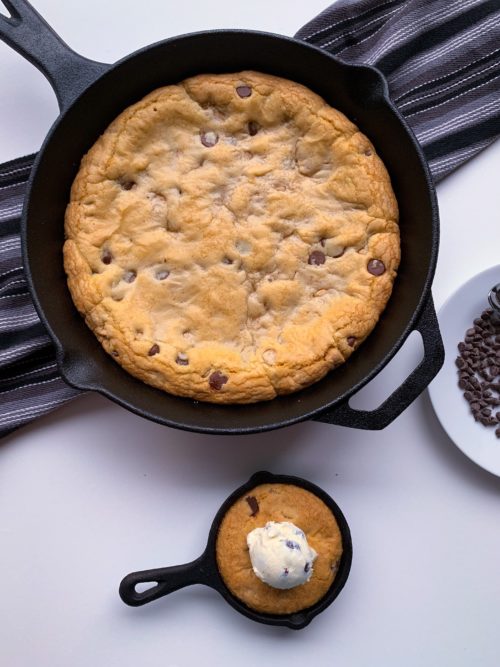
Cut a piece out and serve it with ice cream! The cookie was delicious warm right out of the oven.

I had a small skillet and I wanted to make a personal sized cookie so you can use this recipe for personal servings as well. I do love my personal size recipes!

Enjoy!!!

Print

Skillet Chocolate Chip Cookie

Course Cookies, Dessert
Cuisine American
Prep Time 20 minutes
Cook Time 30 minutes
Resting time 1 hour
Total Time 50 minutes
Servings 12 slices

Ingredients

  • 2 1/4 cups all-purpose flour (spoon & leveled)
  • 1 tsp baking soda
  • 1 1/2 tsp cornstarch
  • 1/2 tsp salt
  • 3/4 cup unsalted butter, melted
  • 3/4 cup light or dark brown sugar
  • 1/2 cup granulated sugar
  • 1 large egg + 1 egg yolk at room temperature
  • 2 tsp pure vanilla extract
  • 2 cups semi-sweet chocolate chips
  • 1 tbsp olive oil (for the skillet)

Instructions

  1. Whisk the flour, baking soda, cornstarch, and salt together in a large bowl. Set aside.
  2. In a medium bowl, whisk the melted butter, brown sugar, and granulated sugar together until no brown sugar lumps remain. Whisk in the egg, then the egg yolk. Whisk in the vanilla extract. Pour the wet ingredients into the dry ingredients and mix together with a large spoon or rubber spatula. The dough will be very soft, yet thick. Fold in the chocolate chips. They may not stick to the dough because of the melted butter, but do your best to combine them. Cover the dough and chill in the refrigerator for 2-3 hours or up to 3-4 days. Chilling is mandatory. I highly recommend chilling the cookie dough overnight for less spreading.

  3. Take the dough out of the refrigerator and allow to slightly soften at room temperature for 10 minutes.
  4. Preheat oven to 350 degrees. 

  5. Grease the bottom of your skillet with olive oil. You don't need much, a tablespoon is plenty. Use a paper towel to spread the oil on the bottom and sides of the skillet. Add your chocolate chip cookie batter to the skillet and spread evenly. 

  6. Bake at 350 degrees for 30-35 minutes or until golden brown. Use a toothpick to make sure the center is done to your liking. Serve warm.

Recipe Notes

Make ahead tip: You can make the cookie dough and chill it in the refrigerator for up to 2-3 days. Allow to come to room temperature then continue with step 4. 

When baked the Skillet Cookie stays fresh in a air tight container at room temperature for up to 1 week. 

Filed Under: Cookies, Desserts

Reese’s Sugar Cookies

January 15, 2019

I was in my kitchen today and was thinking I haven’t baked in awhile so I opened my baking cupboard and just started to grab things out. I had some Reese’s peanut butter cups left over from the holidays and a package of Betty Crocker’s sugar cookie mix. These Reese’s Sugar Cookies are simple and a fun recipe.

Start by making the sugar cookies. Follow the directions on the back of the packaging.  You want to follow the recipe for the cut out option.

Roll out the dough and cut out circles.  I used a measuring cup for my circles. You can use a round cookie cutter, glass or anything in your kitchen that is round.

Line a cookie sheet with a silicone mat or grease the sheet if you don’t have a mat. Position one circle on the cookie sheet and place a Reese’s peanut butter cup in the middle of the dough. I suggest cutting the peanut butter cups in half. You can keep the peanut butter cup whole but the cookie will have a larger bump instead of a minimal one.  I tried it both ways and I like it better cut in half.

Add another circle dough right on top and press the dough circles together.  I used a cake pop stick to dent the edges of the cookie. If you don’t want the dents just firmly press the edges together. I also added some coarse sugar to the top of the cookie.

Bake for 9-10 minutes at 350 degrees.

Let the cookies completely cool and drizzle with melted chocolate. I used Wilton Candy Melts for the chocolate. 

Print

Reese’s Sugar Cookie

Course Cookies
Cuisine American
Prep Time 20 minutes
Cook Time 10 minutes
Resting Time 15 minutes
Total Time 30 minutes
Servings 18 cookies

Ingredients

  • 1 package Sugar Cookie Mix Betty Crocker
  • 9 or 18 Reese’s Peanut Butter cups
  • melted chocolate to drizzle on top

Instructions

  1. Preheat oven to 350 degrees.

  2. Make sugar cookies directed on back of package. Use the cut out option if using Betty Crocker.

  3. Roll out the dough and cut out circles.  I used a measuring cup for my circles. You can use a round cookie cutter, glass or anything in your kitchen that is round.

  4. Line a cookie sheet with a silicone mat or grease the sheet if you don’t have a mat. Position one circle on the cookie sheet and place a Reese’s peanut butter cup in the middle of the dough. I suggest cutting the peanut butter cups in half. You can keep the peanut butter cup whole but the cookie will have a larger bump instead of a minimal one.  I tried it both ways and I like it better cut in half.
  5. Add another circle dough right on top and press the dough circles together.  I used a cake pop stick to dent the edges of the cookie. If you don’t want the dents just firmly press the edges together. I also added some coarse sugar to the top of the cookie.
  6. Bake for 9-10 minutes at 350 degrees.
  7. Let the cookies completely cool on a wire rack and drizzle with melted chocolate. I used Wilton Candy Melts for the chocolate. 


Filed Under: Cookies, Desserts

Almond Sugar Cookies

December 31, 2018

I know I’m late posting this recipe but the holidays just caught up with me! These Almond Sugar Cookies scream holiday celebration. If you want to make these after Christmas it’s still a wonderful cookie anytime of the year. I gave some to my friends and they said they taste like Christmas! That’s what I like to hear! These almond sugar cookies are quick and easy.

These simple, quick sugar cookies are soft and buttery with almond extract.  If you don’t like almond you may use vanilla extract.

These cookies are made in 1 bowl and take less than 20 minutes. 10 minutes to prepare and 10 minutes to bake. Easy, right? Enjoy!


Print

Almond Sugar Cookies

Course Cookies
Cuisine American
Keyword Almond Sugar Cookies
Prep Time 10 minutes
Cook Time 10 minutes
Total Time 20 minutes
Servings 18 cookies

Ingredients

  • 1/4 cup butter softened to room temperature
  • 1/4 cup butter flavored shortening
  • 1 cup granulated sugar
  • 2 large eggs
  • 1/2 teaspoon almond extract
  • 1/2 teaspoon baking powder
  • 1/2 teaspoon salt
  • 1 1/2 cups all-purpose flour

Instructions

  1. Preheat oven to 350 degrees.
  2. Cream the butter, shortening and sugar together on medium speed using a handheld or stand mixer with a paddle attachment. Beat in eggs, almond extract, baking powder, and salt. Add flour, and mix until a dough forms.

  3. Use a cookie scoop or roll dough in tablespoon size balls and bake for 8-10 minutes on an ungreased baking sheet or silicone baking mat.


Filed Under: Cookies, Desserts

Snickerdoodle Truffles

December 18, 2018

If you love Snickerdoodle cookies you will love these Snickerdoodle Truffles! They are rich and creamy with the white chocolate wrapped around the snickerdoodle cookie ball with the cream cheese mixed in it. I suggest having a tall glass of milk with one.

The easiest part to these cookies is you buy a prepackaged snickerdoodle mix and bake the cookies as directed on the package. Let the cookies cool and place them in the food processor until fine crumbs form.

Add the cream cheese with the fine crumbs and pulse until well combined. Shape into 1 inch balls, place on the lined prepared baking sheet. Chill 3 hours.

Don’t let this next step stop you from making the snickerdoodle truffles. Coating the balls with the chocolate can be challenging but don’t give up!

Microwave the candy coating in a microwave safe bowl at medium for 1 minute and then in 15 seconds intervals, until melted, stir until smooth.  Stir together the remaining sugar and cinnamon in a small bowl.  Dip the chilled truffles in the melted coating; letting excess drip off.  I use a fork so the excess drips off from the fork. Return to the baking sheet and sprinkle with the cinnamon-sugar.  Let stand for 30 minutes or until set.

Add the Snickerdoodle Truffles in little baggies and tie with a string and give them out as a holiday baked goods gift to your friends and family!

Happy Baking!! Enjoy!!

Print

Snickerdoodle Truffles

Course Dessert
Cuisine American
Keyword Snickerdoodle Truffles
Prep Time 35 minutes
Cook Time 10 minutes
Resting time 3 hours
Total Time 45 minutes
Servings 26 Truffles

Ingredients

  • 1 16 ounce package refrigerated sugar cookie dough
  • 3 tbsp sugar
  • 1 ½ tsp ground cinnamon
  • 1 8 ounce cream cheese cut into cubes
  • 10 ounces vanilla candy coating

Instructions

  1. Preheat oven to 350 degrees F. Shape the dough into 1 inch balls. Stir together half each of the sugar and cinnamon in a small bowl. Roll the dough balls in the cinnamon-sugar mixture. Place the balls about 2 inches apart on an ungreased sheet.
  2. Bake at 350 degrees F for 10 – 14 minutes or until the edges are lightly browned. Cool on baking sheet for 1 minute. Transfer to a wire rack and cool completely for about 20 minutes.
  3. Line a baking sheet with parchment paper. Process cooled cookies in a food processor until fine crumbs form. Add the cream cheese. Pulse until mixture is smooth. Shape into 1 inch balls, place on the lined prepared baking sheet. Chill 3 hours.
  4. Microwave the candy coating in a microwave safe bowl at medium for 1 minute and then in 15 seconds intervals, until melted, stir until smooth. Stir together the remaining sugar and cinnamon in a small bowl. Dip the chilled truffles in the melted coating; letting excess drip off. Roll in the cinnamon-sugar. Return to the baking sheet, let stand for 30 minutes or until set.

Filed Under: Desserts

Spritz Cookies

December 14, 2018

Spritz cookies are a favorite holiday cookie that is simple and delicious, bite-sized and easy to make! What more can you ask for? I usually eat a dozen of these before I am done in the kitchen, but luckily the recipe makes over 80 spritz cookies! Sweet, buttery and adorable, these cookies are the perfect addition to any holiday occasion.

I bought a cookie press last year and it is super fun to make all the different cookie shapes. The one I purchased came with 12 different shapes you can easily change. If you don’t already have a cookie press you can find them on Amazon, Bed Bath & Beyond, Michaels and Target (or wherever you buy your baking supplies). I bought mine at Michaels and used a 50% off coupon. I love their coupons!

Although a cookie press is highly recommended and super easy to use, you can make these with a pastry bag instead using the open star tip to craft various shapes. I have this Cookie Press from Wilton.

The ingredients are quite basic and you can make this quick recipe using only one bowl. Be sure to use softened to room temperature unsalted butter and egg for the best results. I used my KitchenAid Mixer with the paddle attachment, but you can use a hand mixer just as easily. 

One easy time saving tip with this recipe is you can make the dough ahead and freeze it. You can easily fit 20 cookies on one baking sheet and even more if your baking sheet is larger. You can also add a little food coloring to some of your dough to make different colored cookies.  I used a large baking sheet with a silicone mat and fit 24 cookies. You can also use parchment paper if you don’t have a silicone mat. Once the cookies have been pressed onto the baking sheet, you can decorate your cookies as simply as you like: sprinkle with different colored sprinkles, drizzle with chocolate or add a chocolate chip or M&M, even crushed candy canes to the cookie.

Your family, friends and loved ones will love these amazing bite-sized Spritz Cookies. Wrap them up in little baggies or a bakers box and give them away. I hope you enjoyed making these as much as I did. And how many did you eat…?! 

Happy Baking! Enjoy!!!

Print

Spritz Cookies

Course Cookies
Cuisine American
Keyword Spritz Cookies
Prep Time 30 minutes
Cook Time 7 minutes
Total Time 37 minutes
Servings 84 cookies

Ingredients

  • 1 cup 2 sticks unsalted butter softened to room temperature
  • 3/4 cup granulated sugar
  • 1 large egg at room temperature
  • 1 1/2 tsp pure vanilla extract
  • 2 1/4 cups all-purpose flour (spoon & leveled)
  • 1/2 teaspoon salt
  • optional: sprinkles chocolate chips, melted chocolate or crushed candy canes for decoration

Instructions

  1. Preheat oven to 350°F (177°C). Line 2-3 large baking sheets with parchment paper or silicone baking mats.
  2. In a large bowl, using a handheld mixer or a stand mixer fitted with a paddle attachment, beat the butter and granulated sugar together on medium-high speed until smooth, about 2 minutes. Add the egg, vanilla extract, and almond extract, and beat on high speed until combined, about 1 minute. Scrape down the sides and up the bottom of the bowl and beat again as needed to combine.
  3. On low speed, beat in the flour and salt. Turn up to high speed and beat until completely combined.
  4. Press the dough-- follow manufacturer’s directions to fit your cookie press with a decorative plate. Scrape some of the dough into your cookie press. Hold the cookie press perpendicular to the lined baking sheet and press out the cookies 2 inches apart. Decorate the shaped cookie dough with sprinkles if you desire. 

  5. If the cookie dough becomes too soft as you work, chill the shaped cookie dough in the refrigerator for 10 minutes before baking.
  6. Bake until very lightly browned on the edges, 7 to 9 minutes.
  7. Remove from the oven and allow to cool on the baking sheet for 5 minutes before transferring to a wire rack to cool completely. 

  8. Cookies stay fresh in an airtight container at room temperature for up to 1 week.
  9. Make ahead tip: You can chill the cookie dough in the refrigerator for up to 4 days before pressing the dough through the cookie press. You can also freeze the cookie dough for up to 3 months; allow to thaw overnight in the refrigerator, then bring to room temperature before continuing with step 4. Baked cookies freeze well for up to 3 months; thaw before serving.

Recipe Notes

To make ahead, you can either chill the cookie dough in the refrigerator for up to 4 days or freeze the dough for up to 3 months. If freezing, allow the dough to unthaw in the refrigerator overnight before bringing to room temperature to create your cookies.

To change the flavor of these cookies slightly, you can substitute the almond extract with peppermint extract to make the flavor even more festive!

Filed Under: Cookies, Desserts

Chocolate Nutella Cupcakes

November 24, 2018

I made this cake recipe for my best friend’s 40th birthday. Since it’s so delicious, I had to make cupcakes and share will all of you. The frosting is to die for! How can you go wrong with Chocolate and Nutella?! Chocolate Nutella Cupcakes for the win!

It’s an easy recipe so get to baking! Grab your favorite chocolate cake recipe and whip up that Nutella frosting!

I used a flower tip to frost the cupcakes. To add the chocolate pieces on the top of the cupcakes I used chocolates melts. Melt the chocolate in the microwave and spread the melted chocolate on a silicone mat. If you don’t have a silicone mat use a cookie sheet and cover with parchment paper. While still warm, add any color sprinkles you desire. Let the chocolate harden, break into pieces and add to the top of the cupcakes for decoration.

You can make a cake or cupcakes from this recipe. People will love this combination of chocolate and Nutella and will ask for the recipe! Enjoy!!!

Print

Chocolate Nutella Cupcakes

Course Dessert
Cuisine American
Keyword Chocolate Nutella Cupcakes
Prep Time 30 minutes
Cook Time 22 minutes
Total Time 52 minutes
Servings 24 cupcakes

Ingredients

  • 1 box chocolate cake mix (or your favorite homemade recipe)

Nutella Frosting

  • 1 cup butter
  • 1/2 cup shortening
  • 1 cup Nutella hazelnut spread
  • 4-5 cups powdered sugar
  • 3-4 tbsp milk or water

Instructions

  1. Bake cupcakes as directed on the box.

  2. Make icing while cakes cool. Beat together butter and shortening until smooth.
  3. Add Nutella and mix until smooth.
  4. Slowly add 4 cups of powdered sugar and mix until smooth.
  5. Add 2-3 tbsp of milk or water and mix until smooth.
  6. Add fifth cup of powdered sugar and mix until smooth.
  7. Add more water or milk until the right consistency.
  8. Frost the cupcakes as desired.

Recipe Notes

To add the chocolate pieces on the top of the cupcakes I used chocolates melts. Melt the chocolate in the microwave and spread the melted chocolate on a silicone mat. If you don't have a silicone mat use a cookie sheet and cover with parchment paper. While still warm, add any color sprinkles you desire. Let the chocolate harden, break into pieces and add to the top of the cupcakes for decorations. 

Filed Under: Cupcakes, Desserts

Harry Potter Cake

November 5, 2018

One of my friends loves Harry Potter so I made her a Harry Potter Cake!  Any kid or even an adult would love to have this cake if they are a fan of Harry Potter.

I used the same cake recipe as my Naked Cake and I use buttercream frosting in the middle of the cake and red velvet for the top of the frosting. I wanted a deep red for the frosting of the cake so red velvet seemed to fit perfectly. Red and yellow are the colors of Harry Potter so I needed to make sure the whole cake were those colors.

Separate the batter into two bowls.  Add yellow food coloring to one bowl batter and red into the other.  Pour the batter into two separate 9 inch round pans and bake at 350 degrees for 30-35 mins.

While the cake is baking make the red velvet frosting.  Side note:  I had extra buttercream from a previous cake so I used that in the middle. If you don’t want to make a separate batch of buttercream for the middle just use the red velvet for the middle.

Let the cake cools completely. Cut the top of the cakes with a serrated knife to even out the top of the cake.

Place the red cake on the bottom and spread the top of the cake with buttercream or red velvet frosting. Stack the yellow cake on top and coat the whole cake with frosting. Cut out 4 long strips of fondant and lay the strips on top of the cake. Like the picture below.  Since I had the left over buttercream frosting I added yellow food coloring and used a round tip to pipe yellow dots around the cake. To get the Harry Potter logo I found a logo online and printed the logo and cut it out so I could trace the pattern using black fondant. Once the logo is cut out place it on top of the cake.

I had the glasses in my Halloween box from a Where’s Waldo costume and it worked perfectly. I got them at the local party store.

To make the happy birthday sign I printed happy birthday in red on yellow paper. Cut out diamond shapes around the letters and make sure to have enough paper to fold the diamonds in half so it can lay over the string.  I used two wooden dowels to hold the sign up.

Print

Harry Potter Cake

Course Dessert
Keyword Harry Potter Cake
Prep Time 1 hour
Cook Time 35 minutes
Total Time 1 hour 35 minutes
Servings 12 slices

Ingredients

Ingredients

Cake

  • 3 3/4 cups all purpose flour sifted
  • 1 tsp baking powder
  • 3/4 tsp tsp baking soda
  • 1 tsp salt
  • 1 1/2 cups unsalted butter room temperature
  • 2 cups granulated sugar
  • 5 large eggs room temperature
  • 1 tbsp pure vanilla extract
  • 1 3/4 cups buttermilk room temperature

Vanilla Buttercream (see notes)

  • 1 1/2 cups unsalted butter room temperature
  • 5 - 6 cups confectioners' sugar
  • 5 - 6 tbsp heavy cream
  • 1 tsp pure vanilla extract

Red Velvet Frosting

  • 1 cup unsalted butter room tempature
  • 1 8 ounce cream cheese room tempature
  • 2 1/2 tsp vanilla extract
  • 2 tsp gel based food coloring
  • 4 1/2 cups confectioners’ sugar
  • 1/4 cup unsweetened cocoa powder

Black and yellow fondant for decorating

Instructions

Instructions

Making the Cake

  1. Preheat oven to 350°F (177°C). Grease and lightly flour three 9-inch cake pan
  2. Whisk the flour, baking powder, baking soda, and salt together in a large bowl. Set aside.
  3. Using a handheld or stand mixer fitted with a paddle or whisk attachment, beat the butter and sugar together on high speed until smooth and creamy, about 3 minutes. Scrape down the sides and up the bottom of the bowl with a rubber spatula as needed.
  4. On medium-high speed, add 1 egg at a time, beating well after each addition. Beat in the vanilla extract. Scrape down the sides and up the bottom of the bowl with a rubber spatula as needed.
  5. With the mixer on low speed, add the dry ingredients in three additions alternating with the buttermilk, beginning and ending with the dry ingredients, and mixing each addition just until incorporated. Do not overmix this batter. The batter will be smooth, velvety, and slightly thick.
  6.  Pour/spread batter evenly into the 2 prepared cake pans.

  7. Bake for around 30-35 minutes or until the cakes are baked through. To test for doneness, insert a toothpick into the center of the cake. If it comes out clean, it is done. Allow cakes to cool completely in the pans set on a wire rack. The cakes must be completely cool before frosting and assembling.

Buttercream Frosting

  1. In a large bowl using a hand-held mixer or stand mixer fitted with a whisk or paddle attachment, beat the butter on medium speed until creamy - about 2 minutes.
  2. Add 5 and 1/2 cups confectioners' sugar, 5 Tablespoons heavy cream, and the vanilla extract, with the mixer running on low. Increase to high speed and beat for 3 full minutes.
  3. Add 1/2 cup more confectioners' sugar if frosting is too thin, 1 more Tablespoon cream if frosting is too thick.
  4. Yields about 4.5 cups of frosting.

Red Velvet Frosting

  1. Using an electric stand mixer fitted with paddle attachment, or handheld mixer and large bowl, beat butter on medium speed until creamy. Add cream cheese; beat until fully incorporated. Add vanilla and food coloring and mix until well blended. Gradually increase mixer speed to high and continue beating until light and fluffy, scraping down the sides of bowl as necessary with rubber spatula.
  2. In a large bowl, whisk together sifted confectioners’ sugar and cocoa. Gradually add confectioners’ sugar and cocoa mixture, beating on low speed (stir), until well combined. Beat on high speed until well combined and smooth while scraping down sides of bowl as necessary, about 2 minutes.

Assemble and decorate the cake:

  1. First, using a large serrated knife, slice a thin layer off the tops of the cakes to create a flat surface. Discard or save and eat later.
  2. Place 1 cake layer on your cake stand, cake turntable, or serving plate. Spread frosting evenly on top. 

  3. Top with 2nd cake layer and evenly cover the entire cake with frosting.

  4. Use a bench scraper to smooth out the frosting on the sides of the cake
  5. Cut out 4 long strips of yellow fondant and lay the strips on top of the cake.See picture for reference.  Since I had the left over buttercream frosting I added yellow food coloring and used a round tip to pipe yellow dots around the cake. 

  6. To get the Harry Potter logo I found a logo online and printed the logo and cut it out so I could trace the pattern using black fondant. Once the logo is cut out place it on top of the cake. 

Recipe Notes

Please note that you don't need to make a full batch of buttercream frosting for this recipe.  Cut the recipe in half if you want buttercream in the middle of the cake instead of red velvet. I also added yellow buttercream around the cake. I just wanted to list the buttercream frosting if you wanted the exact same cake. 

Filed Under: Cakes, Desserts

Halloween Candy Cookies

October 30, 2018

What should you do with all your kids Halloween candy or that left over Halloween candy that you didn’t hand out?!? Make Halloween Candy Cookies of course!

These cookies have everything but the kitchen sink in them and they are so good! You can use any candy you want. Just throw it all in to make these delicious Halloween candy cookies. On top of all the candy you add peanut butter and oatmeal. My on my! Yummy!

I used Twix, Snickers, Reese’s and Sixlets. I grew up on Sixlets and they are my favorite candies. All my friends know this and when they find a good deal they snag them for me. (Check out the dollar store if you like Sixlets). I have great friends that care about my Sixlets addiction. M&M’s work great in the Halloween Candy Cookies. Each bite is different and you won’t regret making these fun cookies. People will come back for second and thirds! Enjoy!

Print

Halloween Candy Cookies

Course Cookies, Dessert
Keyword Halloween Candy Cookies
Prep Time 25 minutes
Cook Time 10 minutes
Total Time 30 minutes
Servings 36 cookies

Ingredients

Ingredients

  • ½ cup unsalted butter room temperature
  • ½ cup creamy peanut butter
  • 1 cup brown sugar
  • 1 large egg room temperature
  • ¾ cup all-purpose flour
  • 1 tsp baking soda
  • 1 tsp cornstarch
  • ¼ tsp baking powder
  • ¼ tsp salt
  • 1 ½ cups old-fashioned oats
  • 2 cup of assorted candies (use more if you want)

Instructions

Instructions

  1. Preheat oven to 350º degrees (F). Prepare the cookie sheet with parchment paper, a silicone mat or spray the pan with non-stick spray.

  2. Chop candy into small pieces.

  3. In a stand mixer use the paddle attachment  Cream together the butter, peanut butter and brown sugar until light and fluffy, about 2-3 minutes.

  4. Add in the egg on low speed.

  5. In a separate bowl, sift together flour, baking soda, cornstarch, baking powder, and salt. 

  6. Slowly add the flour mixture to the wet ingredients and mix until just combined.
  7. Stir in the oats and all candies by hand.
  8. Using a cookie scoop (2-3 tablespoons), scoop out cookie dough into balls. Place on baking sheet. I placed 12 on each sheet. 

  9. Bake the cookies for 8-10 minutes until the edges are just starting to brown and the top still looks slightly undercooked.
  10. Remove from the oven and cool for 5 minutes on the baking sheet before moving them to a wire rack to cool completely.

Filed Under: Cookies, Desserts

Cinnamon Sugar (Doughnut) Muffins

October 18, 2018

These Cinnamon Sugar (Doughnut) Muffins are cake like and they taste like a donut. I love cinnamon sugar so why not make a muffin and top it off with a good amount of cinnamon sugar. They are very filling and satisfying! Get a large cup of milk or coffee first thing in the morning and devour these cinnamon sugar (doughnut) muffins.

Rush into the kitchen and get started!!!!

In a medium-sized mixing bowl, cream together the butter, vegetable oil, and sugars till smooth. Add the eggs, beating to combine. Stir in the baking powder, baking soda, nutmeg, salt, and vanilla. Stir the flour into the butter mixture alternately with the milk, beginning and ending with the flour and making sure everything is thoroughly combined.

Line cupcake pan and spray the liners with non-stick spray. Spoon the batter evenly into the prepared pan, filling the cups nearly full. 

Bake the muffins for 15 to 17 minutes, or until they’re a pale golden brown and a cake tester inserted into the middle of one of the center muffins comes out clean.

Remove them from the oven, and let them cool for a couple of minutes, or until you can handle them. While they’re cooling, melt the butter for the topping (this is easily done in the microwave). Remove the paper liners. Dip the top of the muffin into the butter. Make sure to coat the whole top of the muffin in the butter. Roll the top of the muffin into the cinnamon sugar.

Serve the cinnamon sugar (doughnut) muffins  warm or store in an airtight container.

ENJOY!!!!

Print

Cinnamon Sugar ( Doughnut) Muffins

Course Dessert
Keyword Cinnamon Sugar (Doughnut) Muffin
Prep Time 20 minutes
Cook Time 15 minutes
Total Time 35 minutes
Servings 12 muffins

Ingredients

BATTER

  • 1/4 cup butter
  • 1/4 cup vegetable oil
  • 1/2 cup granulated sugar
  • 1/3 cup brown sugar
  • 2 large eggs
  • 1 1/2 tsp baking powder
  • 1/4 tsp baking soda
  • 1 tsp ground nutmeg
  • 3/4 tsp salt
  • 1 tsp vanilla extract
  • 2 2/3 cups unbleached all-purpose flour
  • 1 cup milk

TOPPING

  • 3 tbsp melted butter
  • 3 tbsp cinnamon sugar

Instructions

INSTRUCTIONS

  1. Preheat the oven to 425°F. Line a cupcake pan and lightly grease the liners with non-stick spray. This will ensure that they peel off the muffins nicely.

  2. In a medium-sized mixing bowl, cream together the butter, vegetable oil, and sugars till smooth.
  3. Add the eggs, beating to combine.
  4. Stir in the baking powder, baking soda, nutmeg, salt, and vanilla.
  5. Stir the flour into the butter mixture alternately with the milk, beginning and ending with the flour and making sure everything is thoroughly combined.
  6. Spoon the batter evenly into the prepared pan, filling the cups nearly full.
  7. Bake the muffins for 15 to 17 minutes, or until they're a pale golden brown and a cake tester inserted into the middle of one of the center muffins comes out clean.
  8. Remove them from the oven, and let them cool for a couple of minutes, or until you can handle them. While they're cooling, melt the butter for the topping (this is easily done in the microwave).
  9. Dip the top of the muffins into the melted butter, then roll in the cinnamon-sugar.

  10. Serve warm, or cool on a rack and wrap airtight. Store for a day or so at room temperature.

Recipe Notes

You can substitute whole wheat flour instead of regular flour. I made them with whole wheat flour as well and it will work with this recipe. 


Filed Under: Breakfast, Cupcakes, Desserts

White Chocolate Raspberry Cheesecake Cookies

October 7, 2018

I remember years ago I was at Subway and I had one of their White Chocolate Raspberry Cheesecake Cookies. I couldn’t believe how much I loved this cookie on the very first bite. I was determined to make these cookies. The first time I made them I knew I had a winner of a cookie.  They are so soft and fluffy! They are like mini cakes inside.

The secret ingredient to these cookies is “Jiffy” raspberry muffin mix.

Mix the butter, cream cheese, shortening and brown sugar together. Add the eggs, muffin mix and flour. Stir in white chocolate chips.  Cool cookie batter in the refrigerator for 30 minutes before baking.

Roll the batter into 1 inch balls on a greased cookie sheet. I use parchment paper and lightly grease the parchment paper either method works great. I use a cookie scoop to roll the balls. Here is a similar one that I use. Preheat oven to 350 degrees and bake for 10-12 minutes or until golden brown. In between batches store the extra batter in the refrigerator.

If you love these White Chocolate Raspberry Cheesecake Cookies tell your friends or stop going to Subway to buy them and make them yourself. Enjoy!

Print

White Chocolate Raspberry Cheesecake Cookies

Course Dessert
Keyword White Chocolate Raspberry Cheesecake Cookies
Prep Time 20 minutes
Cook Time 12 minutes
Resting Time 30 minutes
Total Time 32 minutes
Servings 30 cookies

Ingredients

Ingredients

  • 4 ounces cream cheese softened
  • 1/2 cup (1 stick) butter softened
  • 2 tbsp shortening
  • 1/2 cup brown sugar
  • 2 eggs
  • 2 - 7 ounce boxes Jiffy raspberry muffin mix
  • 1/2 cup all-purpose flour
  • 1 1/2 cup white chocolate chips

Instructions

Instructions

  1. Beat together with paddle attachment cream cheese, butter, shortening and brown sugar in a large mixing bowl until combined. Add eggs one at a time beating after each one.

  2. Mix in muffin mix and flour until just combined. Add white chocolate chips and stir until incorporated.
  3. Chill dough in the refrigerator at least 30 minutes.
  4. Preheat oven to 350 degrees. Line baking sheet with parchment and lightly spray with grease or lightly grease baking sheets.

  5. Scoop cookie dough mix into 1 inch balls onto baking sheets. Bake 10-12 minutes or until golden brown on edges.

  6. In between baking batches of cookies make sure to store the dough in the refrigerator.


Filed Under: Cookies, Desserts

  • « Go to Previous Page
  • Page 1
  • Page 2
  • Page 3
  • Page 4
  • Page 5
  • Page 6
  • Go to Next Page »

Primary Sidebar

Hello and Welcome

Hi! I'm Holly and welcome to my personal blog and thank you for taking the time to look through my recipes and hiking adventures. I hope you enjoy them as much as me. Stay connected to see upcoming blog posts! I'm excited to have you join!

Recent Posts

  • Sourdough Focaccia
  • Andes Mint Truffles
  • Cole Slaw
  • Pumpkin Spice Cupcakes
  • Chicken Tortilla Soup

Archives

  • October 2024
  • December 2023
  • October 2023
  • August 2022
  • April 2022
  • February 2022
  • January 2021
  • May 2020
  • April 2020
  • February 2020
  • November 2019
  • October 2019
  • August 2019
  • July 2019
  • June 2019
  • May 2019
  • April 2019
  • March 2019
  • February 2019
  • January 2019
  • December 2018
  • November 2018
  • October 2018
  • September 2018
  • August 2018
  • July 2018
  • June 2018
  • May 2018

Categories

Don’t Miss These!

Little Si

Ice Cream Sandwiches

Cinnamon Sugar (Doughnut) Muffins

Baked Sugar Donuts

Most Popular Recipes

Ombre Vanilla Cake

Ice Cream Sandwiches

Footer

My Favorites

stay connected

  • Facebook
  • Instagram
  • Pinterest

Don’t miss a recipe or an adventure!

Copyright© 2025 · Brunch Pro Theme by Feast Design Co.