• Skip to primary navigation
  • Skip to main content
  • Skip to primary sidebar
  • Skip to footer
  • Home
  • Recipes
  • Hiking
  • Contact

Holly in the PNW

The girl that can't sit still!

Desserts

Marshmallow Caramel Rice Krispie Treats

April 8, 2019

Anytime I have something in my cupboard taking up space, I always find something to make. I had both leftover marshmallows and caramels so I went out and bought my favorite cereal and decided to make Marshmallow Caramel Rice Krispie Treats. You have the softness of the marshmallow, the sweetness from the caramel and the crispiness from the cereal. It’s just a great combo. Did I mention they are bite-sized?! Of course, they are! If you check out my other recipes, I have a lot of bite-sized recipes.

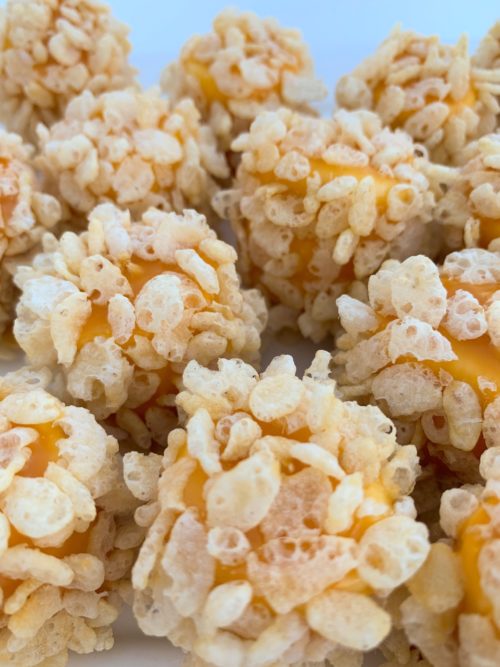
Marshmallow Caramel Rice Krispie Treats are quick, easy and painless to make. You only need 5 ingredients to make these treats and they are ready to eat in under 40 minutes!

In a medium sauce pan, over medium heat combine the caramels, butter and heavy cream. Stir constantly until the caramels are melted with a nice creamy texture.

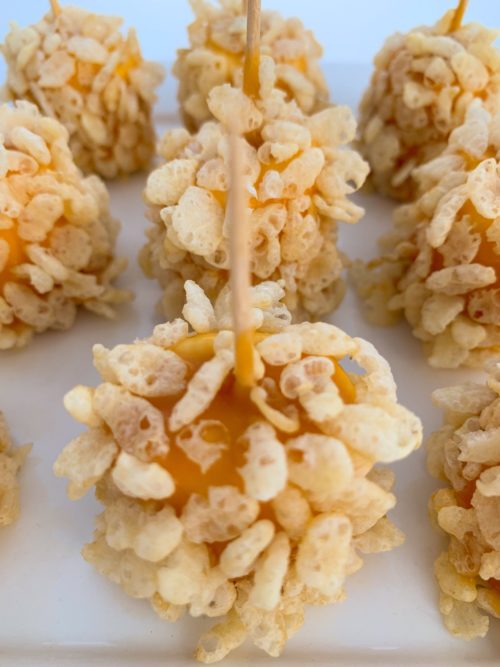
Insert a toothpick into the marshmallow, dip and coat the marshmallow in the caramel mixture. Tap off the excess sauce. Sprinkle Rice Krispies all over the dipped marshmallow.  Transfer to baking sheet, make sure you cover the baking sheet with parchment paper. Let rest for 30 minutes.

Enjoy!!!

You will probably have left over caramel sauce at the end of making these. It all depends on how many marshmallows you have. I made 36 and had sauce left over so I made Caramel Popcorn with Almonds.

Print

Course Dessert
Cuisine American
Keyword Marshmallow Caramel Rice Krispies Treat
Prep Time 30 minutes
Cook Time 10 minutes
Total Time 40 minutes
Servings 36 pieces

Ingredients

  • 1 11 oz bag wrapped caramels
  • 1 cup heavy cream
  • 1 tbsp butter
  • 1 bag large marshmallows (36 marshmallows)
  • 4 cups Rice Krispies cereal

Instructions

  1. In a medium saucepan place the caramels, heavy cream and butter. Over medium heat stir constantly until creamy.

  2. Using a toothpick dip each marshmallow into the caramel mixture. Tap off the excess.

  3. Pour the Rice Krispies in a medium size bowl and sprinkle the Rice Krispies over the caramel marshmallow until it's covered.

  4. Line a baking sheet with parchment paper and place the covered marshmallow on the baking sheet. Remove the toothpick if desired.  

  5. Let them rest for 30 minutes.

Filed Under: Desserts

Oreo Chocolate Cake

April 5, 2019

This Oreo Chocolate Cake is a great option to take to any party. Who doesn’t like Oreos?! Everyone will be drooling over your dessert. It’s made with vanilla buttercream frosting with smashed up Oreos incorporated in the frosting. You can make this a two- or three-layer cake. Another great option (which I have made many times) is to make cupcakes. Whatever your heart desires or your party needs call for, your Oreo Chocolate Cake will be a hit!

Whip up that cake mix, bake it, smash up some Oreo’s and frost it!

Grab a slice of Oreo Chocolate Cake with a tall glass of milk! Did I mention you need to have a large slice?! It’s nice and rich and the milk will go perfectly.

Bring it to parties, make it for yourself or make it as a birthday cake!

Enjoy!!!

Print

Oreo Chocolate Cake

Course Cake, Dessert
Cuisine American
Keyword Oreo Chocolate Cake
Prep Time 30 minutes
Cook Time 20 minutes
Resting time 1 hour
Total Time 1 hour 50 minutes
Servings 12 slices

Ingredients

  • 1 box chocolate cake mix (make as directed on box)

Oreo Buttercream frosting

  • 1 package Oreos divided
  • 1 1/2 cups unsalted butter room temperature
  • 4 - 5 cups confectioners' sugar
  • 1/4 cup heavy cream
  • 2 tsp pure vanilla extract

Instructions

  1. Mix the cake batter as directed on box. Make the cake with two cake pans or 24 cupcakes. If making cake, divide up the batter equally between the two pans you will be using. Once baked, let the cakes cool completely.  

Oreo Vanilla Butter Cream Frosting

  1. With a handheld or stand mixer fitted with a paddle attachment, beat the butter on medium speed until creamy, about 2 minutes. Add 4 and 1/2 cups confectioners’ sugar, heavy cream, and vanilla extract. Beat on low speed for 30 seconds, then increase to high speed and beat for 3 full minutes. Add up to 1/2 cup more confectioners’ sugar if frosting is too thin or another tablespoon of cream if frosting is too thick.

  2. Crush up 3/4 of the package of Oreos. I put the Oreos inside a large plastic Ziploc bag and used a rolling pin to crush them up. You can use a food processor as well. 

  3. Add the crushed Oreos to the frosting and beat on low speed to incorporate the Oreos.

  4. Remove the cakes from the pans.

  5. First, using a large serrated knife, slice a thin layer off the tops of the cakes to create a flat surface. Discard or save and eat later.
  6. Place 1 cake layer on your cake stand, cake turntable, or serving plate. Spread frosting evenly on top. Use your own judgement on how much to use. 

  7. Top with 2nd cake layer and evenly cover the top with frosting. Cover the sides of the cake with frosting. Use a bench scraper or a butter knife to smooth out the frosting on the sides of the cake. 

  8. Using a flower tip and a piping bag pipe frosting around the top of the cake. Sprinkle the top with crushed Oreos. Cut a few of the remaining Oreos in half and place on top.


Filed Under: Cakes, Desserts

Ding Dong Cake

April 2, 2019

A Ding Dong cake has always been on my list of things to bake. I loved Ding Dongs as a kid! The middle filling was to die for, I would eat it straight out of the cake. I finally had the perfect opportunity to make a Ding Dong cake for my boyfriend’s birthday. As a kid Ding Dongs were one of his favorites as well, so what a perfect opportunity to make an adult sized Ding Dong cake!

I used a bundt pan and cut the cake in half after it was completely cooled. It needs to be completely cooled before adding the filling or the filling will melt all over the cake. Add all the filling on the bottom layer of the cake and attach the top layer.  Place the cake on a wire rack and place parchment paper under the wire rack for easy clean up.

Heat up the heavy cream and butter in the microwave until it boils and add a full bag (2 cups) of chocolate chips and stir. Once the chocolate is melted, pour all over the cake. Let the chocolate set for maybe 15 – 20 minutes. Transfer the cake to a serving plate or cake stand.  I use this cake lifter to transfer my cakes if not already on a cake board.

Chill for 1 – 2 hours in the fridge before serving.

Your guests will tell you it tastes just like a Ding Dong! Make sure you have tin foil for leftovers because if there happens to be any left, they will definitely want to take some home. Be sure to store in the fridge.

Enjoy!!!

Print

Ding Dong Cake

Course Cake, Dessert
Cuisine American
Keyword Ding Dong Cake
Prep Time 40 minutes
Cook Time 45 minutes
Resting time 1 hour
Total Time 2 hours 25 minutes
Servings 12 Slices

Ingredients

Cake

  • 1 Devil's food chocolate cake mix
  • 1 3.9 oz instant chocolate pudding mix
  • ¾ cup vegetable oil
  • ¾ cup water
  • 4 eggs
  • ½ cup sugar
  • ½ cup sour cream
  • 1 tsp vanilla

Filling

  • 5 tbsp flour
  • 1 cup milk
  • 1½ tsp vanilla
  • 1 cup butter
  • 1¼ cup sugar

Ganache Frosting

  • 2 cups chocolate chips milk chocolate or semi-sweet
  • 1 cup heavy cream
  • 1½ tbsp butter

Instructions

Cake

  1. Preheat oven to 350 degrees F.

  2. In a large mixing bowl combine all of the cake ingredients and mix until well blended, about 3 - 4 minutes. 

  3. Grease a bundt pan with butter or non stick cooking spray and flour. You don't want to have the cake stick to the pan.

  4. Bake for 40 to 45 minutes. The cake will be done when a toothpick inserted comes out clean. Flip the pan upside down and place cake on a wire rack. Cool completely. The cake must be completely cooled before applying the filling. 

Filling

  1. Pour milk and flour into a medium sauce pan and whisk together very well to make sure no lumps are formed.

  2. Place pan on stove and turn the heat to medium and stir constantly to make a roux (see notes).

  3. Remove the roux mixture from the heat and add vanilla. Allow to cool.

  4. While the mixture is cooling, cream butter and sugar together in a medium bowl. The sugar may take up to 10 minutes to properly dissolve.

  5. Add the cooled roux to the butter mixture and beat again at a higher speed until well blended and the sugar is completely dissolved.

  6. Carefully cut the cake in half with a serrated knife. Remove the top half and set aside.

  7. Spoon filling over the bottom half of the cake and spread evenly.

  8. Replace the top of the cake on top of the filling. 

Ganache Topping

  1. In a microwave safe dish heat butter and heavy cream until it begins to boil (about 2 minutes).

  2. Pour in chocolate chips and stir until melted and smooth.
  3. Carefully place the cake back on the wire rack with parchment paper under the wire rack.

  4. Drizzle ganache topping all over the cake with a large spoon. 

  5. After the ganache is set (15 - 20 minutes) carefully move cake to cake stand or serving plate.

  6. Refrigerate cake for 1 to 2 hours before serving.

Recipe Notes

What is a Roux?

Roux is made by cooking equal parts flour and fat together until the raw flavor of the flour cooks out and the roux has achieved the desired color. Butter is the most commonly used fat, but you can also make roux with heavy cream, oil, bacon grease, or other rendered fats. It's used to thicken soups, sauces and even the filling for this ding dong cake.

Filed Under: Cakes, Desserts

Vanilla Cake Pops

March 27, 2019

Vanilla Cake Pops are a perfect addition to your Easter celebrations. They are a must when you want to bake and you can even get your kids involved. Sprinkles galore!!! Why not dye eggs and make cake pops?!!

If you haven’t seen my Chocolate Cake Pops recipe it’s the exact same process. All you need to do is make a vanilla cake instead of a chocolate cake. I also made these Valentine day cake pops with the same recipe. This is how much I love them!

Put them on display for your family and friends at your Easter dinner and have them for dessert.

Enjoy!

Print

Vanilla Cake Pops

Course Cake, Dessert
Cuisine American
Keyword Vanilla Cake Pops
Prep Time 1 hour
Cook Time 25 minutes
Resting Time 2 hours
Total Time 1 hour 25 minutes
Servings 40 cake pops

Ingredients

Vanilla Cake

  • 1 2/3 cups cups all-purpose flour spoon & leveled
  • 1/2 tsp baking powder
  • 1/4 tsp baking soda
  • 1/2 tsp salt
  • 1/2 cup unsalted butter softened to room temperature
  • 1 cup granulated sugar
  • 1 large egg at room temperature
  • 2 tsp pure vanilla extract
  • 1 cup 2% milk

Frosting

  • 7 tbsp unsalted butter softened to room temperature
  • 1 3/4 cups confectioners' sugar
  • 2-3 tsp 2% milk
  • 1 tsp pure vanilla extract

Coating

  • 40 ounces candy melts or coating

Instructions

Vanilla Cake

  1. Whisk the flour, baking powder, baking soda, and salt together in a medium bowl. Set aside. Using a handheld or stand mixer fitted with a paddle or whisk attachment, beat the butter and sugar together in a large bowl until creamed, about 2 minutes. Add the egg and vanilla extract and beat on high speed until combined. Scrape down the bottom and sides of the bowl as needed.

  2. With the mixer running on low speed, add the dry ingredients and milk to the wet ingredients until combined. Make sure there are no large lumps at the bottom of the bowl. Batter will be slightly thick

  3. Grease the baking pan with non-stick spray. Pour the batter evenly into the prepared 9 x 13 pan. Bake for 25-27 minutes or until a toothpick inserted in the center comes out clean. Allow the cake to cool completely in the pan; set on a wire rack.

Vanilla Frosting

  1. With a handheld or stand mixer fitted with a paddle attachment, beat the butter on medium speed until creamy, about 2 minutes. Add confectioners' sugar, milk, and vanilla extract with the mixer running on low. Increase to high speed and beat for 3 full minutes.

  2. Crumble the cooled cake into the bowl on top of the frosting. Make sure there are no large lumps. Turn the mixer on low and beat the frosting and cake crumbles together until combined.
  3. Measure 1 Tablespoon of moist cake mixture and roll into a ball. I use a cookie scoop to measure out my ball. Place balls on a lined baking sheet. Refrigerate for 2 hours or freeze for 1 hour.

  4. Melt the coating in a 2-cup liquid measuring cup (best for dunking!). Use a microwave or you can use a double boiler and pour some out at a time into the liquid measuring cup. Let the coating cool down for a few minutes before you begin dipping. If it's too hot when you dip, the coating will crack.

Coat the cake balls

  1. Remove only 2-3 cake balls from the refrigerator at a time. Keep the rest cold! Dip a lollipop stick about 1/2 inch into the coating, then insert into the center of the cake ball. Only push it about halfway - 3/4 through the cake ball. Dip the cake ball into the coating until it is completely covered. Make sure the coating covers the base of the cake ball where it meets the lollipop stick. Very gently tap the stick against the edge of the measuring cup to allow excess coating to drop off. Decorate the top with sprinkles and place upright into a styrofoam block, box (flip the box upside down and poke the lollipops into the bottom of the box) or even tall shot glasses work. Repeat with remaining cake balls, only working with some out of the refrigerator at a time. The cake balls must be very cold when dipping!

  2. Coating will set within an hour. Store cake pops in the refrigerator for up to 1 week. You may freeze the cake pops for up to 3 months.

Filed Under: Cakes, Desserts

Simple Chocolate Truffles

February 27, 2019

If you want a sweet and quick chocolate treat, these perfectly sized Simple Chocolate Truffles are where it’s at! The topping options are endless, making them a versatile treat for all sorts of occasions. Extra creamy truffles, yet not overly sweet, are the perfect little treat for just about anyone.

I coated the simple chocolate truffles with a few different tasty toppings. White chocolate shavings are one of my favorites and definitely make these truffles adorable .

Simply dusted with cocoa powder!

Everyone loves sprinkles! I used chocolate sprinkles because you can’t go wrong with chocolate on chocolate right?!

Crush up any kind of nuts, I used a mixture of almonds and pecans.

Simple chocolate truffles are best at room temperature. Arrange your beautifully topped truffles on a plate for an after dinner treat for yourself or your loved ones. Put a few different truffles in a little gift box and give them to your favorite coworker. Whatever you choose to do with your truffles, they won’t disappoint!

Enjoy!!!

Print

Simple Chocolate Truffles

Course Dessert
Cuisine American
Keyword Simple Chocolate Truffles
Prep Time 20 minutes
Resting time 1 hour
Total Time 1 hour 20 minutes
Servings 18 truffles

Ingredients

  • 2 4-ounce quality chocolate bars (very finely chopped)
  • 2/3 cup heavy cream
  • 1 tbsp unsalted butter at room temperature
  • 1/2 tsp pure vanilla extract
  • topping options: unsweetened cocoa powder, sprinkles, crushed nuts, melted or tempered chocolate, coconut

Instructions

  1. Place the finely chopped chocolate pieces in a heat-proof bowl. Set aside.

  2. Heat the heavy cream until it is simmering, hot but not boiling. You can heat it on the stove or in the microwave.

  3. Add the butter to the chocolate and pour the heavy cream evenly on top. Let the warm cream and chocolate butter mixture sit for 5 minutes. Add the vanilla extract then stir until the chocolate has completely melted. If the chocolate isn’t melting, place the heat-proof bowl over a pot of simmering water (1 inch of water will do) and stir until melted. 

  4. Pour into a flat shallow dish, such as an 8×8 inch baking pan, so the mixture evenly and quickly sets. Cover with plastic wrap and refrigerate for 1 hour.

  5. Scoop the set truffle mixture into 1 tablespoon sized mounds. I use a cookie scoop which is the perfect size. Roll into balls. The mixture will be very sticky. 

  6. Roll each ball into the topping of your choice.  

Recipe Notes

Cover tightly and store truffles at room temperature for 3-4 days or in the refrigerator for up to 2 weeks.


Filed Under: Desserts

Peanut Butter Blossoms

February 13, 2019

Peanut Butter Blossoms are one of my favorite cookies. You can’t go wrong with peanut butter cookies topped with a Hersey’s kiss. I thought it would make a really cute valentine cookie so I sprinkled the cookies with red sanding sugar instead of regular sugar. Of course the original cookie recipe calls for regular sugar but this is festive for February and topped with a kiss!

Just bake all these cookies and give them away if you don’t want to eat them all yourself! It’s a great cookie to take to your office or give to your kids for Valentine’s Day at school.

So cute and festive for Valentine’s Day!

Enjoy!!

Print

Peanut Butter Blossoms

Course Cookies, Dessert
Cuisine American
Keyword Peanut Butter Blossoms
Prep Time 20 minutes
Cook Time 10 minutes
Resting Time 30 minutes
Total Time 30 minutes
Servings 24 cookies

Ingredients

  • 1 1/4 cups all-purpose flour
  • 1/2 tsp baking soda
  • 1/4 tsp salt
  • 1/2 cup unsalted butter softened to room temperature
  • 3/4 cup granulated sugar divided
  • 1/2 cup packed light brown sugar
  • 1 large egg at room temperature
  • 3/4 cup creamy peanut butter
  • 1 tsp pure vanilla extract
  • 24 chocolate kiss candies unwrapped
  • optional: 1/2 cup red sanding sugar

Instructions

  1. Whisk the flour, baking soda, and salt together. Set aside.
  2. Using a hand mixer or a stand mixer fitted with paddle attachment, beat the butter for 1 minute on high speed until creamy. On medium-high speed, beat in the brown sugar and only 1/4 cup of the granulated sugar until completely creamed and smooth, about 2 minutes. Add the egg and beat on high until combined, about 1 minute. Scrape down the sides and bottom of the bowl as needed. Add the peanut butter and vanilla extract and mix on high until combined.

  3. Add the dry ingredients to the wet ingredients and mix on low until combined. Cover and chill the dough for at least 30 minutes in the refrigerator.

  4. Preheat oven to 350°F. Line two large baking sheets with parchment paper or silicone baking mats. Set aside. Also, make sure there is room in your freezer because they will later need to be placed inside to prevent the chocolate kisses from melting on the warm cookies.

  5. Scoop and roll cookie dough, about 1 Tablespoon of dough each. Roll each ball in the remaining 1/2 cup of sugar. *If you want to make your cookies festive, replace the regular sugar with the red sanding sugar. Arrange on the baking sheet about 2 inches apart. Bake for 10 minutes or until the tops begin to slightly crack. Remove cookies from the oven and allow to cool for 10 minutes.

  6. Press a chocolate kiss candy into each cookie on 1 of the baking sheets until it sticks. Place the baking sheet in the freezer so the chocolate does not melt. Remove after 10 minutes in the freezer. Repeat with 2nd baking sheet of cookies.


Filed Under: Cookies, Desserts

Valentine Sugar Cookies

February 12, 2019

Yes, another Valentine Cookie post!  I had some left over cookie dough batter from the Heart Shaped Sugar Cookies I made.  I added pink butter cream frosting and made some more valentine sugar cookies. These cookies are soft, delicious, and even better topped with butter cream frosting!

I had both colors left over from the original recipe so I mixed them together to get a multicolored look for these valentine cookies. I used pink butter cream frosting to pipe the frosting on top of the cookie. You can use any tip you want, the one pictured is a star tip.

The recipe listed is the same recipe I used for the Heart Shaped Sugar Cookies, but I made some edits to make this exact multicolored cookie.

Enjoy!!!

Print

Valentine Sugar Cookies

Course Cookies, Dessert
Cuisine American
Keyword Valentine Sugar Cookies
Prep Time 40 minutes
Cook Time 10 minutes
Resting time 1 hour
Total Time 50 minutes
Servings 24 cookies

Ingredients

  • 1 cup unsalted butter at room temperature
  • 1 cup granulated sugar
  • 1 tsp vanilla extract
  • 2 large eggs at room temperature
  • 4 cups all-purpose flour sifted
  • 3/4 cup cornstarch sifted
  • 3/4 tsp kosher salt
  • 1/4 cup pink sanding sugar for bowl of pink batter
  • few drops red/pink food coloring for bowl of pink batter

Butter Cream Frosting

  • 3/4 cup unsalted butter room temperature
  • 2 - 3 cups confectioners' sugar
  • 2 - 3 tbsp heavy cream
  • 1/2 tsp pure vanilla extract

Instructions

  1. You will cut the recipe in half so please keep this in mind when you are preparing your batter. Two bowls will be required. I made the white batter first and then the pink batter to make sure I kept everything separate.
  2. Preheat oven to 350 degrees F.

  3. Remember, use half the ingredients in each bowl!

  4. In a standing mixer fitted with a paddle attachment, cream butter, granulated sugar, vanilla and egg together.
  5. Sift flour, cornstarch, salt. Mix until incorporated.
  6. In the second bowl, add a few drops of red/pink food coloring to the sugar/butter mixture. Mix until a desired color is reached. Sprinkle ¼ cup pink sanding sugar to this bowl.

  7. Transfer both batters to plastic wrap, separately.

  8. Roll each batter into a disk and chill for about 1 hour.

  9. Take some white batter and some pink batter and mix together to make a white and pink mixture. Don't mix together too much or the batter will look pink, you want some white batter showing. Roll the batter to a 1/4 inch thickness.

  10. Cut cookies with a heart shaped cutter.
  11. Place cookies on a baking sheet lined with parchment paper or silicone mat.
  12. Bake for 10 minutes and watch them closely, you don't want them to brown. Let cool on a wire rack.

Buttercream Frosting

  1. In a large bowl using a hand-held mixer or stand mixer fitted with a whisk or paddle attachment, beat the butter on medium speed until creamy - about 2 minutes.
  2. With the mixer running on low, add 2 and 1/2 cups confectioners' sugar, 2 Tablespoons heavy cream, and the vanilla extract. Increase to high speed and beat for 3 full minutes.

  3. Add 1/2 cup more confectioners' sugar if frosting is too thin; 1 more Tablespoon cream if frosting is too thick.

  4. Yields about 2.5 cups of frosting

  5. Pipe frosting using a tip of your choice onto the cooled sugar cookie.


Filed Under: Cookies, Desserts

Salted Chocolate Cookies

February 8, 2019

I know there are so many chocolate cookie recipes out there so I just needed to add another. Every blog needs one. These are some thick chocolate cookies that won’t disappoint. I do love thick and chewy cookies! It’s a challenge of mine to always have thick chocolate cookies and I think I nailed this one.

The results are thick, crisp-edged, and soft inside with loads of chocolate chunks! Top off with a faint crunch of sea salt.

Sink your teeth into these yummy salted chocolate cookies! Grab a tall glass of milk to go along with these thick, soft and chewy cookies.

Enjoy!

Print

Salted Chocolate Cookies

Course Cookies, Dessert
Cuisine American
Keyword Salted Chocolate Cookies
Prep Time 15 minutes
Cook Time 10 minutes
Total Time 25 minutes
Servings 28 cookies

Ingredients

  • 1/2 cup unsalted butter at room temperature
  • 2 tablespoons granulated sugar
  • 2 tablespoons turbinado sugar (Sugar in the Raw)
  • 3/4 cups plus 2 tbsp packed light or dark brown sugar
  • 1 large egg at room temperature
  • 1 tsp vanilla extract
  • 3/4 tsp baking soda
  • 1/4 tsp fine sea or table salt
  • 1 3/4 cups all-purpose flour
  • 1/2 pound semi or bittersweet chocolate, cut into roughly 1/2-inch chunks with a serrated knife
  • sea salt to finish

Instructions

  1. Heat oven to 350°F and line a baking sheet with parchment paper or a silicone baking mat.

  2. In a large bowl, cream the butter and sugars together with an electric mixer with a paddle attachment until very light and fluffy, about 5 minutes. Add egg and vanilla, beating until incorporated, and scraping down the bowl as needed. Beat in salt (fine sea or table) and baking soda until combined. Add the flour on a low speed until just mixed. The dough will look crumbly. Stir in the chocolate chunks.

  3. Using a cookie scoop, if you don't have a cookie scoop it's about 1 tablespoon mounds, spacing them apart on the prepared baking sheet. Sprinkle each with a few flakes of sea salt. 

  4. Bake for 10 minutes or until golden on the outside but still very gooey and soft inside. Once out of the oven, let the cookies rest on the baking sheet for 5 minutes. Transfer to a cooling rack.

Filed Under: Cookies, Desserts

Valentine Vanilla Cake Pops

February 4, 2019

Valentine Vanilla Cake Pops should be added to your list for your special day! These are a perfect ratio between cake and icing. On your first bite you won’t regret making these for your friends or family, or that special someone. With all those red sprinkles, it’s just so festive!

Cake pops are a great way to eat just a small serving without devouring a whole cake. Like I say in a lot of my posts, I love personal sizes.

I’ve made chocolate cake pops before and I finally tried vanilla. If you’re more of a vanilla fan then this cake pop recipe is just for you. You can make these with any type of sprinkles or colored candy coating.  Since it was February, and Valentine’s Day is coming soon, I wanted to throw in the red sprinkles and make it festive.

Grab the recipe and start rolling and dipping those cake balls into something very delicious! Let me know what you think.

Wrap them up in miniature cellophane bags, tie them with a ribbon and give them out as Valentine gifts. You will be loved even more!

Enjoy!

Print

Valentine Vanilla Cake Pops

Course Cake, Dessert
Cuisine American
Keyword Valentine Vanilla Cake Pops
Prep Time 1 hour
Cook Time 25 minutes
Resting time 2 hours
Total Time 3 hours 25 minutes
Servings 40 cake pops

Ingredients

Vanilla Cake

  • 1 2/3 cups cups all-purpose flour spoon & leveled
  • 1/2 tsp baking powder
  • 1/4 tsp baking soda
  • 1/2 tsp salt
  • 1/2 cup unsalted butter softened to room temperature
  • 1 cup granulated sugar
  • 1 large egg at room temperature
  • 2 tsp pure vanilla extract
  • 1 cup 2% milk

Frosting

  • 7 tbsp unsalted butter softened to room temperature
  • 1 3/4 cups confectioners' sugar
  • 2-3 tsp 2% milk
  • 1 tsp pure vanilla extract

Coating

  • 40 ounces candy melts or coating

Instructions

Vanilla Cake

  1. Whisk the flour, baking powder, baking soda, and salt together in a medium bowl. Set aside. Using a handheld or stand mixer fitted with a paddle or whisk attachment, beat the butter and sugar together in a large bowl until creamed, about 2 minutes. Add the egg and vanilla extract and beat on high speed until combined. Scrape down the bottom and sides of the bowl as needed.
  2. With the mixer running on low speed, add the dry ingredients and milk to the wet ingredients until combined. Make sure there are no large lumps at the bottom of the bowl. Batter will be slightly thick.

  3. Prepare a 9x13 pan and spray with non-stick coating. Pour the batter evenly into the pan. Bake for 25-27 minutes or until a toothpick inserted in the center comes out clean. Allow the cake to cool completely in the pan; set on a wire rack.

Vanilla Frosting

  1. With a handheld or stand mixer fitted with a paddle attachment, beat the butter on medium speed until creamy, about 2 minutes. Add confectioners' sugar, milk, and vanilla extract with the mixer running on low. Increase to high speed and beat for 3 full minutes.
  2. Crumble the cooled cake into the bowl on top of the frosting. Make sure there are no large lumps. Turn the mixer on low and beat the frosting and cake crumbles together until combined.
  3. Measure 1 Tablespoon of moist cake mixture and roll into a ball. I use a cookie scoop to measure out my ball. Place balls on a lined baking sheet. Refrigerate for 2 hours or freeze for 1 hour.
  4. Melt the coating in a 2-cup liquid measuring cup (best for dunking!). Use a microwave or you can use a double boiler and pour some out at a time into the liquid measuring cup. Let the coating cool down for a few minutes before you begin dipping. If it's too hot when you dip, the coating will crack.

Coat the cake balls

  1. Remove only 2-3 cake balls from the refrigerator at a time. Keep the rest cold! Dip a lollipop stick about 1/2 inch into the coating, then insert into the center or the cake ball. Only push it about halfway - 3/4 through the cake ball. Dip the cake ball into the coating until it is completely covered. Make sure the coating covers the base of the cake ball where it meets the lollipop stick. Very gently tap the stick against the edge of the measuring cup to allow excess coating to drop off. Decorate the top with sprinkles and place upright into a styrofoam block, box (flip the box upside down and poke the lollipops into the bottom of the box) or even tall shot glasses work. Repeat with remaining cake balls, only working with some out of the refrigerator at a time. The cake balls must be very cold when dipping!

  2. Coating will set within an hour. Store cake pops in the refrigerator for up to 1 week. You may freeze the cake pops up to 3 months.


Filed Under: Cakes, Desserts

Heart Shaped Sugar Cookies

January 31, 2019

It’s time to show people how much you love them! Whip up some heart shaped sugar cookies for all your loved ones for Valentine’s Day. This is a fun recipe.

You will make two separate batches of dough so you will need to cut the recipe in half while preparing the dough. This is so you can have half white cookie batter and half pink cookie batter. Once the batter is made you will need to chill the cookie dough for about an hour. You can chill over night as well if you want to prepare the batter a day ahead.

Once the dough is chilled roll out each color separately about 1/4 inch in thickness. Sprinkle sanding sugar all over the pink batter and place a piece of plastic wrap over the batter and roll again. This will allow the sprinkles to stick to the dough and not stick to the rolling pin.

Using a ruler and a knife cut out 1/2 inch stripes. Layer pink and white stripes so they are touching. Add plastic wrap over the dough and roll to create a seal. I’ve found plastic wrap to work great just in case the dough gets a little sticky and it doesn’t stick to the rolling pin.

Cut cookies with a heart shaped cookie cutter. Place cookies on a silicone mat or parchment paper. Bake cookies at 350 degrees for 10 minutes. Watch carefully cause you don’t want your cookies to brown. Transfer to wire rack and let them cool.

Happy Valentine’s Day and Enjoy!!!

Print

Heart Shaped Sugar Cookies

Course Cookies, Dessert
Cuisine American
Prep Time 40 minutes
Cook Time 10 minutes
Resting time 1 hour
Total Time 50 minutes
Servings 24 cookies

Ingredients

  • 1 cup unsalted butter at room temperature
  • 1 cup granulated sugar
  • 1 tsp vanilla extract
  • 2 large eggs at room temperature
  • 4 cups all-purpose flour sifted
  • 3/4 cup cornstarch sifted
  • 3/4 tsp kosher salt
  • 1/4 cup pink sanding sugar
  • few drops red/pink food coloring

Instructions

  1. You will cut the recipe in half so please keep this in mind when you are preparing your batter. Two bowls will be required. I made the white batter first and then the pink batter to make sure I kept everything separate. 

  2. Preheat to 350 degrees F.

  3. Remember use half the ingredients. 

    In a standing mixer fitted with a paddle attachment, cream butter, granulated sugar, vanilla and egg together.

  4. Sift flour, cornstarch, salt. Mix until incorporated.

  5. On the second batch add a few drops of red/pink food coloring to the 2nd batch of sugar/butter mixture. Mix until a desired color is reached. Sprinkle ¼ cup pink sanding sugar to one batch. 

  6. Transfer both batters to plastic wrap. 

  7. Roll into a disk and chill for about 1 hour.
  8. Roll out each batter to a 1/4 inch thickness.

  9. When you roll out the pink dough place more sanding sugar on top and place plastic wrap over the dough and re-roll so the sanding sugar sticks to the dough. The plastic wrap helps the sanding sugar stay off the rolling pin. 

  10. Using a ruler and a sharp knife, cut ½ inch strips of each color batter.

  11. Layer pink and white stripes so that they are touching.
  12. Roll to create a seal. I use plastic wrap over the batter so it won't stick to the rolling pin. 

  13. Cut cookies with a heart shaped cutter.
  14. Place cookies on a baking sheet lined with parchment paper or silicone mat. 

  15. Bake for 10 minutes and watch them closely you don't want them to brown. Let cool on a wire rack. 

Filed Under: Cookies, Desserts

  • « Go to Previous Page
  • Page 1
  • Page 2
  • Page 3
  • Page 4
  • Page 5
  • Page 6
  • Go to Next Page »

Primary Sidebar

Hello and Welcome

Hi! I'm Holly and welcome to my personal blog and thank you for taking the time to look through my recipes and hiking adventures. I hope you enjoy them as much as me. Stay connected to see upcoming blog posts! I'm excited to have you join!

Recent Posts

  • Sourdough Focaccia
  • Andes Mint Truffles
  • Cole Slaw
  • Pumpkin Spice Cupcakes
  • Chicken Tortilla Soup

Archives

  • October 2024
  • December 2023
  • October 2023
  • August 2022
  • April 2022
  • February 2022
  • January 2021
  • May 2020
  • April 2020
  • February 2020
  • November 2019
  • October 2019
  • August 2019
  • July 2019
  • June 2019
  • May 2019
  • April 2019
  • March 2019
  • February 2019
  • January 2019
  • December 2018
  • November 2018
  • October 2018
  • September 2018
  • August 2018
  • July 2018
  • June 2018
  • May 2018

Categories

Don’t Miss These!

Chocolate Almond Cookie Pudding Cups

Spritz Cookies

Skillet Chocolate Chip Cookie

Pineapple Chicken with Rice

Most Popular Recipes

Valentine Vanilla Cake Pops

Chocolate Chip Cookie Sandwich

Footer

My Favorites

stay connected

  • Facebook
  • Instagram
  • Pinterest

Don’t miss a recipe or an adventure!

Copyright© 2025 · Brunch Pro Theme by Feast Design Co.