• Skip to primary navigation
  • Skip to main content
  • Skip to primary sidebar
  • Skip to footer
  • Home
  • Recipes
  • Hiking
  • Contact

Holly in the PNW

The girl that can't sit still!

Everyday Meals

Skillet Chicken Fajitas

February 21, 2019

I try and eat healthy unless I’m baking something delicious for my blog. You always need a little room for baked goods, right? When I’m not baking I’m usually cooking a healthy meal. Skillet chicken fajitas are one of my easy and healthy go-to dinners I eat at least once a week. If you stick to the basics they are pretty healthy and you should have some left over for lunch tomorrow!

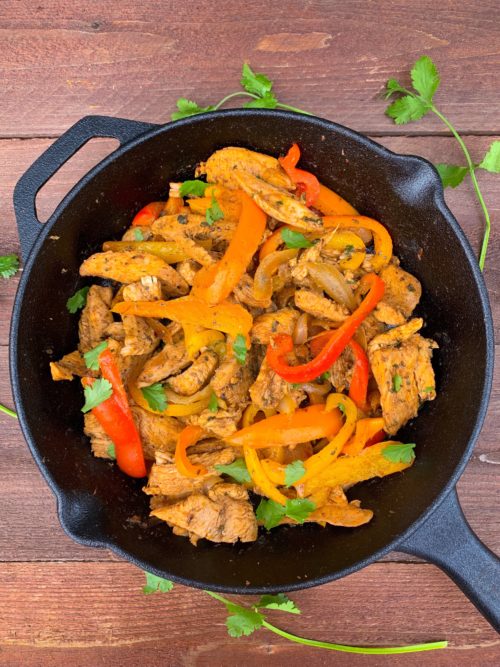
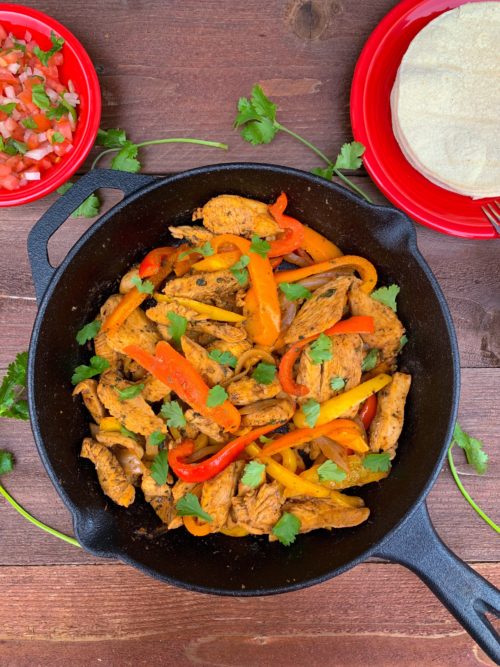
Sautéed onions and peppers with seasoned chicken, you will devour this meal as fast as you put it on your plate. It’s quick, easy and healthy. It has a nice little kick to it but if you like it spicy you can add more hot sauce to the recipe. Grab that skillet and start cooking!

After you cook up all the ingredients in the skillet spoon the mixture onto a tortilla and add some fresh pico de gallo or salsa. I used my simple and easy homemade pico de gallo, but any store bought brand will work.

You can keep this meal more on the healthy, lean side or you can add your favorite cheese and avocados. Either way, healthy or not, you’ll love this skillet chicken fajita recipe.

Enjoy!!!

Print

Skillet Chicken Fajitas

Course Dinner, Main Course
Cuisine Mexican
Keyword Skillet Chicken Fajitas
Prep Time 20 minutes
Cook Time 20 minutes
Resting time 30 minutes
Total Time 1 hour 10 minutes
Servings 8 people

Ingredients

Chicken Fajitas

  • 2 pounds chicken breasts (thinly sliced)
  • 4 tbsp fresh cilantro
  • 1 tbsp extra virgin olive oil
  • 1/2 tsp ground cumin
  • 1 tsp chili powder
  • 2 tsp dried oregano
  • 1/2 tsp garlic powder
  • 1 tsp kosher salt
  • 1 tsp hot sauce (or more if you want it spicy)
  • Juice of one lime

For the Peppers and Onions

  • 1 tbsp extra virgin olive oil
  • 1 red bell pepper (thinly sliced)
  • 1 yellow bell pepper (thinly sliced)
  • 1 orange bell pepper (thinly sliced)
  • 1 yellow onion (thinly sliced)
  • 1 teaspoon chili powder
  • 1 teaspoon kosher salt

Instructions

  1. In a large bowl combine all of the chicken fajita ingredients. Do not add the lime juice or pepper and onion ingredients.

  2. Toss the thinly sliced chicken in the marinade until coated. Cover and refrigerate for 30 minutes.

  3. Preheat a large cast iron skillet over high heat with 1 tablespoon of oil.

  4. When the skillet is hot add in the sliced peppers, onion, chili powder and salt.

  5. Saute the peppers and onions for about 4 minutes or until they are softened slightly.

  6. Remove the peppers and onions from the skillet onto a plate and set aside.
  7. Add one more tablespoon oil to the skillet.

  8. Add in the chicken fajita mixture and saute until the chicken is cooked thoroughly and is no longer pink (cook to at least 165 degrees!).

  9. Add the peppers and onions back into the skillet. Squeeze the lime juice over the chicken, peppers and onions.

  10. Mix everything together until well combined and heated evenly (about 1 minute). Serve immediately.

  11. Serve the fajitas on tortillas and top with pico de gallo or salsa. If desired, top with your favorite cheese and sliced avocados.

Filed Under: Everyday Meals

Healthy Chili

February 6, 2019

It’s been snowy and cold in Seattle so I cooked up this healthy chili to stay warm. You can’t beat a hot bowl of chili on a cold day! This chili isn’t overly powerful with chili taste and spice. You can add more chili powder and spice to your liking. I can’t do a lot of spice but there’s a little kick to it so it’s not so bland.

This is a quick chili recipe that’s not difficult and you can whip it up for yourself or for a party. It’s delicious!

Enjoy!!

Print

Healthy Chili

Course Main Course, Soup
Cuisine American
Keyword Healthy Chili
Prep Time 20 minutes
Cook Time 50 minutes
Total Time 1 hour 10 minutes
Servings 4 people

Ingredients

  • 1 lb ground turkey
  • 1 1/2 cups canned pinto beans drained and rinsed
  • 1 sweet onion chopped
  • 1 bell pepper chopped
  • 2 tbsp garlic minced
  • 2 tbsp chili powder or to taste
  • 1 tbsp dried oregano
  • 2 tsp cumin powder
  • 2 tsp cocoa powder
  • 1 tsp salt
  • 1/2 tsp black pepper
  • 1/4 tsp cayenne pepper or to taste
  • 4 cups beef broth
  • 1 can 14 oz diced tomatoes
  • 1/4 cup corn meal
  • Topping options: sour cream, shredded cheddar cheese, chopped red onions, shallots or green onions, sliced jalapenos, hot sauce, diced avocado

Instructions

  1. Add ground turkey to sauce pan and stir with wooden spoon to break up the meat into smaller pieces; saute until meat is brown.

  2. Stir in onions and saute until soft, about 2 minutes.
  3. Stir in bell peppers and garlic.
  4. Add chili powder, dried oregano, cumin powder, cocoa powder, salt, black pepper, cayenne pepper and stir until fragrant, about 1 minute.
  5. Transfer meat mixture into a bigger pot.

  6. Stir in beef broth, tomatoes and pinto beans.
  7. Bring the chili to a boil stirring frequently. Reduce the heat and let it simmer for about 45 minutes.
  8. Stir in corn meal slowly. The corn meal will clump up if you pour it in all at once.
  9. Cook until chili has thickened, stirring frequently, about 5 minutes.
  10. Pour chili into serving bowls and serve with your choice of toppings: sour cream, shredded cheddar cheese, chopped red onions, shallots or green onions, sliced jalapenos, hot sauce, diced avocado or anything you can think of!

Filed Under: Everyday Meals

Mini Chicken Pot Pie

November 12, 2018

I’ve been making chicken pot pies for years so I wanted to share my recipe. I turned them into mini chicken pot pies for all the people that like single servings. You can also make this recipe as a whole pie too. Since I’m posting this right before thanksgiving it’s excellent with your left over turkey so make a turkey pot pie instead of chicken.

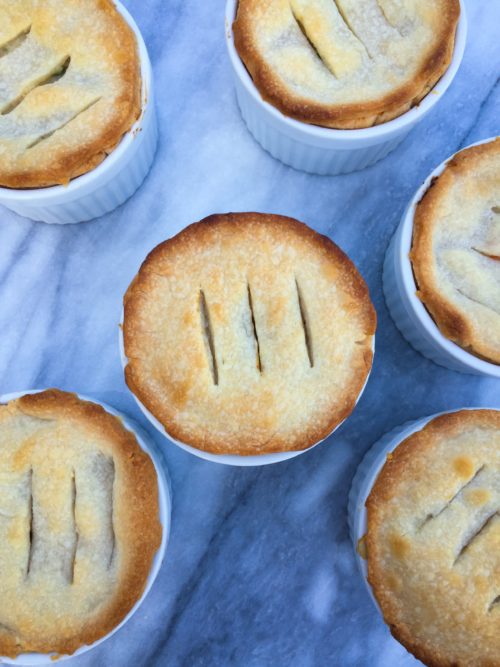
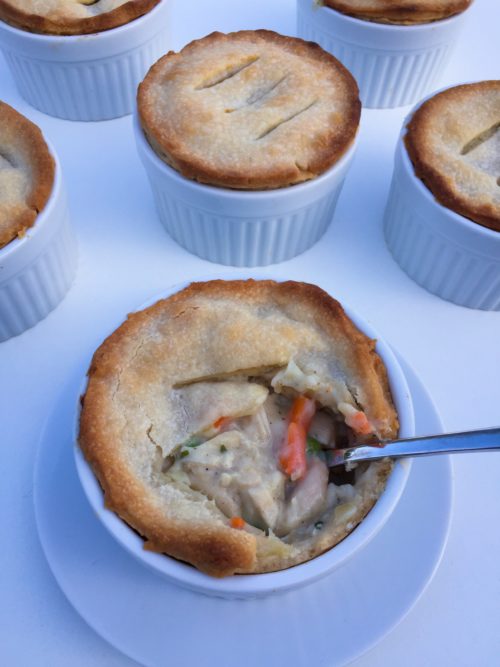
You can make your own pie crust or buy it from the store. It’s so much easier to buy it and it tastes just as good. I’ve made it both ways.  I like to use rotisserie chicken for my pot pies but you can use any type of chicken you want.

Since I’m usually cooking for one or two people I thought using the ramekins and having single servings was a better idea.  It’s great for reheating the next day as well.  Eating these mini chicken pot pies for a few days will not be a disappointment.

Bake the mini chicken pot pies and devour! It will be hot and steamy on the very first bite!

ENJOY!!!

Print

Mini Chicken Pot Pie

Course Main Course
Cuisine American
Keyword Mini Chicken Pot Pie
Servings 6 pies

Ingredients

  • 2 15 ounce pie crust 2 should come in one package
  • 1-3 cups chicken see notes
  • 1/4 cup butter
  • 1/3 cup flour
  • 1/3 cup chopped onion
  • 2 cloves garlic minced
  • 3/4 tsp salt
  • 1/2 tsp pepper
  • 1 1/2 cups chicken broth
  • 1/2 cup milk
  • 2 cups mixed vegetables

Instructions

  1. Preheat oven to 425 degrees

  2. Spray non stick spray in the bottom of pie pan or ramekins. Divide the pie crust and place the crust into 6 ramekins. If you are making a whole pie place one pie crust in 9 inch pie pan.

  3. In medium sauce pan, melt butter over medium heat. Add onion and garlic, cook until tender, about 2 minutes. 

  4. Stir in flour, salt and pepper. Cook stirring constantly, until mixture is bubbly, remove from heat.

  5. Stir in chicken broth and milk. Heat to boiling, stirring constantly. Boil and stir 1 minute.

  6. Stir in chicken and vegetables and remove from heat.

  7. Spoon chicken filling over the crust and place pie crust over the filling.  Flute edges and cut 3 slits on the top layer of the pie crust. If using a pie pan cut slits in several places all over the pie. 

  8. Bake at 425 degrees for 25 - 30 minutes or until the crust is golden brown.

Recipe Notes

You can use any type of chicken you want.  I usually use a rotisserie chicken.

Filed Under: Everyday Meals

Flatbread Pizza

November 10, 2018

I had some left over dough from my pull apart bread recipe that I totally love.  I decided to use it and make flatbread pizza with a pesto sauce that I picked up at my local Trader Joe’s.  Its simple and quick if you already have the dough prepared.  If not make some dough and cook a lot of flat bread pizzas.

I used the Trader Joe’s Pesto alla Genovese Basil Pesto for the base and topped it with  mozzarella cheese and sliced cherry tomatoes. I also added the everything but the bagel seasoning on top.  Trader Joe’s is the best for sauces and seasonings.

You can top your pizza with anything you want. Throw it in the over at 475 degrees for about 10-15 mins or until the edges are golden brown. Enjoy!


Print

Flat Bread Pizza

Cuisine Italian
Keyword Flat Bread PIzza

Ingredients

Ingredients:

  • 2 tsp Red Star® Platinum yeast
  • 1 tbsp granulated sugar
  • 3/4 cup milk warm
  • 3 tbsp unsalted butter at room temperature
  • 1 large egg
  • 2 1/3 cups all-purpose flour spoon & leveled, plus more as needed
  • 1 tsp salt

Cream Cheese / Butter Filling

  • 2 ounces brick style cream cheese at room temperature
  • 6 tbsp unsalted butter at room temperature
  • 1-2 teaspoons dried oregano
  • 1-2 teaspoon dried basil

Instructions

Directions:

Make the dough:

  1. Place the yeast and sugar in the bowl of a stand mixer fitted with a dough hook or paddle attachment. Or, if you do not own a stand mixer, a regular large mixing bowl. Heat the milk on the stove or in the microwave until warm to touch. Pour warm milk on top of yeast/sugar. Whisk gently to combine, then loosely cover with a clean kitchen towel and allow to sit for 5-10 minutes. The mixture will be frothy after 5-10 minutes.
  2. If you do not have a mixer, you can mix by hand in this step. Add the butter, egg, flour, and salt. Beat on low speed for 3 minutes. Dough will be soft. Transfer it to a lightly floured work surface. Using lightly floured hands, knead it for 1 minute. If the dough is too sticky to handle, add 1-3 more Tablespoons of flour, but you want a very soft dough. Shape into a ball.
  3. Place the dough in a greased bowl (I use nonstick spray to grease) and cover with plastic wrap or aluminum foil. Place in a slightly warm environment to rise until doubled in size, around 60-90 minutes. For this warm spot, I suggest using the oven. Preheat to 200°F (93°C), then turn the oven off after preheating. Place the covered bowl inside and shut the oven door. This is your warm environment.
  4. As the dough rises, prepare the filling in the next steps.

Make the cream cheese / butter filling:

  1. In a large bowl spoon all of the filling ingredients together until combined. Cover tightly and set aside until ready to use.
  2. Punch down the dough to release the air. Add the cream cheese filling to the dough and knead together.

  3. Cover with plastic wrap or aluminum foil and allow to rise once again in a slightly warm environment until puffy, about 45 minutes.
  4. Preheat oven to 475 degrees.

  5. Roll out the dough and make a flatbread pizza shape, top with any kind of sauce and add your toppings. Bake for 10-15 minutes of until the edges are golden brown.


Filed Under: Everyday Meals

Pull Apart Bread

September 24, 2018

I love homemade bread and I’m trying to master my skills. This pull apart bread will melt in your mouth. If you like the everything but the bagel seasoning from Trader Joe’s you’ll love this pull apart bread!

Let’s start with the yeast don’t let yeast scare you it’s simple. I use red star yeast. Add the yeast, salt and warm milk to a mixing bowl. Whisk together, it will be frothy. Cover with a clean towel for ten minutes. Add the butter, egg, flour and salt in the mixing bowl and beat on low speed for about 3 minutes. Lightly flour your clean counter surface and kneed dough into a ball. Let your dough rise in a warm environment for about 60 minutes. You can preheat your oven to 200 degrees and shut it off and stick your dough in there. Cover your mixing bowl with plastic wrap or aluminum. Keep the door open closed. You want your dough to double in size.

While the dough is rising make your spread. You can use any type of spread you want for the middle. I used a little bit of cream cheese, butter, oregano and basil.

Preheat your oven to 350 degrees. Once your dough has doubled in size poke down on the dough and kneed again on a lightly floured surface. Roll out the dough. You want the dough to be about a 1/4 inch thick. Add the spread all over the dough.

Cut out circles. I use this Cookie Cutter which is a perfect size.

Grease a loaf pan. Fold the circles in half and place them upright in the loaf pan.

Melt two tablespoons butter and pour over prepared bread circles and sprinkle with everything but the bagel seasoning.

Bake for 30-35 mins until golden brown at 350 degrees.

This bread is so soft it will just melt in your mouth. I served it at a football party and it was gone in seconds! You might want to make a double batch!

Look at this middle! So soft!

Pull apart and devour! You won’t regret making this one!

Print

Pull Apart Bread

Course Side Dish
Keyword Pull Apart Bread
Servings 12 slices

Ingredients

Ingredients:

  • 2 tsp Red Star® Platinum yeast
  • 1 tbsp granulated sugar
  • 3/4 cup milk warm
  • 3 tbsp unsalted butter at room temperature
  • 1 large egg
  • 2 1/3 cups all-purpose flour (spoon & leveled), plus more as needed
  • 1 tsp salt

Cream Cheese / Butter Filling

  • 2 ounces brick style cream cheese at room temperature
  • 6 tbsp unsalted butter at room temperature
  • 1-2 teaspoons dried oregano
  • 1-2 teaspoon dried basil

Instructions

Directions:

  1. Make the dough: Place the yeast and sugar in the bowl of a stand mixer fitted with a dough hook or paddle attachment. Or, if you do not own a stand mixer, a regular large mixing bowl. Heat the milk on the stove or in the microwave until warm to touch. Pour warm milk on top of yeast/sugar. Whisk gently to combine, then loosely cover with a clean kitchen towel and allow to sit for 5-10 minutes. The mixture will be frothy after 5-10 minutes.

  2. If you do not have a mixer, you can mix by hand in this step. Add the butter, egg, flour, and salt. Beat on low speed for 3 minutes. Dough will be soft. Transfer it to a lightly floured work surface. Using lightly floured hands, knead it for 1 minute. If the dough is too sticky to handle, add 1-3 more Tablespoons of flour, but you want a very soft dough. Shape into a ball.
  3. Place the dough in a greased bowl (I use nonstick spray to grease) and cover with plastic wrap or aluminum foil. Place in a slightly warm environment to rise until doubled in size, around 60-90 minutes. For this warm spot, I suggest using the oven. Preheat to 200°F (93°C), then turn the oven off after preheating. Place the covered bowl inside and shut the oven door. This is your warm environment.
  4. As the dough rises, prepare the filling and topping in the next steps and grease a 9x5-inch loaf pan.
  5. Make the cream cheese / butter filling: In a large bowl spoon all of the filling ingredients together until combined. Cover tightly and set aside until ready to use. 

  6. Assemble the bread: Punch down the dough to release the air. Place dough on a lightly floured work surface and with a floured rolling pin, roll out until the dough is about 1/4 inch thick. Spread cream cheese filling on top. Using a 3.5 - 4 inch circle cookie cutter, cut into circles. I get about 12 circles. Fold circles in half and line in prepared baking pan, round side up.

  7. Cover with plastic wrap or aluminum foil and allow to rise once again in a slightly warm environment until puffy, about 45 minutes.
  8. Adjust the oven rack to the lower third position then preheat oven to 350°F.

  9. Brush dough with the 2 Tablespoons of melted butter and sprinkle with everything but the bagel seasoning on top. Use as much of the seasoning as you want.

  10. Bake until golden brown, about 30-35 minutes. If you find the top of the loaf is browning too quickly, tent with aluminum foil. Remove from the oven and place on a wire rack. Cool for 10 minutes in the pan, then remove from the pan and serve warm.

Filed Under: Appetizers, Everyday Meals

Pineapple Chicken with Rice

May 8, 2018

Whenever I think of pineapple I think of paradise! Sitting on a beach drinking Pina Coladas all day long. I decided to bring a fresh Pineapple home and prepare Pineapple Chicken with Rice for my family.

I was recently in the store and I was walking through the produce section and noticed that the pineapples were on sale. I thought to myself I need to make a pineapple dish and I bought a couple to experiment with.  I did some research on different types of pineapple dishes and this was my end result. It was so delicious and I even served it to my family that were visiting from out of town. They loved it!

You can also hollow out the pineapple and serve the meal in that! It will be a hit I promise!

Print

Pineapple Chicken with Rice

Course Main Course
Prep Time 20 minutes
Cook Time 15 minutes
Total Time 35 minutes
Servings 4 people

Ingredients

  • 2 pounds Chicken Breast
  • 1 tbsp Olive Oil extra virgin
  • 1/4 cup Pineapple Juice
  • 2 tbsp Low Sodium Soy Sauce may use regular
  • 2 tbsp Chicken Broth
  • 2 tbsp Hoisin Sauce
  • 1/4 cup Brown Sugar may use less if you don't want it too sweet
  • 1 clove Garlic minced
  • 1 tsp cornstarch
  • 1 cup diced pineapple

Instructions

  1. In a medium saucepan, whisk together the pineapple juice, soy sauce, chicken stock, hoisin sauce, brown sugar, garlic and cornstarch. Bring the mixture to a boil and cook until the mixture has reduced to about 1 cup and is the consistency of thick syrup. Set the sauce aside.
  2. Add the olive oil to a large nonstick skillet set over medium-high heat. Add the chicken to the pan and season it with salt and pepper. Cook the chicken, stirring, until it is no longer pink, about 5 minutes. Drain off any liquids then add the sauce to the pan and stir until combined. Add the pineapple and cook, stirring, for an additional 1 minute.

  3. Serve over rice

Filed Under: Everyday Meals

  • « Go to Previous Page
  • Page 1
  • Page 2

Primary Sidebar

Hello and Welcome

Hi! I'm Holly and welcome to my personal blog and thank you for taking the time to look through my recipes and hiking adventures. I hope you enjoy them as much as me. Stay connected to see upcoming blog posts! I'm excited to have you join!

Recent Posts

  • Sourdough Focaccia
  • Andes Mint Truffles
  • Cole Slaw
  • Pumpkin Spice Cupcakes
  • Chicken Tortilla Soup

Archives

  • October 2024
  • December 2023
  • October 2023
  • August 2022
  • April 2022
  • February 2022
  • January 2021
  • May 2020
  • April 2020
  • February 2020
  • November 2019
  • October 2019
  • August 2019
  • July 2019
  • June 2019
  • May 2019
  • April 2019
  • March 2019
  • February 2019
  • January 2019
  • December 2018
  • November 2018
  • October 2018
  • September 2018
  • August 2018
  • July 2018
  • June 2018
  • May 2018

Categories

Don’t Miss These!

Mini Chicken Pot Pie

Vanilla Naked Cake with Raspberry Filling

Sourdough Focaccia

Chocolate Nutella Basketball Cake

Most Popular Recipes

Chocolate Nutella Basketball Cake

Ice Cream Sandwiches

Footer

My Favorites

stay connected

  • Facebook
  • Instagram
  • Pinterest

Don’t miss a recipe or an adventure!

Copyright© 2025 · Brunch Pro Theme by Feast Design Co.