• Skip to primary navigation
  • Skip to main content
  • Skip to primary sidebar
  • Skip to footer
  • Home
  • Recipes
  • Hiking
  • Contact

Holly in the PNW

The girl that can't sit still!

Cakes

Number Cookie Cake

May 1, 2020

Today my blog turns 2! I can’t believe it’s been 2 years since I started my blog. It sure has been a fun and great hobby and I have been so happy to share my recipes with all of YOU! Thank you to everyone for following my blog and making my recipes. There will be many more to come!

Since we have to stay at home because of the pandemic a lot of people are cooking and baking a lot more. I know I sure have been! We are all in this together and one day things will calm down and we will be back to normal. In the meantime, we can try new recipes at home!

Let’s get started with a Number Cookie Cake. I love sugar cookies and this is the base of this number cookie cake. I could eat sugar cookies all day long!

I have a good friend that owns a cookie business so I reached out to her for her sugar cookie recipe, so you know these are going to be top notch. Soft sugar cookies are the only way to go, so I knew she would be a great resource.  She does marvelous and stunning work. It blows me away how talented she is. Her business is called M&T Sweet Treats. You can find her on Facebook and on Instagram!

Let’s get started with the cookie base. Combine butters and sugar until smooth. Add eggs one at a time and vanilla until incorporated. Mix flour, baking powder and salt. Divide the dough in half and cover with plastic wrap and chill in the refrigerator for 1 – 3 hours.

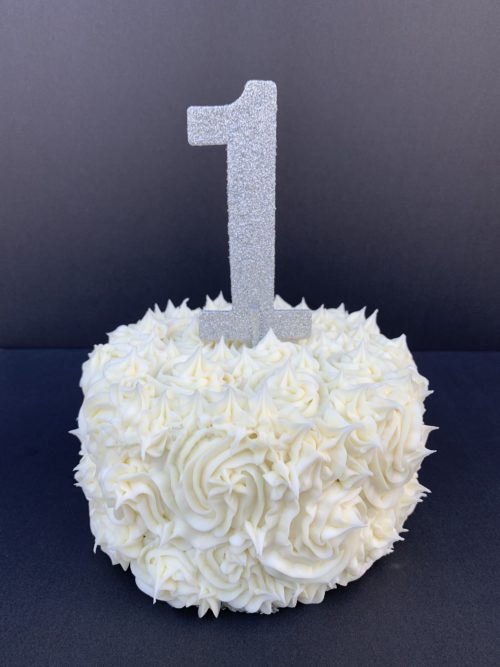
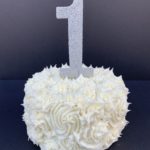
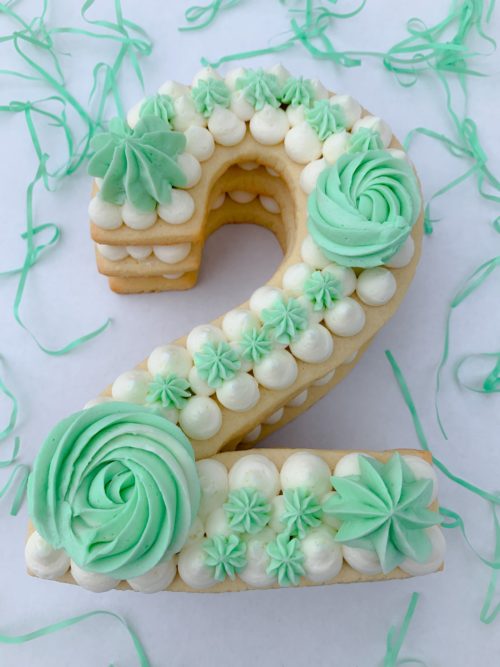
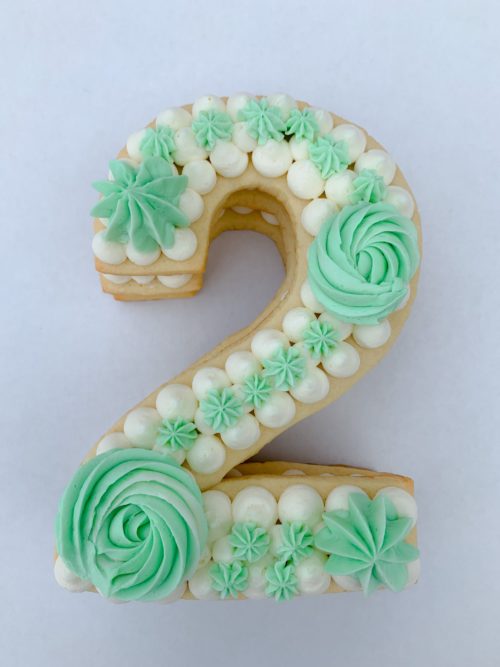
Once chilled rolled the dough onto a floured surface until desired thickness. I printed a number 2 off of Microsoft Word for a template. Cut out a number 2 (or any design you want) from the dough. Reshape the remaining dough and repeat for as many layers as you want. I did three layers for this number 2 cake.

For the frosting, combine room temperature butter, vanilla, powdered sugar and whole milk. For each one cup of powdered sugar add one tablespoon of milk. Add the vanilla when you reach the desired consistency.

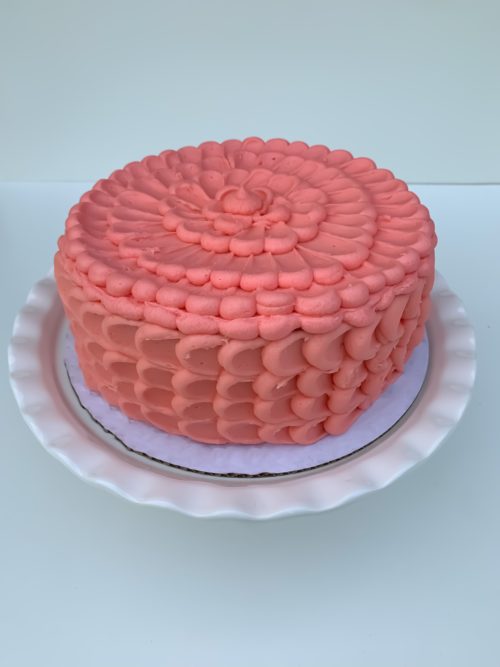
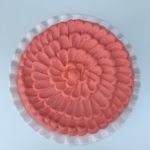
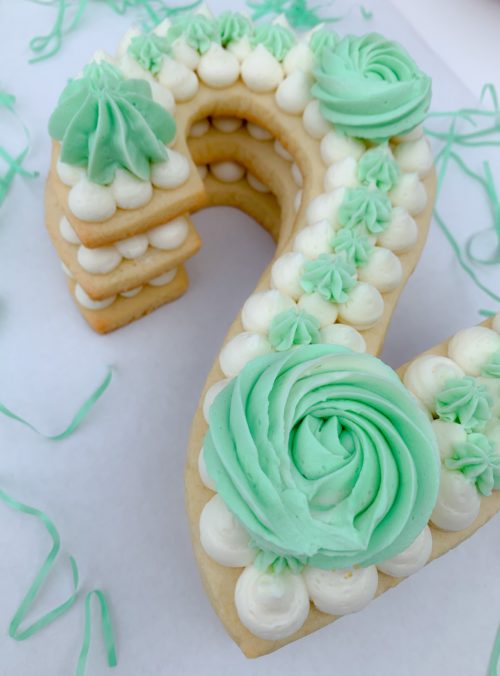
On each layer decorate with frosting. Use your imagination! I used four separate tips to decorate my cookie cake. For the circles I used a large round tip. The mini flowers I used a drop flower tip, the large flowers I used a closed star tip for both.

The cookies stay soft for days after baking!

Enjoy!!!!

Print

Number Cookie Cake

Course Cake, Cookies, Dessert
Cuisine American
Prep Time 1 hour
Servings 12 people

Ingredients

Number Cookie Cake

  • 1 1/2 cups unsalted butter room temperature
  • 2 cups granulated sugar
  • 4 eggs room temperature
  • 1 tsp pure vanilla extract
  • 5 cups flour
  • 2 tsp baking powder
  • 1 tsp salt

Vanilla Buttercream

  • 1 cup unsalted butter room temperature
  • 4 - 5 cups confectioners' sugar
  • 4 - 5 tbsp whole milk
  • 1 tsp pure vanilla extract

Instructions

Number Cookie Cake

  1. With a handheld or stand mixer fitted with a paddle attachment, beat the butter on medium speed until creamy – about 2 minutes

  2. Add sugar and beat until smooth.

  3. Add eggs one at time and beat after each egg until smooth. Add the vanilla with the last egg.

  4. Mix in flour, baking powder and salt. Blend well until combined.

  5. Divide dough in half and wrap with plastic wrap. Chill in refrigerate for 1 - 3 hours.

  6. Roll dough onto floured surface until desired thickness.

  7. Cut out your number or design. Reshape the remaining dough and repeat for as many layers as you want. Bake one layer on their own cookie sheet.

  8. Bake layers at 350 degrees for 8 -10 minutes or until golden brown. It depends on your thickness of the cookie and it can take longer to bake.

Vanilla Buttercream

  1. With a handheld or stand mixer fitted with a paddle attachment, beat the butter on medium speed until creamy – about 2 minutes

  2. Add 1 cup of confectioners' sugar and 1 tbsp milk at a time. Beat on low speed for 30 seconds after each cup of confectioners’ sugar and tablespoon of milk is added, then increase to medium-high speed and beat for 2 full minutes after the 4th cup is added. Add up to 1 cup more confectioners’ sugar if frosting is too thin or another tablespoon of milk if frosting is too thick. Once you've reached the desired consitency, mix in the vanilla.

  3. Assemble each layer of your cookie cake and decorate as desired.

Filed Under: Cakes, Cookies

Chocolate Chip Pumpkin Bundt Cake

October 15, 2019

Chocolate chips, pumpkin and some basic ingredients will make this moist and delicious Chocolate Chip Pumpkin Bundt Cake. Yes, I said moist! This is the perfect dessert for  you and because it’s fall.

With all this pumpkin talk I wanted to whip up a quick dessert that anyone (even you!) can make. The chocolate chips add a perfect balance of sweetness to the cake. The powdered sugar sprinkled on top adds the perfect touch to make it look extra fancy.

This is also a great breakfast dish served with a large cup of coffee. It’s also perfect for Sunday football parties since you can feed a large group with this cake. Go Hawks!

Look at this middle! Doesn’t it look divine?!

Cut up a slice and dig in! If you make the slice too small, be warned, you will be back for seconds!

Enjoy!!!

Print

Chocolate Chip Pumpkin Bundt Cake

Course Cake, Dessert
Cuisine American
Keyword Chocolate Chip Pumpkin Bundt Cake
Prep Time 20 minutes
Cook Time 1 hour 5 minutes
Total Time 1 hour 25 minutes

Ingredients

  • 3 cups all-purpose flour
  • 2 tsp baking soda
  • 2 tsp cinnamon
  • 1 tsp pumpkin pie spice
  • ½ tsp salt optional
  • 2½ cups granulated sugar
  • 1 cup vegetable oil
  • 3 eggs
  • 1 tsp vanilla extract
  • 1 can (15 ounce) pumpkin
  • 2 cups semi-sweet chocolate chips
  • powdered sugar for dusting

Instructions

  1. Preheat oven to 350 degrees. Spray 10-inch bundt pan with baking spray and set aside.
  2. In a medium bowl, whisk together the flour, baking soda, cinnamon, pumpkin pie spice and salt.

  3. In a large bowl, beat sugar and vegetable oil until combined. Add eggs, one at a time, beating well after each addition. Add vanilla as you add the last egg.

  4. Alternate adding flour mixture and scoops of pumpkin to the egg mixture, beating well on medium-low after each addition. Stir in chocolate chips.

  5. Pour batter into prepared bundt pan.

  6. Bake for 60 - 65 minutes, or until a toothpick inserted in the center comes out clean. Cool for 10 minutes before cooling on a wire rack. Let cool completely and then dust with powdered sugar before serving.

Filed Under: Cakes, Desserts

Chocolate Nutella Basketball Cake

June 1, 2019

I was asked to make a cake for a high school basketball team for a dessert dash. It was a challenge to make but worth it! Plus it’s chocolate nutella so you know it’s tasty! I used the same cake recipe and frosting as my Chocolate Nutella Cupcakes. It’s also a great cake to make for the NBA playoffs since the Golden State Warriors are in the running! Go Warriors!

For the cake I used a half round cake pan. Make sure to coat the pan with lots of non stick spray so the cake doesn’t stick to the pan after it’s baked. Let the cake cool completely. Cut the cake in half and apply frosting to the middle of the cake. Attach the top of the cake and coat the whole cake with rest of the frosting.

I used a half sheet cake board for the background.

I used marshmallow fondant to decorate the outside of the cake.  It’s expensive to buy fondant so I wanted to make my own. Make the fondant, add orange gel food coloring and roll it out to about an 1/8 inch thick and cover the cake with fondant. Decorate the rest of the cake with the rest of the fondant and color the fondant with the corresponding colors for the back board, ball lines and if you want a team name added. When you add the basketball to the cake board make sure you have a round cake board under the basketball cake. The oils will spread onto the half sheet cake board if you don’t have a mini round one directly under the cake. Once the black lines are on the basketball, add the red rim and basket hoop strings.

Enjoy!

Print

Chocolate Nutella Basketball Cake

Course Cake, Dessert
Cuisine American
Keyword Chocolate Nutella Basketball Cake

Ingredients

  • 1 box chocolate cake mix or your favorite homemade recipe

Nutella Frosting

  • 1 cup butter
  • 1/2 cup shortening
  • 1 cup Nutella hazelnut spread
  • 4-5 cups powdered sugar
  • 3-4 tbsp milk or water

Marshmallow Fondant

  • 16 ounce package mini marshmallows
  • 2-5 tbsps water
  • 8 cups powdered sugar
  • 1/3 cup vegetable shortening

Instructions

  1. Bake cake as directed on the box. Let the cake completely cool.

Nutella Icing

  1. Beat together butter and shortening until smooth.

  2. Add Nutella and mix until smooth.
  3. Slowly add 4 cups of powdered sugar and mix until smooth.
  4. Add 2-3 tbsp of milk or water and mix until smooth.
  5. Add fifth cup of powdered sugar and mix until smooth.
  6. Add more water or milk until the right consistency.

Marshmallow Fondant

  1. Place marshmallows and 2 tablespoons of water in a large microwave-safe bowl. 
  2. Microwave for 30 seconds on high; stir until mixed well. Continue microwaving in 30 second intervals until they are melted and smooth.

  3. Place about 5 cups of the powdered sugar on top of the melted marshmallow mixture and gently fold it into the marshmallows.
  4. Grease your hands and your counter-top generously with shortening. Turn marshmallow mixture onto counter and start kneading it like you would dough.
  5. Add more confectioners' sugar as needed and re-grease your hands the counter-top as needed.
  6. If the marshmallow fondant is tearing easily, it is too dry; add water (about 1/2 tablespoon at a time) kneading until fondant forms a firm, smooth elastic ball that will stretch without tearing, about 8 minutes.
  7. To color fondant, add a little gel color to your desired amount and knead it with your hands until it absorbs all of the color. Add more color as needed to reach the desired colored. (I use medical gloves when mixing in the color. It's very helpful while cleaning your hands after).

  8. Follow directions above to assemble and decorate the cake.

Recipe Notes

TO STORE FONDANT:

To store the fondant, coat it with a thin layer of shortening, wrap it tightly with plastic wrap, and the place it in a resealable bag with all the air squeezed out. It will keep well in refrigerator for several weeks.
When ready to use, knead fondant until smooth. Roll out fondant 1/8 inch thick.

Filed Under: Cakes, Desserts

Ombre Vanilla Cake

May 10, 2019

I was lucky enough to make this cake for a dear friend and I think she thoroughly enjoyed it! This would also be a great cake to make for Mother’s Day! Ombre cakes are fun to make so don’t let the design scare you. This Ombre Vanilla Cake turned out to be pretty in pink. You can add several colors for this cake design. If you have the time, it’s also really pretty when you use multiple colors!

I used the same recipe as my Naked Vanilla Raspberry Cake (minus the raspberry sauce).

To make this cake I suggest the following:

  • A cake (preferably round)
  • Butter cream frosting
  • food coloring (I suggest gel but liquid will work too)
  • piping bag
  • piping tip – #12 wilton
  • small offset spatula
  • turn table

Add enough food coloring to your icing to achieve the color you want. Put the icing into the piping bag.

If you haven’t done this technique before I would suggest practicing on a cutting board before you start. Begin by piping four dots in a row. The dots should just touch each other and be about the diameter of a quarter (you can experiment with different sizes). Grab your offset spatula and gently bring it down onto the middle of the bottom icing dot. Press down and drag. Repeat with each dot. Scrape the excess icing off your spatula back onto the icing bowl.

Ok, let’s start the process!!!

Give your cake a crumb coat of buttercream.

Starting at the bottom of the cake, pipe dots until you have reached the top of the cake.  Using the technique you practiced above, cover your entire cake using the petal effect. When you get to the last row the easiest way to finish is just with a vertical row of dots. Make that the back of your cake. Continue and give the top of your cake the petal effect as well.

I’ve seen cakes done with the same technique going up the cake (instead of around) and you can mix it up on the top of the cake doing rows in different directions. Use your creativity!

I really enjoy doing the Ombre effect!

Enjoy!!!

Print

Ombre Vanilla Cake

Course Cake, Dessert
Cuisine American
Keyword Ombre Vanilla Cake
Prep Time 45 minutes
Cook Time 25 minutes
Resting time 1 hour
Total Time 2 hours 10 minutes
Servings 12 servings

Ingredients

Cake

  • 3 3/4 cups all purpose flour sifted
  • 1 tsp baking powder
  • 3/4 tsp baking soda
  • 1 tsp salt
  • 1 1/2 cups unsalted butter room temperature
  • 2 cups granulated sugar
  • 5 large eggs room temperature
  • 1 tbsp pure vanilla extract
  • 1 3/4 cups buttermilk room temperature

Vanilla Buttercream

  • 1 1/2 cups unsalted butter room temperature
  • 5 - 6 cups confectioners' sugar
  • 5 - 6 tbsp heavy cream
  • 1 tsp pure vanilla extract

Instructions

Making the Cake

  1. Preheat oven to 350°F (177°C). Grease and lightly flour three 9-inch cake pans.

  2. Whisk the flour, baking powder, baking soda, and salt together in a large bowl. Set aside.
  3. Using a handheld or stand mixer fitted with a paddle or whisk attachment, beat the butter and sugar together on high speed until smooth and creamy, about 3 minutes. Scrape down the sides and up the bottom of the bowl with a rubber spatula as needed.
  4. On medium-high speed, add 1 egg at a time, beating well after each addition. Beat in the vanilla extract. Scrape down the sides and up the bottom of the bowl with a rubber spatula as needed.
  5. With the mixer on low speed, add the dry ingredients in three additions alternating with the buttermilk, beginning and ending with the dry ingredients, and mixing each addition just until incorporated. Do not overmix this batter. The batter will be smooth, velvety, and slightly thick.
  6. There is about 8 cups of batter total, so each layer will be 2 and 2/3 cups. Pour/spread batter evenly into prepared cake pans.
  7. Bake for around 25-26 minutes or until the cakes are baked through. To test for doneness, insert a toothpick into the center of the cake. If it comes out clean, it is done. Allow cakes to cool completely in the pans set on a wire rack. The cakes must be completely cool before frosting and assembling.

Making the Buttercream Frosting

  1. In a large bowl using a hand-held mixer or stand mixer fitted with a whisk or paddle attachment, beat the butter on medium speed until creamy, about 2 minutes.

  2. With the mixer running on low, add 5 and 1/2 cups confectioners' sugar, 5 tablespoons heavy cream, and the vanilla extract. Increase to high speed and beat for 3 full minutes.
  3. Add 1/2 cup more confectioners' sugar if frosting is too thin, 1 more tablespoon cream if frosting is too thick.
  4. Yields about 4.5 cups of frosting.

Assemble and Decorate the Cake

  1. First, using a large serrated knife, slice a thin layer off the tops of the cakes to create a flat surface. Discard or save and eat later.
  2. Place 1 cake layer on your cake stand, cake turntable, or serving plate. Spread frosting evenly on top.

  3. Top with 2nd cake layer and evenly cover the top with more frosting.

  4. Top with the third cake layer and evenly cover the top with more frosting. Cover the sides with a crumb coat finish of frosting.

  5. Use a bench scraper to smooth out the frosting on the sides of the cake.
  6. Decorate cake with the ombre effect and follow the instructions above. 

  7. Refrigerate the cake for 2-3 hours or up to 1 day before slicing and serving. If chilling for more than a few hours, loosely cover with plastic wrap after 1 hour of refrigeration (the frosting will "set" after about 1 hour and the plastic wrap won't really ruin your frosting at that point).

Recipe Notes

Cover and store leftover cake in the refrigerator for up to 1 week.

Filed Under: Cakes, Desserts

Vanilla Checkered Cake

May 1, 2019

My blog turned one today! I can’t believe it’s been a year since I took the leap of starting a blog. I’ve always wanted to start a blog and I finally did it and I couldn’t be happier to share all of my recipes and hiking adventures with YOU!

I’ve posted 51 blog posts in my first year, making this one #52! It’s been a fun year of baking, hiking and blogging. Soon enough I will be adding more hiking posts. Thank you for making this fun for me and following my page. Tell your friends about my blog if you love it as much as me!

I made this Vanilla Checkered Cake to celebrate my one year anniversary of my blog! YAY! Turning one is fun!

Don’t let the inside of the cake scare you, it’s easier than you think. But if you don’t want to attempt the checkered cake you can just leave it all one color. Either way it’s delish! You can’t go wrong with vanilla cake and vanilla buttercream. All the details of this cake will be in the recipe. I really enjoyed making this Vanilla Checkered Cake!

Enjoy!!!

Print

Vanilla Checkered Cake

Course Cake, Dessert
Cuisine American
Keyword Vanilla Checkered Cake
Prep Time 1 hour
Cook Time 30 minutes
Resting time 1 hour
Total Time 2 hours 30 minutes
Servings 12 slices

Ingredients

  • 1 box vanilla cake mix
  • 1 3oz box vanilla pudding
  • 1 cup water
  • 1/3 cup vegetable oil
  • 3 large eggs

Vanilla Butter Cream

  • 1 cup unsalted butter at room tempature
  • 4-5 cups confectioners’ sugar
  • 1/4 cup whole milk
  • 2 tbsp pure vanilla extract
  • salt to taste
  • black gel food coloring

Instructions

  1. Preheat oven to 350 degrees. Grease two 6 inch pans and set aside.

  2. Combine cake mix, vanilla pudding, water, oil and eggs in a mixing bowl. With the paddle attachment mix until well combined when no lumps appear. 

  3. Pour half the batter into one pan. Add the black food coloring. I usually dip a knife into the gel food coloring and add it that way. You don't need much. Mix the food coloring until incorporated. Pour the black batter into the other greased pan. Bake cakes for 26 - 31 minutes. Poke a tooth pick in the middle until it comes out clean. 

  4. Let the cakes completely cool on a wire rack.

Vanilla Buttercream

  1. While the cake is cooling make the frosting. With a handheld or stand mixer fitted with a paddle attachment, beat the butter on medium speed until creamy – about 2 minutes. Add 4 and 1/2 cups confectioners’ sugar, the heavy cream, and vanilla extract. Beat on low speed for 30 seconds, then increase to high speed and beat for 3 full minutes. Add up to 1/2 cup more confectioners’ sugar if frosting is too thin or another tablespoon of cream if frosting is too thick. Add a pinch of salt if frosting is too sweet. 

Assembling the cake

  1. Once the cakes are completely cooled cut the top of the cakes off with a serrated knife and make the tops even.

  2. You will need a 4 inch and a 2 inch cookie cutter for the next steps (you can also use a template and cut your circles out with a knife). You will need to cut two circles from each layer.

  3. First, insert the smallest circular cutter into the center of each layer. Carefully remove the centers, leaving them intact.

  4. Cut your larger circles. The idea is to make the width of the cake in each of your rings as equal as possible, so that the squares of your checkerboard will all appear to be equal in size.

  5. You will have a few circles to piece back together. When you put the cakes together alternate colors. If you have white on the outside, black will be the second layer and the inside layer will be white. Black on the outside, white in the middle and the inside layer will be black.

  6. Apply a layer of frosting to the top of the bottom cake. Stack your cakes on top of each other. Put a good crumb coat on… as in, a crumb coat that conceals the cake underneath. It can be sloppy and uneven, but you should not be able to see what color the cake is.

    *crumb coat explanation below!

  7. To get the rosette effect on the cake you will need to use tip #1M and a piping bag. Fill the bag up with buttercream. If you have an appropriately sized coupler you can use that, or you can just insert the tip into the bag and cut off the excess.

  8. To make your rose, start in the center, then slowly move your tip in a circle around the center point. I wanted a single rose to span the side of the cake so I looped around my center point twice. Try to end in the same place each time.

  9. Go all the way around the cake and complete with one last rose! Then go back and add the roses to the top using the same method.

  10. When making flowers that big, you are bound to have some empty spaces in the cake. Go back in and add dollops of stars with the tip.

Recipe Notes

I also added some silver sprinkles on the crumb coat to give it a little extra crunch when you bite into the cake!

*A crumb coat is a thin layer of frosting applied all over the cake that seals in stray crumbs before the roses are piped onto the cake.

Filed Under: Cakes, Desserts

Oreo Chocolate Cake

April 5, 2019

This Oreo Chocolate Cake is a great option to take to any party. Who doesn’t like Oreos?! Everyone will be drooling over your dessert. It’s made with vanilla buttercream frosting with smashed up Oreos incorporated in the frosting. You can make this a two- or three-layer cake. Another great option (which I have made many times) is to make cupcakes. Whatever your heart desires or your party needs call for, your Oreo Chocolate Cake will be a hit!

Whip up that cake mix, bake it, smash up some Oreo’s and frost it!

Grab a slice of Oreo Chocolate Cake with a tall glass of milk! Did I mention you need to have a large slice?! It’s nice and rich and the milk will go perfectly.

Bring it to parties, make it for yourself or make it as a birthday cake!

Enjoy!!!

Print

Oreo Chocolate Cake

Course Cake, Dessert
Cuisine American
Keyword Oreo Chocolate Cake
Prep Time 30 minutes
Cook Time 20 minutes
Resting time 1 hour
Total Time 1 hour 50 minutes
Servings 12 slices

Ingredients

  • 1 box chocolate cake mix (make as directed on box)

Oreo Buttercream frosting

  • 1 package Oreos divided
  • 1 1/2 cups unsalted butter room temperature
  • 4 - 5 cups confectioners' sugar
  • 1/4 cup heavy cream
  • 2 tsp pure vanilla extract

Instructions

  1. Mix the cake batter as directed on box. Make the cake with two cake pans or 24 cupcakes. If making cake, divide up the batter equally between the two pans you will be using. Once baked, let the cakes cool completely.  

Oreo Vanilla Butter Cream Frosting

  1. With a handheld or stand mixer fitted with a paddle attachment, beat the butter on medium speed until creamy, about 2 minutes. Add 4 and 1/2 cups confectioners’ sugar, heavy cream, and vanilla extract. Beat on low speed for 30 seconds, then increase to high speed and beat for 3 full minutes. Add up to 1/2 cup more confectioners’ sugar if frosting is too thin or another tablespoon of cream if frosting is too thick.

  2. Crush up 3/4 of the package of Oreos. I put the Oreos inside a large plastic Ziploc bag and used a rolling pin to crush them up. You can use a food processor as well. 

  3. Add the crushed Oreos to the frosting and beat on low speed to incorporate the Oreos.

  4. Remove the cakes from the pans.

  5. First, using a large serrated knife, slice a thin layer off the tops of the cakes to create a flat surface. Discard or save and eat later.
  6. Place 1 cake layer on your cake stand, cake turntable, or serving plate. Spread frosting evenly on top. Use your own judgement on how much to use. 

  7. Top with 2nd cake layer and evenly cover the top with frosting. Cover the sides of the cake with frosting. Use a bench scraper or a butter knife to smooth out the frosting on the sides of the cake. 

  8. Using a flower tip and a piping bag pipe frosting around the top of the cake. Sprinkle the top with crushed Oreos. Cut a few of the remaining Oreos in half and place on top.


Filed Under: Cakes, Desserts

Ding Dong Cake

April 2, 2019

A Ding Dong cake has always been on my list of things to bake. I loved Ding Dongs as a kid! The middle filling was to die for, I would eat it straight out of the cake. I finally had the perfect opportunity to make a Ding Dong cake for my boyfriend’s birthday. As a kid Ding Dongs were one of his favorites as well, so what a perfect opportunity to make an adult sized Ding Dong cake!

I used a bundt pan and cut the cake in half after it was completely cooled. It needs to be completely cooled before adding the filling or the filling will melt all over the cake. Add all the filling on the bottom layer of the cake and attach the top layer.  Place the cake on a wire rack and place parchment paper under the wire rack for easy clean up.

Heat up the heavy cream and butter in the microwave until it boils and add a full bag (2 cups) of chocolate chips and stir. Once the chocolate is melted, pour all over the cake. Let the chocolate set for maybe 15 – 20 minutes. Transfer the cake to a serving plate or cake stand.  I use this cake lifter to transfer my cakes if not already on a cake board.

Chill for 1 – 2 hours in the fridge before serving.

Your guests will tell you it tastes just like a Ding Dong! Make sure you have tin foil for leftovers because if there happens to be any left, they will definitely want to take some home. Be sure to store in the fridge.

Enjoy!!!

Print

Ding Dong Cake

Course Cake, Dessert
Cuisine American
Keyword Ding Dong Cake
Prep Time 40 minutes
Cook Time 45 minutes
Resting time 1 hour
Total Time 2 hours 25 minutes
Servings 12 Slices

Ingredients

Cake

  • 1 Devil's food chocolate cake mix
  • 1 3.9 oz instant chocolate pudding mix
  • ¾ cup vegetable oil
  • ¾ cup water
  • 4 eggs
  • ½ cup sugar
  • ½ cup sour cream
  • 1 tsp vanilla

Filling

  • 5 tbsp flour
  • 1 cup milk
  • 1½ tsp vanilla
  • 1 cup butter
  • 1¼ cup sugar

Ganache Frosting

  • 2 cups chocolate chips milk chocolate or semi-sweet
  • 1 cup heavy cream
  • 1½ tbsp butter

Instructions

Cake

  1. Preheat oven to 350 degrees F.

  2. In a large mixing bowl combine all of the cake ingredients and mix until well blended, about 3 - 4 minutes. 

  3. Grease a bundt pan with butter or non stick cooking spray and flour. You don't want to have the cake stick to the pan.

  4. Bake for 40 to 45 minutes. The cake will be done when a toothpick inserted comes out clean. Flip the pan upside down and place cake on a wire rack. Cool completely. The cake must be completely cooled before applying the filling. 

Filling

  1. Pour milk and flour into a medium sauce pan and whisk together very well to make sure no lumps are formed.

  2. Place pan on stove and turn the heat to medium and stir constantly to make a roux (see notes).

  3. Remove the roux mixture from the heat and add vanilla. Allow to cool.

  4. While the mixture is cooling, cream butter and sugar together in a medium bowl. The sugar may take up to 10 minutes to properly dissolve.

  5. Add the cooled roux to the butter mixture and beat again at a higher speed until well blended and the sugar is completely dissolved.

  6. Carefully cut the cake in half with a serrated knife. Remove the top half and set aside.

  7. Spoon filling over the bottom half of the cake and spread evenly.

  8. Replace the top of the cake on top of the filling. 

Ganache Topping

  1. In a microwave safe dish heat butter and heavy cream until it begins to boil (about 2 minutes).

  2. Pour in chocolate chips and stir until melted and smooth.
  3. Carefully place the cake back on the wire rack with parchment paper under the wire rack.

  4. Drizzle ganache topping all over the cake with a large spoon. 

  5. After the ganache is set (15 - 20 minutes) carefully move cake to cake stand or serving plate.

  6. Refrigerate cake for 1 to 2 hours before serving.

Recipe Notes

What is a Roux?

Roux is made by cooking equal parts flour and fat together until the raw flavor of the flour cooks out and the roux has achieved the desired color. Butter is the most commonly used fat, but you can also make roux with heavy cream, oil, bacon grease, or other rendered fats. It's used to thicken soups, sauces and even the filling for this ding dong cake.

Filed Under: Cakes, Desserts

Vanilla Cake Pops

March 27, 2019

Vanilla Cake Pops are a perfect addition to your Easter celebrations. They are a must when you want to bake and you can even get your kids involved. Sprinkles galore!!! Why not dye eggs and make cake pops?!!

If you haven’t seen my Chocolate Cake Pops recipe it’s the exact same process. All you need to do is make a vanilla cake instead of a chocolate cake. I also made these Valentine day cake pops with the same recipe. This is how much I love them!

Put them on display for your family and friends at your Easter dinner and have them for dessert.

Enjoy!

Print

Vanilla Cake Pops

Course Cake, Dessert
Cuisine American
Keyword Vanilla Cake Pops
Prep Time 1 hour
Cook Time 25 minutes
Resting Time 2 hours
Total Time 1 hour 25 minutes
Servings 40 cake pops

Ingredients

Vanilla Cake

  • 1 2/3 cups cups all-purpose flour spoon & leveled
  • 1/2 tsp baking powder
  • 1/4 tsp baking soda
  • 1/2 tsp salt
  • 1/2 cup unsalted butter softened to room temperature
  • 1 cup granulated sugar
  • 1 large egg at room temperature
  • 2 tsp pure vanilla extract
  • 1 cup 2% milk

Frosting

  • 7 tbsp unsalted butter softened to room temperature
  • 1 3/4 cups confectioners' sugar
  • 2-3 tsp 2% milk
  • 1 tsp pure vanilla extract

Coating

  • 40 ounces candy melts or coating

Instructions

Vanilla Cake

  1. Whisk the flour, baking powder, baking soda, and salt together in a medium bowl. Set aside. Using a handheld or stand mixer fitted with a paddle or whisk attachment, beat the butter and sugar together in a large bowl until creamed, about 2 minutes. Add the egg and vanilla extract and beat on high speed until combined. Scrape down the bottom and sides of the bowl as needed.

  2. With the mixer running on low speed, add the dry ingredients and milk to the wet ingredients until combined. Make sure there are no large lumps at the bottom of the bowl. Batter will be slightly thick

  3. Grease the baking pan with non-stick spray. Pour the batter evenly into the prepared 9 x 13 pan. Bake for 25-27 minutes or until a toothpick inserted in the center comes out clean. Allow the cake to cool completely in the pan; set on a wire rack.

Vanilla Frosting

  1. With a handheld or stand mixer fitted with a paddle attachment, beat the butter on medium speed until creamy, about 2 minutes. Add confectioners' sugar, milk, and vanilla extract with the mixer running on low. Increase to high speed and beat for 3 full minutes.

  2. Crumble the cooled cake into the bowl on top of the frosting. Make sure there are no large lumps. Turn the mixer on low and beat the frosting and cake crumbles together until combined.
  3. Measure 1 Tablespoon of moist cake mixture and roll into a ball. I use a cookie scoop to measure out my ball. Place balls on a lined baking sheet. Refrigerate for 2 hours or freeze for 1 hour.

  4. Melt the coating in a 2-cup liquid measuring cup (best for dunking!). Use a microwave or you can use a double boiler and pour some out at a time into the liquid measuring cup. Let the coating cool down for a few minutes before you begin dipping. If it's too hot when you dip, the coating will crack.

Coat the cake balls

  1. Remove only 2-3 cake balls from the refrigerator at a time. Keep the rest cold! Dip a lollipop stick about 1/2 inch into the coating, then insert into the center of the cake ball. Only push it about halfway - 3/4 through the cake ball. Dip the cake ball into the coating until it is completely covered. Make sure the coating covers the base of the cake ball where it meets the lollipop stick. Very gently tap the stick against the edge of the measuring cup to allow excess coating to drop off. Decorate the top with sprinkles and place upright into a styrofoam block, box (flip the box upside down and poke the lollipops into the bottom of the box) or even tall shot glasses work. Repeat with remaining cake balls, only working with some out of the refrigerator at a time. The cake balls must be very cold when dipping!

  2. Coating will set within an hour. Store cake pops in the refrigerator for up to 1 week. You may freeze the cake pops for up to 3 months.

Filed Under: Cakes, Desserts

Valentine Vanilla Cake Pops

February 4, 2019

Valentine Vanilla Cake Pops should be added to your list for your special day! These are a perfect ratio between cake and icing. On your first bite you won’t regret making these for your friends or family, or that special someone. With all those red sprinkles, it’s just so festive!

Cake pops are a great way to eat just a small serving without devouring a whole cake. Like I say in a lot of my posts, I love personal sizes.

I’ve made chocolate cake pops before and I finally tried vanilla. If you’re more of a vanilla fan then this cake pop recipe is just for you. You can make these with any type of sprinkles or colored candy coating.  Since it was February, and Valentine’s Day is coming soon, I wanted to throw in the red sprinkles and make it festive.

Grab the recipe and start rolling and dipping those cake balls into something very delicious! Let me know what you think.

Wrap them up in miniature cellophane bags, tie them with a ribbon and give them out as Valentine gifts. You will be loved even more!

Enjoy!

Print

Valentine Vanilla Cake Pops

Course Cake, Dessert
Cuisine American
Keyword Valentine Vanilla Cake Pops
Prep Time 1 hour
Cook Time 25 minutes
Resting time 2 hours
Total Time 3 hours 25 minutes
Servings 40 cake pops

Ingredients

Vanilla Cake

  • 1 2/3 cups cups all-purpose flour spoon & leveled
  • 1/2 tsp baking powder
  • 1/4 tsp baking soda
  • 1/2 tsp salt
  • 1/2 cup unsalted butter softened to room temperature
  • 1 cup granulated sugar
  • 1 large egg at room temperature
  • 2 tsp pure vanilla extract
  • 1 cup 2% milk

Frosting

  • 7 tbsp unsalted butter softened to room temperature
  • 1 3/4 cups confectioners' sugar
  • 2-3 tsp 2% milk
  • 1 tsp pure vanilla extract

Coating

  • 40 ounces candy melts or coating

Instructions

Vanilla Cake

  1. Whisk the flour, baking powder, baking soda, and salt together in a medium bowl. Set aside. Using a handheld or stand mixer fitted with a paddle or whisk attachment, beat the butter and sugar together in a large bowl until creamed, about 2 minutes. Add the egg and vanilla extract and beat on high speed until combined. Scrape down the bottom and sides of the bowl as needed.
  2. With the mixer running on low speed, add the dry ingredients and milk to the wet ingredients until combined. Make sure there are no large lumps at the bottom of the bowl. Batter will be slightly thick.

  3. Prepare a 9x13 pan and spray with non-stick coating. Pour the batter evenly into the pan. Bake for 25-27 minutes or until a toothpick inserted in the center comes out clean. Allow the cake to cool completely in the pan; set on a wire rack.

Vanilla Frosting

  1. With a handheld or stand mixer fitted with a paddle attachment, beat the butter on medium speed until creamy, about 2 minutes. Add confectioners' sugar, milk, and vanilla extract with the mixer running on low. Increase to high speed and beat for 3 full minutes.
  2. Crumble the cooled cake into the bowl on top of the frosting. Make sure there are no large lumps. Turn the mixer on low and beat the frosting and cake crumbles together until combined.
  3. Measure 1 Tablespoon of moist cake mixture and roll into a ball. I use a cookie scoop to measure out my ball. Place balls on a lined baking sheet. Refrigerate for 2 hours or freeze for 1 hour.
  4. Melt the coating in a 2-cup liquid measuring cup (best for dunking!). Use a microwave or you can use a double boiler and pour some out at a time into the liquid measuring cup. Let the coating cool down for a few minutes before you begin dipping. If it's too hot when you dip, the coating will crack.

Coat the cake balls

  1. Remove only 2-3 cake balls from the refrigerator at a time. Keep the rest cold! Dip a lollipop stick about 1/2 inch into the coating, then insert into the center or the cake ball. Only push it about halfway - 3/4 through the cake ball. Dip the cake ball into the coating until it is completely covered. Make sure the coating covers the base of the cake ball where it meets the lollipop stick. Very gently tap the stick against the edge of the measuring cup to allow excess coating to drop off. Decorate the top with sprinkles and place upright into a styrofoam block, box (flip the box upside down and poke the lollipops into the bottom of the box) or even tall shot glasses work. Repeat with remaining cake balls, only working with some out of the refrigerator at a time. The cake balls must be very cold when dipping!

  2. Coating will set within an hour. Store cake pops in the refrigerator for up to 1 week. You may freeze the cake pops up to 3 months.


Filed Under: Cakes, Desserts

Harry Potter Cake

November 5, 2018

One of my friends loves Harry Potter so I made her a Harry Potter Cake!  Any kid or even an adult would love to have this cake if they are a fan of Harry Potter.

I used the same cake recipe as my Naked Cake and I use buttercream frosting in the middle of the cake and red velvet for the top of the frosting. I wanted a deep red for the frosting of the cake so red velvet seemed to fit perfectly. Red and yellow are the colors of Harry Potter so I needed to make sure the whole cake were those colors.

Separate the batter into two bowls.  Add yellow food coloring to one bowl batter and red into the other.  Pour the batter into two separate 9 inch round pans and bake at 350 degrees for 30-35 mins.

While the cake is baking make the red velvet frosting.  Side note:  I had extra buttercream from a previous cake so I used that in the middle. If you don’t want to make a separate batch of buttercream for the middle just use the red velvet for the middle.

Let the cake cools completely. Cut the top of the cakes with a serrated knife to even out the top of the cake.

Place the red cake on the bottom and spread the top of the cake with buttercream or red velvet frosting. Stack the yellow cake on top and coat the whole cake with frosting. Cut out 4 long strips of fondant and lay the strips on top of the cake. Like the picture below.  Since I had the left over buttercream frosting I added yellow food coloring and used a round tip to pipe yellow dots around the cake. To get the Harry Potter logo I found a logo online and printed the logo and cut it out so I could trace the pattern using black fondant. Once the logo is cut out place it on top of the cake.

I had the glasses in my Halloween box from a Where’s Waldo costume and it worked perfectly. I got them at the local party store.

To make the happy birthday sign I printed happy birthday in red on yellow paper. Cut out diamond shapes around the letters and make sure to have enough paper to fold the diamonds in half so it can lay over the string.  I used two wooden dowels to hold the sign up.

Print

Harry Potter Cake

Course Dessert
Keyword Harry Potter Cake
Prep Time 1 hour
Cook Time 35 minutes
Total Time 1 hour 35 minutes
Servings 12 slices

Ingredients

Ingredients

Cake

  • 3 3/4 cups all purpose flour sifted
  • 1 tsp baking powder
  • 3/4 tsp tsp baking soda
  • 1 tsp salt
  • 1 1/2 cups unsalted butter room temperature
  • 2 cups granulated sugar
  • 5 large eggs room temperature
  • 1 tbsp pure vanilla extract
  • 1 3/4 cups buttermilk room temperature

Vanilla Buttercream (see notes)

  • 1 1/2 cups unsalted butter room temperature
  • 5 - 6 cups confectioners' sugar
  • 5 - 6 tbsp heavy cream
  • 1 tsp pure vanilla extract

Red Velvet Frosting

  • 1 cup unsalted butter room tempature
  • 1 8 ounce cream cheese room tempature
  • 2 1/2 tsp vanilla extract
  • 2 tsp gel based food coloring
  • 4 1/2 cups confectioners’ sugar
  • 1/4 cup unsweetened cocoa powder

Black and yellow fondant for decorating

Instructions

Instructions

Making the Cake

  1. Preheat oven to 350°F (177°C). Grease and lightly flour three 9-inch cake pan
  2. Whisk the flour, baking powder, baking soda, and salt together in a large bowl. Set aside.
  3. Using a handheld or stand mixer fitted with a paddle or whisk attachment, beat the butter and sugar together on high speed until smooth and creamy, about 3 minutes. Scrape down the sides and up the bottom of the bowl with a rubber spatula as needed.
  4. On medium-high speed, add 1 egg at a time, beating well after each addition. Beat in the vanilla extract. Scrape down the sides and up the bottom of the bowl with a rubber spatula as needed.
  5. With the mixer on low speed, add the dry ingredients in three additions alternating with the buttermilk, beginning and ending with the dry ingredients, and mixing each addition just until incorporated. Do not overmix this batter. The batter will be smooth, velvety, and slightly thick.
  6.  Pour/spread batter evenly into the 2 prepared cake pans.

  7. Bake for around 30-35 minutes or until the cakes are baked through. To test for doneness, insert a toothpick into the center of the cake. If it comes out clean, it is done. Allow cakes to cool completely in the pans set on a wire rack. The cakes must be completely cool before frosting and assembling.

Buttercream Frosting

  1. In a large bowl using a hand-held mixer or stand mixer fitted with a whisk or paddle attachment, beat the butter on medium speed until creamy - about 2 minutes.
  2. Add 5 and 1/2 cups confectioners' sugar, 5 Tablespoons heavy cream, and the vanilla extract, with the mixer running on low. Increase to high speed and beat for 3 full minutes.
  3. Add 1/2 cup more confectioners' sugar if frosting is too thin, 1 more Tablespoon cream if frosting is too thick.
  4. Yields about 4.5 cups of frosting.

Red Velvet Frosting

  1. Using an electric stand mixer fitted with paddle attachment, or handheld mixer and large bowl, beat butter on medium speed until creamy. Add cream cheese; beat until fully incorporated. Add vanilla and food coloring and mix until well blended. Gradually increase mixer speed to high and continue beating until light and fluffy, scraping down the sides of bowl as necessary with rubber spatula.
  2. In a large bowl, whisk together sifted confectioners’ sugar and cocoa. Gradually add confectioners’ sugar and cocoa mixture, beating on low speed (stir), until well combined. Beat on high speed until well combined and smooth while scraping down sides of bowl as necessary, about 2 minutes.

Assemble and decorate the cake:

  1. First, using a large serrated knife, slice a thin layer off the tops of the cakes to create a flat surface. Discard or save and eat later.
  2. Place 1 cake layer on your cake stand, cake turntable, or serving plate. Spread frosting evenly on top. 

  3. Top with 2nd cake layer and evenly cover the entire cake with frosting.

  4. Use a bench scraper to smooth out the frosting on the sides of the cake
  5. Cut out 4 long strips of yellow fondant and lay the strips on top of the cake.See picture for reference.  Since I had the left over buttercream frosting I added yellow food coloring and used a round tip to pipe yellow dots around the cake. 

  6. To get the Harry Potter logo I found a logo online and printed the logo and cut it out so I could trace the pattern using black fondant. Once the logo is cut out place it on top of the cake. 

Recipe Notes

Please note that you don't need to make a full batch of buttercream frosting for this recipe.  Cut the recipe in half if you want buttercream in the middle of the cake instead of red velvet. I also added yellow buttercream around the cake. I just wanted to list the buttercream frosting if you wanted the exact same cake. 

Filed Under: Cakes, Desserts

  • Go to page 1
  • Go to page 2
  • Go to Next Page »

Primary Sidebar

Hello and Welcome

Hi! I'm Holly and welcome to my personal blog and thank you for taking the time to look through my recipes and hiking adventures. I hope you enjoy them as much as me. Stay connected to see upcoming blog posts! I'm excited to have you join!

Recent Posts

  • Chicken Tortilla Soup
  • Beef Bowls
  • Ice Cream Sandwiches
  • Mint Chocolate Delights
  • Peanut Butter Cookies

Archives

  • August 2022
  • April 2022
  • February 2022
  • January 2021
  • May 2020
  • April 2020
  • February 2020
  • November 2019
  • October 2019
  • August 2019
  • July 2019
  • June 2019
  • May 2019
  • April 2019
  • March 2019
  • February 2019
  • January 2019
  • December 2018
  • November 2018
  • October 2018
  • September 2018
  • August 2018
  • July 2018
  • June 2018
  • May 2018

Categories

Don’t Miss These!

Chocolate Cake Pops

Skillet Chicken Fajitas

Vanilla Checkered Cake

Pineapple Chicken with Rice

Most Popular Recipes

Valentine Vanilla Cake Pops

Chocolate Chip Pumpkin Bundt Cake

Footer

My Favorites

stay connected

  • Facebook
  • Instagram
  • Pinterest

Don’t miss a recipe or an adventure!

Copyright© 2023 · Brunch Pro Theme by Feast Design Co.